Oki GL408e GL408e/GL412e Rewinder Install Guide
Oki GL408e Manual
 |
View all Oki GL408e manuals
Add to My Manuals
Save this manual to your list of manuals |
Oki GL408e manual content summary:
- Oki GL408e | GL408e/GL412e Rewinder Install Guide - Page 1
INTERNAL REWINDER-DISPENSER INSTALLATION GUIDE For printer models: GL 4xxe Series Read this Installation Guide before and during the installation of the above accessory. Keep this Installation Guide handy for future reference. - Oki GL408e | GL408e/GL412e Rewinder Install Guide - Page 2
to setup your new SATO product. Be sure to read this quick guide thoroughly before using this printer. It is an integral part of the product and should be kept in the immediate vicinity of the device and available to the operating staff. All information in this manual have been compiled under due - Oki GL408e | GL408e/GL412e Rewinder Install Guide - Page 3
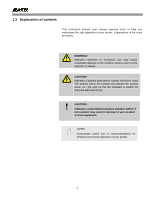
1.3 Explanation of symbols This instruction manual uses various warning icons to help you understand the safe operation of your printer. Explanations of the icons are below. WARNING! Indicates neglectful or erroneous use may cause irreparable damage to the product, serious injury to the operator, or - Oki GL408e | GL408e/GL412e Rewinder Install Guide - Page 4
@sato-int.com SATO Americas SATO SATO LABELING SATO sato-europe.com SATO Pacific & Oceania SATO INTERNATIONAL ASIA @sato-int.com SATO my SATO .com SATO AUTO- - 63091318 SATO AUSTRALIA PTY -5335 SATO NEW SATO offices, refer to www.satoworldwide.com Extensive contact information of worldwide SATO - Oki GL408e | GL408e/GL412e Rewinder Install Guide - Page 5
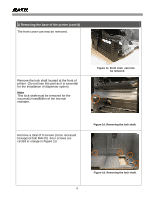
of the rewinder. The pictures of the internal-rewinder used in this Guide are applicable for installation processes of both the rewinder and rewinder-dispenser units. 1) Removing the base of the printer Make sure the printer is OFF and disconnected from the power supply and all other cables - Oki GL408e | GL408e/GL412e Rewinder Install Guide - Page 6
(cont'd) The front cover can now be removed. Remove the lock shaft located at the front of printer. (Do not lose this part as it is essential for the installation of dispenser option) Note This lock shaft must be removed for the successful installation of the internal rewinder. Figure 1c. Front - Oki GL408e | GL408e/GL412e Rewinder Install Guide - Page 7
1) Removing the base of the printer (cont'd) The fifth screw to be removed is shown here. The sixth and seventh screws are shown here, securing the base to the front of - Oki GL408e | GL408e/GL412e Rewinder Install Guide - Page 8
1) Removing the base of the printer (cont'd) Finally, carefully separate the base plate of the printer from the main chassis. This can be done by placing the printer on its side and pulling the base plate out. Figure 1h. Separating the base from the printer 8 - Oki GL408e | GL408e/GL412e Rewinder Install Guide - Page 9
located at the left bottom of platen roller at the front of the printer (Fig 2c), is not caught in the bracket during installation of the internal rewinder-dispenser. 9 Figure 2b. Removing the rewinder's front cover Sensor cable Figure 2c. Make sure no cables are compressed during the mounting. - Oki GL408e | GL408e/GL412e Rewinder Install Guide - Page 10
above the rewinder A total of seven screws (cross recessed hexagonal bolt M4x10) are used to install the internal rewinder-dispenser to the printer chassis (Do not damage the PCB when using any tool such as screwdriver) Do not tighten all seven screws until you are sure the installation - Oki GL408e | GL408e/GL412e Rewinder Install Guide - Page 11
you can proceed to further tighten the screws permanently, followed by inserting the thumbscrew used to secure the printer's front cover in the first step of this guide. Finally, connect the printer power cable as shown, routing it through the slot at the bottom of the internal rewinder. Figure 2g - Oki GL408e | GL408e/GL412e Rewinder Install Guide - Page 12
proper functioning of the liner rewinder. Load the label and ribbon according to the route drawing. The printer starts printing once it is at test print mode move the dispenser plate forward toward you. Turn counter-clockwise direction to move the dispenser plate toward the printer itself. Perform - Oki GL408e | GL408e/GL412e Rewinder Install Guide - Page 13
13
-
 1
1 -
 2
2 -
 3
3 -
 4
4 -
 5
5 -
 6
6 -
 7
7 -
8
-
9
-
10
-
11
-
12
-
13
 |
 |

INTERNAL REWINDER-DISPENSER INSTALLATION GUIDE
For printer models:
GL 4xx
e
Series
Read this Installation Guide before and during the installation
of the above accessory. Keep this Installation Guide handy for
future reference.