Oki GL408e GL408e/GL412e Simple Dispenser Guide
Oki GL408e Manual
 |
View all Oki GL408e manuals
Add to My Manuals
Save this manual to your list of manuals |
Oki GL408e manual content summary:
- Oki GL408e | GL408e/GL412e Simple Dispenser Guide - Page 1
SIMPLE-DISPENSER INSTALLATION GUIDE For printer models: GL 4xxe Series Read this Installation Guide before and during the installation of the above accessory. Keep this Installation Guide handy for future reference. - Oki GL408e | GL408e/GL412e Simple Dispenser Guide - Page 2
Simple-Dispenser Installation Guide 1 General 1.1 Important information This quick guide provides important information on how to setup your new SATO product. Be sure to read this quick guide thoroughly before using this printer. It is an integral part of the product and should be kept in the - Oki GL408e | GL408e/GL412e Simple Dispenser Guide - Page 3
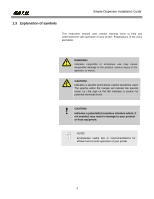
Simple-Dispenser Installation Guide 1.3 Explanation of symbols This instruction manual uses various warning icons to help you understand the safe operation of your printer. Explanations of the icons are below. WARNING! Indicates neglectful or erroneous use may cause irreparable damage to the product - Oki GL408e | GL408e/GL412e Simple Dispenser Guide - Page 4
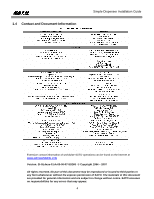
1.4 Contact and Document Information Simple-Dispenser Installation Guide Extensive contact information of worldwide SATO operations can be found on the form whatsoever without the express permission of SATO. The materials in this document are provided for general information and are subject to - Oki GL408e | GL408e/GL412e Simple Dispenser Guide - Page 5
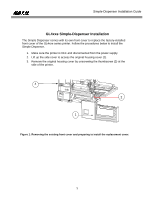
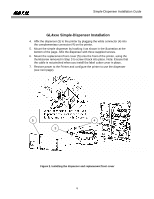
Simple-Dispenser Installation Guide GL4xxe Simple-Dispenser Installation The Simple Dispenser comes with its own front cover to replace the factory-installed front cover of the GL4xxe series printer. Follow the procedures below to install the Simple Dispenser. 1. Make sure the printer is OFF and - Oki GL408e | GL408e/GL412e Simple Dispenser Guide - Page 6
the front of the printer, using the thumbscrew removed in Step 3 to screw it back into place. Note: Ensure that the cable is not pinched when you install the label cutter cover in place. 7. Restore power to the Printer and configure the printer to use the dispenser (see next page). 5 4 3 Figure - Oki GL408e | GL408e/GL412e Simple Dispenser Guide - Page 7
the Peel-Off option to activate the dispenser's functionality. A Remove Label message will display on the LCD prompting label removal for each label that has been printed. 7. When done, go back to ONLINE mode after saving the new settings. Peel-Off Figure 3. Setting the Media Handling option 7 - Oki GL408e | GL408e/GL412e Simple Dispenser Guide - Page 8
Simple-Dispenser Installation Guide 8
-
 1
1 -
 2
2 -
 3
3 -
 4
4 -
 5
5 -
 6
6 -
 7
7 -
8
 |
 |

Read this Installation Guide before and during the installation
of the above accessory. Keep this Installation Guide handy
for future reference.
SIMPLE-DISPENSER INSTALLATION GUIDE
GL 4xx
e
Series
For printer models: