Oki LP470s LP470 LP480 AC Adapter Instructions (English, Fran栩s, Es
Oki LP470s Manual
 |
View all Oki LP470s manuals
Add to My Manuals
Save this manual to your list of manuals |
Oki LP470s manual content summary:
- Oki LP470s | LP470 LP480 AC Adapter Instructions (English, Fran栩s, Es - Page 1
Installation Instructions AC Adapter 1 L'adaptateur c.a 2 Adaptador de CA 3 Adaptador de CA 4 Installation 1. Remove the cover of the printer's DC input jack (1) and connect the AC adapter's DC output terminal (2) to it. For operating the printer via an AC outlet. Can also be used to charge a - Oki LP470s | LP470 LP480 AC Adapter Instructions (English, Fran栩s, Es - Page 2
Directive d'installation Installation 1. Enlevez le capot de la prise d'alimentation c.c. (1) de l'imprimante et branchez la fiche c.c. de l'adaptateur c.a. (2). Permet de fournir une alimentation c.a. à l'imprimante et de charger le bloc-pile chargé à l'intérieur de l'imprimante. AVERTISSEMENT! - Oki LP470s | LP470 LP480 AC Adapter Instructions (English, Fran栩s, Es - Page 3
Instrucciones de Instalación Instalación 1. Retire la tapa del jack de entrada de CD de la impresora (1) y conecte el termina de salida CD del adaptador de CA (2). El adaptador sirve para utilizar la impresora conectándola a un tomacorriente de CA y para cargar la pila mientras está instalada en la - Oki LP470s | LP470 LP480 AC Adapter Instructions (English, Fran栩s, Es - Page 4
não esteja totalmente carregada). Tempo de carregamento Com o adaptador de CA, demora cerca de cinco horas para a bateria atingir a carga plena quando está totalmente exaurida. © 2009 Oki Data Americas, Inc. 4 Português 58397902
-
 1
1 -
 2
2 -
 3
3 -
 4
4
 |
 |

English
For operating the printer via an AC outlet. Can also
be used to charge a battery pack loaded inside the
printer.
WARNING
Use only the specified AC Adapter
designed for your printer.
Cautions
Power
Do not use wet hands to unplug the AC
adapter
.
Doing so increases the risk of
electric shock.
Storing the Printer
If you have no plan to use the printer for
a long time, unplug the AC adapter from
the wall outlet.
Maintenance and Cleaning
For safe maintenance or cleaning of the
printer, make sure to remove the AC
adapter from the printer
.
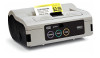
Installation
1.
Remove the cover of the printer°s DC input
jack (1) and connect the AC adapter°s DC
output terminal (2) to it.
2.
C
onnect the AC adapter to the wall outlet (3)
and turn on the power.
The POWER lamp turns green.
Important!
Be sure to turn the printer power off
when removing the DC output terminal
of the AC adapter or disconnecting the
power source. Otherwise, the
information stored in the printer may
not be updated.
Note:
A battery pack is unnecessary when an AC
adapter is used. If a battery pack and an AC
adapter are being used at the same time, the
printer will attempt to charge the battery
pack (if it is not already fully charged).
Charging Time
With the AC adapter, it takes about 5 hours for the
battery pack to reach full charge from a fully
discharged state.
Installation Instructions
AC Adapter . . . . . . . . . . . . . . . . . . . . . . . . . . . . . . . . . . . . . . . .1
L’adaptateur c.a. . . . . . . . . . . . . . . . . . . . . . . . . . . . . . . . . . . . . 2
Adaptador de CA . . . . . . . . . . . . . . . . . . . . . . . . . . . . . . . . . . . . 3
Adaptador de CA . . . . . . . . . . . . . . . . . . . . . . . . . . . . . . . . . . . . 4