Oki ML8480FB ML8480FB User's Guide
Oki ML8480FB Manual
 |
View all Oki ML8480FB manuals
Add to My Manuals
Save this manual to your list of manuals |
Oki ML8480FB manual content summary:
- Oki ML8480FB | ML8480FB User's Guide - Page 1
- Oki ML8480FB | ML8480FB User's Guide - Page 2
Copyright © 2006 by Oki Data. All Rights Reserved Document Information Microline 8480FB User's Guide P/N 59380401, Revision 1.1 drivers and manuals are available from the web site: http://www.okiprintingsolutions.com Trademark Information Oki and Microline are registered trademarks of Oki - Oki ML8480FB | ML8480FB User's Guide - Page 3
High Impact Print Mode 15 Change Print Mode 16 Loading Print Media 17 Individual Sheets/Forms ("MANUAL 17 Continuous Forms ("FRONT 19 Switching Between Normal and High Impact Mode 22 Switch between Single Menu Items 40 Auto Align 54 Disabling Auto Align 54 ML8480 User's Guide Contents • 3 - Oki ML8480FB | ML8480FB User's Guide - Page 4
Change to a Manual Printhead Gap Setting 67 Troubleshooting 69 Paper Jams: Single Sheet 69 Paper Jams: Continuous Forms 70 Paper Jams: Correcting Repetitive Jams 71 Error Messages 74 Maintenance 76 Replace the Ribbon 76 Clean the Housing 81 Control Codes 83 In Sequence by ASCII Code 83 In - Oki ML8480FB | ML8480FB User's Guide - Page 5
Park • Form Tear Off • Choice of Print Modes: Normal, High Speed (for printing drafts), or High Impact (for use with thick multi-part forms) Microline 8480FB User's Guide Introduction • 5 - Oki ML8480FB | ML8480FB User's Guide - Page 6
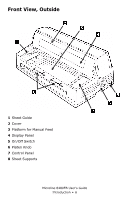
Front View, Outside Front_View with sheet supports.JPG 1 Sheet Guide 2 Cover 3 Platform for Manual Feed 4 Display Panel 5 On/Off Switch 6 Platen Knob 7 Control Panel 8 Sheet Supports Microline 8480FB User's Guide Introduction • 6 - Oki ML8480FB | ML8480FB User's Guide - Page 7
Front View, Inside (1) F2_15d.JPG 1 Cover 2 Ribbon Cartridge 3 LCD Display Panel 4 Printhead Front View, Inside (2) F5-03c.JPG 1 Tractors Microline 8480FB User's Guide Introduction • 7 - Oki ML8480FB | ML8480FB User's Guide - Page 8
Rear View • 1 Stacker • 2 Power Cord Connector • 3 Parallel Port • 4 USB Port F1_24b1.JPG Microline 8480FB User's Guide Introduction • 8 - Oki ML8480FB | ML8480FB User's Guide - Page 9
the High Used to switch back and forth between Impact print mode. Manual Feed (single forms fed from the platform) and Front Feed (continuous forms). See page 23. Function Setting Menu Mode • Scrolls forward through available settings for an item. Microline 8480FB User's Guide Control Panel • 9 - Oki ML8480FB | ML8480FB User's Guide - Page 10
. Function Setting Menu Mode • Saves any changes made in the menu and exits the Menu Mode, placing the printer back on line. Moves continuous forms forward to the tear position. Used with other switches to change their function (see table below). Microline 8480FB User's Guide Control Panel • 10 - Oki ML8480FB | ML8480FB User's Guide - Page 11
Function Setting Menu: Press both the MODE and the SHIFT switches simultaneously to place the printer in the Function Settings Menu mode. Simultaneously press and hold the SHIFT and SEL switches advance backward in rapid-fire 1/180-inch increments. Microline 8480FB User's Guide Control Panel • 11 - Oki ML8480FB | ML8480FB User's Guide - Page 12
are more information blinking, the cover is open. • If both the ALARM and AUTO ALIGN lights are blinking, there is an unrecoverable error. Try turning the printer off, then on again. IF this doesn't clear the problem call your service dealer Microline 8480FB User's Guide Control Panel • 12 - Oki ML8480FB | ML8480FB User's Guide - Page 13
printer is on The printer is off • Menu Mode: line. line. indicates the menu is being set up. • With ALARM light: cover open alarm. EJECT DIRECTION Paper is being ejected to the platform. Paper is being ejected to the stacker. N.A. a. N.A. = Not Applicable. Microline 8480FB User's Guide - Oki ML8480FB | ML8480FB User's Guide - Page 14
instructions assume that the printer is selected (on line). Enter the Menu 1. Press SEL. 2. Press both the MODE and the SHIFT switches simultaneously. Print the Menu 1. With the printer in the Manual to select Align 1, Align 2, Align 3, or Align 4 Microline 8480FB User's Guide Control Panel • 14 - Oki ML8480FB | ML8480FB User's Guide - Page 15
Print Modes Your printer has three ribbon life expectancy. • If you consistently use High Impact Print Mode, ribbon life can be cut in half. If you have a new ribbon and use High Impact Print Mode to print high-density characters or graphics, the paper may be smudged. Microline 8480FB User's Guide - Oki ML8480FB | ML8480FB User's Guide - Page 16
High Impact Note If you change the print mode while printing, the printer immediately switches to the new print mode. 1. Make sure the printer is turned on and that the SEL light is on. 2. Press MODE/High Impact. MODE.JPG The HIGH IMPACT light goes on. Microline 8480FB User's Guide Print Modes • 16 - Oki ML8480FB | ML8480FB User's Guide - Page 17
Individual Sheets/Forms ("MANUAL") The printer is set at the factory for • single sheets/forms • Auto Align mode • Normal print mode • automatic printhead gap Specifications Individual Sheets/Forms, for Use with Auto Align Mode Note Printing envelopes requires use of the sheet guide (1) instead of - Oki ML8480FB | ML8480FB User's Guide - Page 18
48 mm) Load Individual Sheets/Forms 1. If you are using longer paper, pull out the sheet supports (1). 2. Move the sheet guide (2) to the right as far as it will go. This ensures that the single sheet/form that it is square with the print path. Microline 8480FB User's Guide Loading Print Media • 18 - Oki ML8480FB | ML8480FB User's Guide - Page 19
lb. US Bond (52 to 128 g/m2) Multi-part Forms Normal Print Mode (the printer default) • up to 6-part forms (original + 5) • Maximum Thickness: 0.0142" Push the sheet supports in and lift the sheet feed platform. Sheet_Guide_crop.JPG F5-03a.JPG Microline 8480FB User's Guide Loading Print Media - Oki ML8480FB | ML8480FB User's Guide - Page 20
lever (1) on the right tractor (2) and move the tractor over to correspond to the width of the continuous forms you are using. Center the paper support (3) between the two tractors. F5-05a.JPG Microline 8480FB User's Guide Loading Print Media • 20 - Oki ML8480FB | ML8480FB User's Guide - Page 21
the holes in the paper are centered on the pins, then push back the right tractor lock lever. F5-07a.JPG 7. Lower the platform. Microline 8480FB User's Guide Loading Print Media • 21 - Oki ML8480FB | ML8480FB User's Guide - Page 22
8. Position the continuous forms stack below the printer with no more than about 1 inch (3 cm) offset (1). F5-08a.JPG Switching Between Normal and High Impact HIGH IMPACT goes out and NORMAL appears at the end of the first line of the display. Microline 8480FB User's Guide Loading Print Media • 22 - Oki ML8480FB | ML8480FB User's Guide - Page 23
forms. The continuous forms retract back to the tractors. 3. Press MODE once or twice until you see MANUAL on the second line of the display. The printer switches paths and returns to the on-line state. 4. Load a sheet or form on the platform. Microline 8480FB User's Guide Loading Print Media • 23 - Oki ML8480FB | ML8480FB User's Guide - Page 24
in the manual mode. 2. Turn the printer off. 3. Press and hold SELECT and MODE while turning the printer on. 4. When "RELEASE SW" displays, release the switches. 5. When prompted, load a sheet of paper (minimum letter or A4) on the platform. F5-11a.JPG The menu prints. Microline 8480FB User's Guide - Oki ML8480FB | ML8480FB User's Guide - Page 25
Setting X Item X Setting 1 ... Setting X Access the Menu 1. With the printer turned on and on line, press SEL. OFFLINE displays. 2. Simultaneously press the SHIFT and MODE switches. SHIFT plus HIGH IMPACT.JPG PRINTER CONTROL displays. Microline 8480FB User's Guide Function Setting Menu • 25 - Oki ML8480FB | ML8480FB User's Guide - Page 26
Press to scroll forward. to scroll backwards. Press Settings Press to scroll backwards. to scroll forward. Press to scroll backwards. Exit the Menu Press . Microline 8480FB User's Guide Function Setting Menu • 26 - Oki ML8480FB | ML8480FB User's Guide - Page 27
Example: Turn on Proportional Spacing and Form Tear-Off 1. Turn on the printer. 2. Press SEL. The printer goes off-line. 3. Simultaneously press SHIFT and MODE. SHIFT plus HIGH FF.JPG 6. Press MODE. MODE.JPG The setting changes to YES. Microline 8480FB User's Guide Function Setting Menu • 27 - Oki ML8480FB | ML8480FB User's Guide - Page 28
you reset or change the settings. Printing the Function Setting Menu is the only way to have a record of the settings. 1. Turn the printer off. 2. Press and hold SEL and SHIFT while turning the printer on. MENU INITIALIZE FNC. MENU displays. Microline 8480FB User's Guide Function Setting Menu • 28 - Oki ML8480FB | ML8480FB User's Guide - Page 29
off-line. b. Press MODE. The display changes to PATH CHANGE FRONT c. Press the MODE switch one or two times until MANUAL appears on the second line of the display. The printer automatically switches to the manual path and returns on line. Microline 8480FB User's Guide Function Setting Menu • 29 - Oki ML8480FB | ML8480FB User's Guide - Page 30
) Before Starting 1. Make sure continuous forms are loaded. F7_10_e.JPG 2. Make sure front feed is selected. If manual feed is selected, the second line of the display reads ALIGN1 (the default, or whatever alignment method you have selected). Microline 8480FB User's Guide Function Setting Menu • 30 - Oki ML8480FB | ML8480FB User's Guide - Page 31
the printer off-line. b. Press MODE. The display changes to PATH CHANGE MANUAL Press the MODE switch one or two times until FRONT appears on the second line of the display. The printer automatically forms back down to the print position. Microline 8480FB User's Guide Function Setting Menu • 31 - Oki ML8480FB | ML8480FB User's Guide - Page 32
in bold blue type. Group Printer Control Font Item Emulation Mode Print Mode Pitch Prop. Spacing Style Size Character Set Language Set Zero Character Code Page Settings Epson LQ, IBM , BRASCII, Abicomp, Multilingual 1858, ISO8859=15, Microline 8480FB User's Guide Function Setting Menu • 32 - Oki ML8480FB | ML8480FB User's Guide - Page 33
15, 17.1 cpi 12, 20 cpi No, Yes Standard, Special Bi-directional, Uni-directional Bi-directional, Uni-directional Yes, No Invalid, Valid Invalid, Valid Microline 8480FB User's Guide Function Setting Menu • 33 - Oki ML8480FB | ML8480FB User's Guide - Page 34
sec, 1 min, 2 min, 3 min, 4 min, 5 min Parallel I/F Only Nibble Mode supports bidirectional Uni-Directional, Bi-Directional Auto Feed XT Invalid, Valid I-Prime Enable, Disable Buzzer Enable, Disable , 10 min, 15 min, 30 min, 60 min Microline 8480FB User's Guide Function Setting Menu • 34 - Oki ML8480FB | ML8480FB User's Guide - Page 35
Settings 6 LPI, 8 LPI 279.4 mm (11"), 304.8 mm (12") No, Yes 3.18 mm (1/8"), 6.35 mm (1/4") 8". 10.6", 13.2", 13.6" Valid, Invalid Not Used. Not Used. Microline 8480FB User's Guide Function Setting Menu • 35 - Oki ML8480FB | ML8480FB User's Guide - Page 36
Auto, Manual Gap x x = 1 - 8, A - E (see page 67) Gap Pos. 50.8 mm (2"), 101.6 mm (4") Auto Align (POW) Align 1, Align 2, Align 3, Align 4, Select Align Auto Align Align 1, Align 2, Align 3, Align 4, Invalid MemoryAutoAlign Valid, Invalid Microline 8480FB User's Guide Function Setting - Oki ML8480FB | ML8480FB User's Guide - Page 37
Group Item Manual Feed (cont.) Align1 Pos.Adj. (Align 1 must be selected) Align2 Pos.Adj. (Align 2 must be selected) from initial setting Valid Level 1, Valid Level 2, Invalid Valid Level 1, Valid Level 2, Invalid Valid, Invalid Microline 8480FB User's Guide Function Setting Menu • 37 - Oki ML8480FB | ML8480FB User's Guide - Page 38
Pos value for the Front Feed path (see page 58). Off, On Print, Tear Off 3.18 mm (1/8"), 6.35 mm (1/4") Auto, Manual Gap x x = 1 to 8, A to E (see page 67) 50.8 mm (2"), 101.6 mm (4") -40 to 0 to to +15 in increments of 1/120 inch Not Used. Microline 8480FB User's Guide Function Setting Menu • 38 - Oki ML8480FB | ML8480FB User's Guide - Page 39
1/360 inch (0.14 mm) Same as above Same as above Same as above -10 to 0 to +10 See table below. Not Used. Not Used. Microline 8480FB User's Guide Function Setting Menu • 39 - Oki ML8480FB | ML8480FB User's Guide - Page 40
be disabled. Adjusts the set horizontal location for printing the first character on a form when using manual feed from the platform. Selectable settings: Left 10, Left 9, ... Left 2, Left 1, Right Right 10, in increments of 1/180 inch (0.14 mm). The default is 0. Microline 8480FB User's Guide • 40 - Oki ML8480FB | ML8480FB User's Guide - Page 41
forms when you are using manual feed from the platform. printer. Note This setting does not apply when the printer initializes in response to an I-PRIME signal. Available settings: Align 1 [the default], Align 2, Align 3, Align 4, or Invalid (skew adjustment disabled). Microline 8480FB User's Guide - Oki ML8480FB | ML8480FB User's Guide - Page 42
by the corresponding Alignx Pos.Adj in the Manual Feed group (see page 41). Auto CR IBM emulation only. The default is No. If you want the printer to automatically add a carriage return when a Line Feed is received at the end of a line, change the setting to Yes. Microline 8480FB User's Guide • 42 - Oki ML8480FB | ML8480FB User's Guide - Page 43
the printer's audible data could print directly on the platen and damage the printhead. Code Page Choose the Code Page character set you wish to use: USA [the default], Canada French, Multilingual, Portugal, Norway, BRASCII, Abicomp, Multilingual 1858, or ISO-8859=15. Microline 8480FB User's Guide - Oki ML8480FB | ML8480FB User's Guide - Page 44
feature allows a printed continuous form page to be torn off without wasting paper or adjusting the printer. For more information, see page 61. Front Load Adj. For fine tuning the Top of Form the printhead gap is set automatically [the default] or manually. Microline 8480FB User's Guide • 44 - Oki ML8480FB | ML8480FB User's Guide - Page 45
Gap Settings Setting Manual Gap 1 Manual Gap 2 Manual Gap 3 Manual Gap 4 Manual Gap 5 Manual Gap 6 Manual Gap 7 Manual Gap 8 Manual Gap A Manual Gap B Manual Gap C Manual Gap D Manual Gap E Used for • Single sheets 14 to mm) [the default] or 4 inches (102 mm). Microline 8480FB User's Guide • 45 - Oki ML8480FB | ML8480FB User's Guide - Page 46
sec, 45 sec, 1 min, 2 min, 3 min, 4 min, or 5 min. If your software spends a long time processing between portions of data it feeds to the printer, choose a longer time interval value to keep your printer from dumping the received data while it is waiting for more. Microline 8480FB User's Guide • 46 - Oki ML8480FB | ML8480FB User's Guide - Page 47
the front panel switches MODE and SHIFT (see page 11) to be stored in the printer's memory. Change to Invalid if you do not wish this value to be stored. Length Choose the length of the manual feed paper you are using: 279.4 mm (11") [the default] or 304.8 mm (12"). Microline 8480FB User's Guide • 47 - Oki ML8480FB | ML8480FB User's Guide - Page 48
using manual feed from the platform: On-line [the default] or Offline. Parallel I/F Only Nibble Mode supports bi-directional path. The default is off (Not Tear Off). To set the printer to automatically engage the Form Tear feature when it switches to continuous forms 8480FB User's Guide • 48 - Oki ML8480FB | ML8480FB User's Guide - Page 49
interval specified under Power Save Time. The default is Enable. Print Dir. Cmd. The default is Valid: the printer will recognize a command for unidirectional printing. Change to Invalid if you do not wish the printer to recognize uni-directional printing commands. Microline 8480FB User's Guide • 49 - Oki ML8480FB | ML8480FB User's Guide - Page 50
. If your system uses the DC1 and DC3 codes for print suppress mode, change the setting to or 128 Kbytes) devoted to holding received data. The default is 128 Kbytes. Changing this to 0 but if you abort the print job, the printer will stop much sooner. Regist. Low Adjusts 8480FB User's Guide • 50 - Oki ML8480FB | ML8480FB User's Guide - Page 51
for double width and height printing. Skew Detect Detects and corrects paper skew when manual feed through the platform is being used with Auto Align disabled. Available settings: Valid forms to load into the printer when using preprinted forms with anomalies Microline 8480FB User's Guide • 51 - Oki ML8480FB | ML8480FB User's Guide - Page 52
line feeding of 18 mm (.71") or more Valid 2 • Continuous forms and manual feed • before Form Feeding Skip Over Perf. Sets what happens when the printer comes within 1-inch (25 mm) of the bottom of the page. The default of adjustment is limited to avoid paper jams. Microline 8480FB User's Guide • 52 - Oki ML8480FB | ML8480FB User's Guide - Page 53
print data is received when you are using manual feed from the platform: 2.0 sec [the default], 1.5 sec, 1.0 sec, or 0.5 sec. Zero Character The default is Unslashed. Change to Slashed if you wish to use a slash to distinguish the number zero from the capital letter 0. Microline 8480FB User's Guide - Oki ML8480FB | ML8480FB User's Guide - Page 54
the printer menu: 1. Press SEL. The printer goes off-line. 2. Simultaneously press SHIFT and MODE. SHIFT plus HIGH IMPACT.jpg The printer enters the Menu Mode. PRINTER CONTROL displays. 3. Simultaneously press SHIFT and FF repeatedly until MANUAL FEED displays. Microline 8480FB User's Guide Auto - Oki ML8480FB | ML8480FB User's Guide - Page 55
SHIFT + FF.jpg 4. Press FF repeatedly until AUTO ALIGN displays. FF.jpg 5. Press MODE repeatedly until the setting INVALID displays. MODE.jpg 6. Press LOAD to save your new setting and exit the menu mode. Microline 8480FB User's Guide Auto Align • 55 - Oki ML8480FB | ML8480FB User's Guide - Page 56
. Use the Printer Menu Note The printer default for TOF is 1/4-inch (6.4 mm). 1. Press SEL. The printer goes off-line. 2. Simultaneously press SHIFT and MODE. SHIFT plus HIGH IMPACT.jpg The printer enters the Function Setting Menu. PRINTER CONTROL displays. Microline 8480FB User's Guide Set Top of - Oki ML8480FB | ML8480FB User's Guide - Page 57
then press FF repeatedly until the feed path for which you wish to change the TOF appears: MANUAL FEED or FRONT FEED. SHIFT + FF.jpg 4. Press FF. FF.JPG TOF displays. 5. Press LOAD: this saves your setting and exits the menu mode. LOADJPG Microline 8480FB User's Guide Set Top of Form (TOF) • 57 - Oki ML8480FB | ML8480FB User's Guide - Page 58
custom Top of Forms: • Manual Feed (single forms) • Front Feed (continuous forms). Front Feed (Continuous Forms) 1. Make sure the printer is set to the Front reset the printer to the factory defaults, the 1Chr. Set Pos you have established will be deleted. Microline 8480FB User's Guide Set Top of Form ( - Oki ML8480FB | ML8480FB User's Guide - Page 59
up on the page (print paper retracts further out of the printer): - In 1/180-inch (0.14 mm) increments: press and hold the SHIFT switch, then press LF. - In 10/180-inch (1.41 mm) increments: press and hold the SHIFT switch, then press MODE. Microline 8480FB User's Guide Set Top of Form (TOF) • 59 - Oki ML8480FB | ML8480FB User's Guide - Page 60
move the TOF further up on the page (print paper retracts further out of the printer): - In 1/180-inch increments: press and hold the SHIFT switch, then press LF. 3. Press SEL to return the printer to the on-line state. 4. Send the print job. Microline 8480FB User's Guide Set Top of Form (TOF) • 60 - Oki ML8480FB | ML8480FB User's Guide - Page 61
Tear Off feature allows you to advance continuous forms to the stacker for tear off. The printer default for Forms Tear Off is Off. To use this feature, you must enter the Function ON. 6. Press LOAD: this saves your setting and exits the menu mode. Microline 8480FB User's Guide Form Tear Off • 61 - Oki ML8480FB | ML8480FB User's Guide - Page 62
Move Continuous Forms Up for Tear Off 1. Press the SEL switch to deselect the printer. 2. Press and hold the SHIFT and SEL switches to move continuous forms to the tear off position. Microline 8480FB User's Guide Form Tear Off • 62 - Oki ML8480FB | ML8480FB User's Guide - Page 63
while turning on the printer. 3. Load a sheet of paper on the platform. 4. The Font Sample test will run and the sheet will eject. 5. Remove the first printed sheet from the platform and load another sheet. 6. The test finishes printing and the sheet ejects. Microline 8480FB User's Guide Tests • 63 - Oki ML8480FB | ML8480FB User's Guide - Page 64
SW displays. HEXDUMP NORMAL displays and "Hex Dump Mode" prints at the top of the paper. Running a Hex Dump Test To run the test, send data to the printer while it is in the Hex Dump Mode. Exiting Hex Dump Mode Turn the printer off, then on again. Microline 8480FB User's Guide Tests • 64 - Oki ML8480FB | ML8480FB User's Guide - Page 65
the printhead and the platen. Your printer comes from the factory set to manually set gap. You may need to experiment a bit to determine the best manual setting for a particular media. Note Because their thickness varies, envelopes do not work with Auto Gap. Microline 8480FB User's Guide - Oki ML8480FB | ML8480FB User's Guide - Page 66
Printhead Gap Settings Setting Manual Gap 1 Manual Gap 2 Manual Gap 3 Manual Gap 4 Manual Gap 5 Manual Gap 6 Manual Gap 7 Manual Gap 8 Manual Gap A Manual Gap B Manual Gap C Manual Gap D Manual Gap E Used paper, 0.65 to 0.70 mm thick Microline 8480FB User's Guide Setting the Printhead Gap • 66 - Oki ML8480FB | ML8480FB User's Guide - Page 67
: one in the Manual Feed group and one in the Form Feed group. 1. Press the SEL switch to deselect the printer. 2. Press SEL. The printer goes off-line. 3. Simultaneously press SHIFT and MODE. SHIFT plus HIGH IMPACT.jpg PRINTER CONTROL displays. Microline 8480FB User's Guide Setting the Printhead - Oki ML8480FB | ML8480FB User's Guide - Page 68
4. Press and hold SHIFT, then press FF repeatedly until MANUAL FEED displays. SHIFT + FF.jpg 5. Press FF repeatedly until GAP CONTROL displays. FF.JPG 6. Press .JPG 10. Press LOAD: this saves your setting and exits the menu mode. LOAD.JPG Microline 8480FB User's Guide Setting the Printhead Gap • 68 - Oki ML8480FB | ML8480FB User's Guide - Page 69
Troubleshooting Paper Jams: Single Sheet If a paper jam is indicated on the display panel, use the following method to clear it. Caution! sheet of paper. F7_07.jpg 3. Turn the platen knob forward or backward to bring out the jammed sheet. F7_08b.jpg Microline 8480FB User's Guide Troubleshooting • 69 - Oki ML8480FB | ML8480FB User's Guide - Page 70
switch. 2. Tear off the continuous form from the paper stack. F7_10_a.jpg 3. Turn the platen knob to bring out the continuous forms. F7_10_b.jpg Microline 8480FB User's Guide Troubleshooting • 70 - Oki ML8480FB | ML8480FB User's Guide - Page 71
you have continuous forms loaded, park the paper by pressing SEL to deselect the printer, then pressing LOAD. 2. Turn OFF the printer. 3. Open the cover and remove any visible pieces of paper with a pair by turning the platen knob. F7_08b_back.JPG Microline 8480FB User's Guide Troubleshooting • 71 - Oki ML8480FB | ML8480FB User's Guide - Page 72
thick, then load it on the tractors. 10. Use the platen knob to draw the quadruple-thick form around the platen and out of the printer. F7_10_d.JPG 11. Remove any bits of paper that come out. Microline 8480FB User's Guide Troubleshooting • 72 - Oki ML8480FB | ML8480FB User's Guide - Page 73
12. Reload your continuous forms paper. F5-06a.JPG 13. Close the sheet feed platform and the cover. F7_10_c.JPG 14. Turn on the printer. Microline 8480FB User's Guide Troubleshooting • 73 - Oki ML8480FB | ML8480FB User's Guide - Page 74
platform. Cover Open Close Cover Close the top cover. Paper Feed Alarm Re-Set Paper Print media on the platform has miss-fed into the printer. Press SEL, then press LOAD to eject the media, then try loading it again. Microline 8480FB User's Guide Troubleshooting • 74 - Oki ML8480FB | ML8480FB User's Guide - Page 75
print density is high and the printer has switched to uni-directional printing. Gap NG Reload The printhead gap has been set to a manual setting that does not suit the media. Change the setting or restore it to the default Auto Gap before printing. Microline 8480FB User's Guide Troubleshooting • 75 - Oki ML8480FB | ML8480FB User's Guide - Page 76
display panel forward. 4. Pull the ribbon out a bit at the left end of the cartridge to give some slack, then unthread it from the printhead. F2_13b.JPG 5. Remove the used ribbon cartridge and discard it in accordance with local regulations. F2_18a.JPG Microline 8480FB User's Guide Maintenance • 76 - Oki ML8480FB | ML8480FB User's Guide - Page 77
6. Unpack the ribbon cartridge and remove the lock pieces (1). F2_09.jpg 7. Swing out the ribbon arms on either end of the cartridge until they snap into place. F2_10a.JPG Microline 8480FB User's Guide Maintenance • 77 - Oki ML8480FB | ML8480FB User's Guide - Page 78
F2_11a.JPG 9. Pull the ribbon out a bit at the left end of the cartridge to give some slack, then slide the ribbon underneath the printhead. Be careful that the ribbon is not twisted, folded or pulled off the ribbon arms during this process. F2_13a.JPG Microline 8480FB User's Guide Maintenance • 78 - Oki ML8480FB | ML8480FB User's Guide - Page 79
Always turn the ribbon knob clockwise (to the right): turning it counterclockwise (to the left) can cause the ribbon to jam. 11. Turn the ribbon knob clockwise (in the direction of the molded arrow) to take up any excess slack in the ribbon. F2_15a.JPG Microline 8480FB User's Guide Maintenance • 79 - Oki ML8480FB | ML8480FB User's Guide - Page 80
cover. F2_03_close_cover.JPG Caution! If the cover does not close easily, do not force it. The right end of the ribbon cartridge is not properly seated in the printer. Open the cover and reseat it. Then reclose the cover. 14. Turn the printer back on. Microline 8480FB User's Guide Maintenance • 80 - Oki ML8480FB | ML8480FB User's Guide - Page 81
detergents on the cabinet: they could damage the housing. 1. Turn the printer off and remove any paper that is loaded. 2. Open the platform ribbon cartridge. F2_18a.JPG 6. Use a clean, dry cloth to clean any bits of paper or paper dust from around the platen. Microline 8480FB User's Guide - Oki ML8480FB | ML8480FB User's Guide - Page 82
7. Replace the ribbon cartridge (see page 76 for more information) and tilt the display panel back into place. 8. Close the cover. Microline 8480FB User's Guide Maintenance • 82 - Oki ML8480FB | ML8480FB User's Guide - Page 83
% H ESC % n ESC % T ESC & ESC & m n1 n2 d0 d1 d2 Function Emulation(s) BELL BACKSPACE CANCEL CODE CARRIAGE RETURN RESET PRINT SUPPRESS MODE RESET COMPRESSED CHARACTER PITCH SET 10 CPI SET PRINT SUPPRESS Diablo Epson LQ Epson LQ Microline 8480FB User's Guide Control Codes • 83 - Oki ML8480FB | ML8480FB User's Guide - Page 84
CODES PRINTER CODE PAGE IBM EXECUTE RELATIVE DOT POSITION Epson LQ / Diablo PRINT CONTINUOUSLY FROM ALL IBM CHARACTERS CHART REVERSE LINE FEED IBM FINE LINE FEED (n/360 INCH) Epson LQ / Diablo PRINT ONE CHARACTER FROM ALL IBM CHARACTERS CHART Microline 8480FB User's Guide Control Codes - Oki ML8480FB | ML8480FB User's Guide - Page 85
Code n2 ... SOFTWARE I-PRIME SELECT N/360 m LINE SPACING ONE LINE UNIDIRECTIONAL PRINTING SET BIT 7 CODE TO 0 ESC 5 ESC 5 n ESC 6 ESC 6 ESC 7 SET BIT 7 CODE TO 1 SET 1/8 INCH FIXED LINE SPACING SET 7/72 INCH FIXED LINE SPACING II DISABLE UPPER ASCII CONTROL CODE SELECT CHARACTER SET I Epson - Oki ML8480FB | ML8480FB User's Guide - Page 86
Diablo Epson LQ / IBM ESC C NUL n ESC CR P ESC D FORM LENGTH SET BY INCHES RESET PRINTER REVERSE HALF-LINE FEED Epson LQ / IBM Diablo Diablo ESC d n1 n2 MOVE RIGHT RELATIVE DOT POSITION ESC IBM / Diablo Epson LQ / IBM / Diablo Epson LQ / IBM Microline 8480FB User's Guide Control Codes • 86 - Oki ML8480FB | ML8480FB User's Guide - Page 87
ASCII Code ESC HT n1 ESC I n ESC I n ESC j ESC j n ESC J n ESC k n ESC K n1 n2 ESC L n1 n2 ESC LF ESC M ESC n ESC N n ESC O ESC O ESC P ESC p n ESC P n ESC q n ESC Q n ESC Q LINE SPACING IN 1/48-INCH Diablo INCREMENTS Microline 8480FB User's Guide Control Codes • 87 - Oki ML8480FB | ML8480FB User's Guide - Page 88
Code ESC s n ESC S n ESC SI ESC SI ESC SO ESC SP n ESC T ESC T ESC t n ESC U ESC U n ESC US n ESC US n ESC VT ESC W ESC w a ESC w n ESC W n ESC x n ESC X n1 n2 ESC Y n1 n2 ESC Z n1 n2 - Oki ML8480FB | ML8480FB User's Guide - Page 89
ASCII Code HT LF SI SO SP VT Function HORIZONTAL TAB LINE FEED SET COMPRESSED CHARACTER PITCH SET IMMEDIATE DOUBLE WIDTH CHARACTERS / IBM / Diablo Epson LQ / IBM / Diablo Epson LQ / IBM / Diablo Epson LQ / IBM / Diablo Diablo Epson LQ / IBM / Diablo Microline 8480FB User's Guide Control Codes • 89 - Oki ML8480FB | ML8480FB User's Guide - Page 90
8 ESC 8 Epson LQ / IBM Epson/IBM Diablo ESC % n ESC L n1 n2 ESC 9 ESC 7 ESC R ESC & ESC * m n1 n2 ESC $ n1 n2 Epson LQ / Diablo Epson LQ / IBM / Diablo Epson/IBM Epson LQ LQ / IBM PPR/IBM XL24 Epson LQ / Diablo Microline 8480FB User's Guide Control Codes • 90 - Oki ML8480FB | ML8480FB User's Guide - Page 91
IBM / Diablo IBM IBM Epson LQ Epson LQ / Diablo IBM / Diablo Epson LQ Diablo Diablo IBM Epson LQ / Diablo IBM IBM IBM Epson LQ Printer initialization FS @ Quasi-double density graphics ESC Y n1 n2 Epson LQ Epson LQ / IBM / Diablo Microline 8480FB User's Guide Control Codes • 91 - Oki ML8480FB | ML8480FB User's Guide - Page 92
italics characters ESC % H Reset perforation auto skip ESC 0 Reset print suppress mode DC1 Reset printer ESC CR P Reset super/subscript ESC T Reset tab settings to power-on ESC R / Diablo Epson LQ / IBM / Diablo Epson LQ / Diablo Epson LQ Microline 8480FB User's Guide Control Codes • 92 - Oki ML8480FB | ML8480FB User's Guide - Page 93
ESC g Set 20 cpi ESC SI Set 7/72 inch fixed line spacing ESC 1 Set bit 7 code to 0 ESC = Set bit 7 code to 1 ESC > Set character cell size ESC @ Z n Set character pitch ESC US n Set LQ / IBM / Diablo Epson LQ Epson LQ / IBM Epson LQ Microline 8480FB User's Guide Control Codes • 93 - Oki ML8480FB | ML8480FB User's Guide - Page 94
Function ASCII Code Set elite character pitch (12 cpi) Set emphasized print mode Set emulation Set enhanced/double strike print mode ESC M ESC E ESC @ LQ Epson Epson LQ / IBM PPR/IBM XL24/Diablo Diablo Epson LQ / IBM / Diablo Epson LQ / Diablo Microline 8480FB User's Guide Control Codes • 94 - Oki ML8480FB | ML8480FB User's Guide - Page 95
unidirectional printing Single density graphics Software I-Prime ESC U n ESC K n1 n2 ESC } NUL Space SP Start automatic underscoring ESC E Start bold printing ESC O Epson LQ / IBM / Diablo Diablo Diablo Diablo IBM Diablo Diablo Microline 8480FB User's Guide Control Codes • 95 - Oki ML8480FB | ML8480FB User's Guide - Page 96
Function ASCII Code Start/end double-wide printing ESC @ W n Start/end super/subscripting ESC @ V n Stop printing ESC j Top of Form set ESC 4 Vertical tab VT Emulation(s) Diablo Diablo IBM IBM Epson LQ / IBM / Diablo Microline 8480FB User's Guide Control Codes • 96 - Oki ML8480FB | ML8480FB User's Guide - Page 97
# of parts 1 to 2 3 to 6 7 or more Speed (approximation) 10 inches / second 254 mm / second 7 inches / second 177.8 mm / second 6 inches / second 152.4 mm / second Microline 8480FB User's Guide Specifications • 97 - Oki ML8480FB | ML8480FB User's Guide - Page 98
540 (2-pass) 540 486 (2-pass) 486 432 (2-pass) 432 378 (2-pass) 378 180 (2-pass) 360 162 (2-pass) 324 144 (2-pass) 288 129 (2-pass) 252 Microline 8480FB User's Guide Specifications • 98 - Oki ML8480FB | ML8480FB User's Guide - Page 99
Failures (MTBF) 10.000 hours at 25% duty cycle and 35% page density Mean Time to Repair (MTTR) 30 minutes Printhead life 300 million characters Ribbon Life (on average, 10 cpi utility) 6 million characters Microline 8480FB User's Guide Specifications • 99 - Oki ML8480FB | ML8480FB User's Guide - Page 100
: • Recycled paper tends to leave behind more paper dust, requiring more frequent cleaning of the printer. • Recycled paper is easily affected by humidity and should not be used in humid environments. Width • 14 to 56 lb. US Bond (52 to 210 g/m2 ) Microline 8480FB User's Guide Specifications • 100 - Oki ML8480FB | ML8480FB User's Guide - Page 101
Recycled paper tends to leave behind more paper dust, requiring more frequent cleaning of the printer. • Recycled paper is easily affected by humidity and should not be used in humid 8 parts (original + 7) • Up to 0.019-inch (0.48 mm) thick Microline 8480FB User's Guide Specifications • 101 - Oki ML8480FB | ML8480FB User's Guide - Page 102
Recycled paper tends to leave behind more paper dust, requiring more frequent cleaning of the printer. • Recycled paper is easily affected by humidity and should not be used in humid parts (original + 7) • Up to 0.019-inch (0.48 mm) thick Microline 8480FB User's Guide Specifications • 102 - Oki ML8480FB | ML8480FB User's Guide - Page 103
4 -5/16 x 8-11/16 inches (220 x 110 mm) COM-10: 9-1/2 x 4 -1/8 inches (241 x 104.8 mm) Printer Dimensions Width: 24.8 inches (630 mm) Depth: 23.98 inches (609 mm) Height: 10.35 inches (263 mm) Printer Weight Printer main body only, 44.1 lb. (20 kg) Microline 8480FB User's Guide Specifications • 103 - Oki ML8480FB | ML8480FB User's Guide - Page 104
°C -4 to 140°F -20 to +60°C 30 to 85% RH 40 to 70% RH 5 to 95% RH Electrical Requirements • 120 volts ac (+6.0%), 50/60 Hz (±2%) Microline 8480FB User's Guide Specifications • 104
-
 1
1 -
 2
2 -
 3
3 -
 4
4 -
 5
5 -
 6
6 -
 7
7 -
8
-
9
-
10
-
11
-
12
-
13
-
14
-
15
-
16
-
17
-
18
-
19
-
20
-
21
-
22
-
23
-
24
-
25
-
26
-
27
-
28
-
29
-
30
-
31
-
32
-
33
-
34
-
35
-
36
-
37
-
38
-
39
-
40
-
41
-
42
-
43
-
44
-
45
-
46
-
47
-
48
-
49
-
50
-
51
-
52
-
53
-
54
-
55
-
56
-
57
-
58
-
59
-
60
-
61
-
62
-
63
-
64
-
65
-
66
-
67
-
68
-
69
-
70
-
71
-
72
-
73
-
74
-
75
-
76
-
77
-
78
-
79
-
80
-
81
-
82
-
83
-
84
-
85
-
86
-
87
-
88
-
89
-
90
-
91
-
92
-
93
-
94
-
95
-
96
-
97
-
98
-
99
-
100
-
101
-
102
-
103
-
104
 |
 |
