Oki OKIPAGE10ex Flash Simm Hardware Installation Guide
Oki OKIPAGE10ex Manual
 |
View all Oki OKIPAGE10ex manuals
Add to My Manuals
Save this manual to your list of manuals |
Oki OKIPAGE10ex manual content summary:
- Oki OKIPAGE10ex | Flash Simm Hardware Installation Guide - Page 1
| Hardware Installation Guide: English 1 - Oki OKIPAGE10ex | Flash Simm Hardware Installation Guide - Page 2
to: Training and Publications Department Oki Data Americas, Inc. 2000 Bishops Gate Blvd. Mount Laurel, New Jersey 08054 Visit our Web site at: www.okidata.com or e-mail us at [email protected] OKI, OKILAN and OKIPAGE are registered trademarks of Oki Electric Industry Company, Ltd.; Marques - Oki OKIPAGE10ex | Flash Simm Hardware Installation Guide - Page 3
the SIMM Card 6 Installing the Board 7 Installing Flash Memory in the OKIPAGE 20, 20DX and 20DXn Printers 8 SIMM Configurations 8 Preparing Your Printer the SIMM Card 9 Installing Flash Memory in the OKIPAGE 18, 18n, 24DX and 24DXn Printers 13 Installing SIMMs 13 Preparation 13 Installing - Oki OKIPAGE10ex | Flash Simm Hardware Installation Guide - Page 4
in this guide to install the Flash SIMM in your OKIPAGE printers and install the Image Creator and NetFlash utilities in your computer. Operating instructions for the Image Creator and NetFlash utilities are located on the CD included in this kit. |4 OKI Flash SIMM ! Your OKIPAGE printer - Oki OKIPAGE10ex | Flash Simm Hardware Installation Guide - Page 5
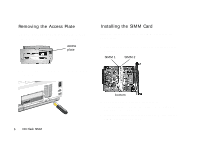
Kit (Part # 70033101) · RS-232C Serial Interface Kit (Part # 00025302) · OKILAN® 310e Network Interface Kit (OKIPAGE 10i only) (Part # 70032901) · OKILAN® 310e+ Network Interface Kit (OKIPAGE 12i only) (Part # , then slide the board out of the printer. | Hardware Installation Guide: English 5 - Oki OKIPAGE10ex | Flash Simm Hardware Installation Guide - Page 6
option board on a flat surface. Locate the SIMM 2 socket. SIMM 1 SIMM 2 b. Use a screwdriver to pry the plate from the back panel of the printer. |6 OKI Flash SIMM bottom 2 Remove the SIMM card from its packaging. 3 Hold the SIMM card with the metallic contact edge down, and the notch on the - Oki OKIPAGE10ex | Flash Simm Hardware Installation Guide - Page 7
each end of the SIMM card. Installing the Board 1 Locate the guide rails (1) and edge connector (2) in the printer. 2 Insert the option board into the printer, making sure that it locates in the guide rails. Slide in the board and push it firmly into place. 3 Tighten the - Oki OKIPAGE10ex | Flash Simm Hardware Installation Guide - Page 8
20, 20DX and 20DXn Printers SIMM Configurations The OKIPAGE 20/20DX has three slots for installation of optional SIMMS: SIMM sockets ! CAUTION! SIMMs and circuit boards off and unplug power cord. 2 Detach the interface cable. 3 Push the OPEN button, then open the top cover. |8 OKI Flash SIMM - Oki OKIPAGE10ex | Flash Simm Hardware Installation Guide - Page 9
side panel out and remove it from the printer. Installing the SIMM Card 1 Locate the three SIMM sockets on the board. SIMM sockets | Hardware Installation Guide: English 9 - Oki OKIPAGE10ex | Flash Simm Hardware Installation Guide - Page 10
housing, then swing it up into place and replace the two mounting screws. 3 Pivot the SIMM to the left until it snaps into place. |10 OKI Flash SIMM - Oki OKIPAGE10ex | Flash Simm Hardware Installation Guide - Page 11
5 Replace the side panel (tabs go in slots): you'll need to move the cover hinge out of the way before you put the side panel back into place. 6 Secure the panel in place with the two screws. 7 Close the printer cover. | Hardware Installation Guide: English 11 - Oki OKIPAGE10ex | Flash Simm Hardware Installation Guide - Page 12
8 Reattach the interface cable and plug the power cord into the power outlet. |12 OKI Flash SIMM - Oki OKIPAGE10ex | Flash Simm Hardware Installation Guide - Page 13
InOstvaellrivnigewFlash Memory in the OKIPAGE 18, 18n, 24DX and 24DXn Printers Installing SIMMs Preparation 1 Turn the printer off. ! CAUTION! Circuit boards can be ground yourself by touching the chassis of your computer each time before handling SIMMs. | Hardware Installation Guide: English 13 - Oki OKIPAGE10ex | Flash Simm Hardware Installation Guide - Page 14
2 Unplug the power cord and detach the interface cable from the back of the printer. 3 Push the OPEN button, then open the top cover. 4 Remove and save the two large screws (1) on the right side, which hold the side panel in place. |14 OKI Flash SIMM - Oki OKIPAGE10ex | Flash Simm Hardware Installation Guide - Page 15
5 Pull the side panel out and remove it from the printer, then close the cover to protect the image drum from light while you are installing the SIMM. 6 Remove and save the screws on the metal plate covering the internal board, then lift the plate out. | Hardware Installation Guide: English 15 - Oki OKIPAGE10ex | Flash Simm Hardware Installation Guide - Page 16
. 3 Angle the SIMM down about 45°, then insert the contact edge into the top socket and lift the board until it locks in place. |16 OKI Flash SIMM - Oki OKIPAGE10ex | Flash Simm Hardware Installation Guide - Page 17
Finishing the Installation 1 Position the metal plate on the housing and replace the mounting screws. 2 Open the cover and replace the side panel (tabs go in slots): you need to move the cover hinge (1) out of the way. | Hardware Installation Guide: English 17 - Oki OKIPAGE10ex | Flash Simm Hardware Installation Guide - Page 18
3 Secure the panel in place with the two screws (1). 5 Reattach the PC interface cable and plug the power cord into the power outlet. 4 Close the printer cover. |18 OKI Flash SIMM - Oki OKIPAGE10ex | Flash Simm Hardware Installation Guide - Page 19
your CD-ROM drive. 2 Click Start - Run. 3 Type D:\SETUP (if your CD-ROM drive exists at other than D, use the appropriate letter). 4 Follow the installation instructions. | Hardware Installation Guide: English 19
-
 1
1 -
 2
2 -
 3
3 -
 4
4 -
 5
5 -
 6
6 -
 7
7 -
8
-
9
-
10
-
11
-
12
-
13
-
14
-
15
-
16
-
17
-
18
-
19
 |
 |

|