Oki B410dn B410//B420/B430 User Guide (English) - Page 66
to be out of the printer for longer than this, please wrap
 |
View all Oki B410dn manuals
Add to My Manuals
Save this manual to your list of manuals |
Page 66 highlights
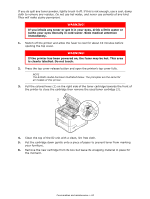
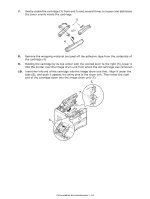
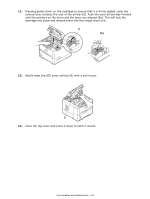
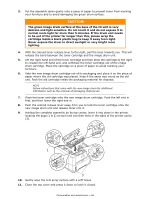
3. Put the assembly down gently onto a piece of paper to prevent toner from marking your furniture and to avoid damaging the green drum surface. CAUTION! The green image drum surface at the base of the ID unit is very delicate and light sensitive. Do not touch it and do not expose it to normal room light for more than 5 minutes. If the drum unit needs to be out of the printer for longer than this, please wrap the cartridge inside a black plastic bag to keep it away from light. Never expose the drum to direct sunlight or very bright room lighting. 4. With the colored toner release lever to the right, pull the lever towards you. This will release the bond between the toner cartridge and the image drum unit. 5. Lift the right-hand end of the toner cartridge and then draw the cartridge to the right to release the left-hand end, and withdraw the toner cartridge out of the image drum cartridge. Place the cartridge on a piece of paper to avoid marking your furniture. 6. Take the new image drum cartridge out of its packaging and place it on the piece of paper where the old cartridge was placed. Keep it the same way round as the old unit. Pack the old cartridge inside the packaging material for disposal. NOTE Follow instructions that come with the new image drum for additional information such as the removal of packaging material etc. 7. Place the toner cartridge onto the new image drum cartridge. Push the left end in first, and then lower the right end in. 8. Push the colored release lever away from you to lock the toner cartridge onto the new image drum unit and release toner into it. 9. Holding the complete assembly by its top center, lower it into place in the printer locating the pegs (1 & 2) at each end into their slots in the sides of the printer cavity (3). 2 1 3 10. Gently wipe the LED array surface with a soft tissue. 11. Close the top cover and press it down to latch it closed. Consumables and maintenance > 66
-
 1
1 -
2
-
3
-
4
-
5
-
6
-
7
-
8
-
9
-
10
-
11
-
12
-
13
-
14
-
15
-
16
-
17
-
18
-
19
-
20
-
21
-
22
-
23
-
24
-
25
-
26
-
27
-
28
-
29
-
30
-
31
-
32
-
33
-
34
-
35
-
36
-
37
-
38
-
39
-
40
-
41
-
42
-
43
-
44
-
45
-
46
-
47
-
48
-
49
-
50
-
51
-
52
-
53
-
54
-
55
-
56
-
57
-
58
-
59
-
60
-
 61
61 -
 62
62 -
 63
63 -
 64
64 -
 65
65 -
 66
66 -
 67
67 -
 68
68 -
 69
69 -
 70
70 -
 71
71 -
72
-
73
-
74
-
75
-
76
-
77
-
78
-
79
-
80
-
81
-
82
-
83
-
84
 |
 |
