Oki C5650n C5650n/C5650dn User's Guide - Page 90
Color Menu, The items on this menu provide a means of changing
 |
View all Oki C5650n manuals
Add to My Manuals
Save this manual to your list of manuals |
Page 90 highlights
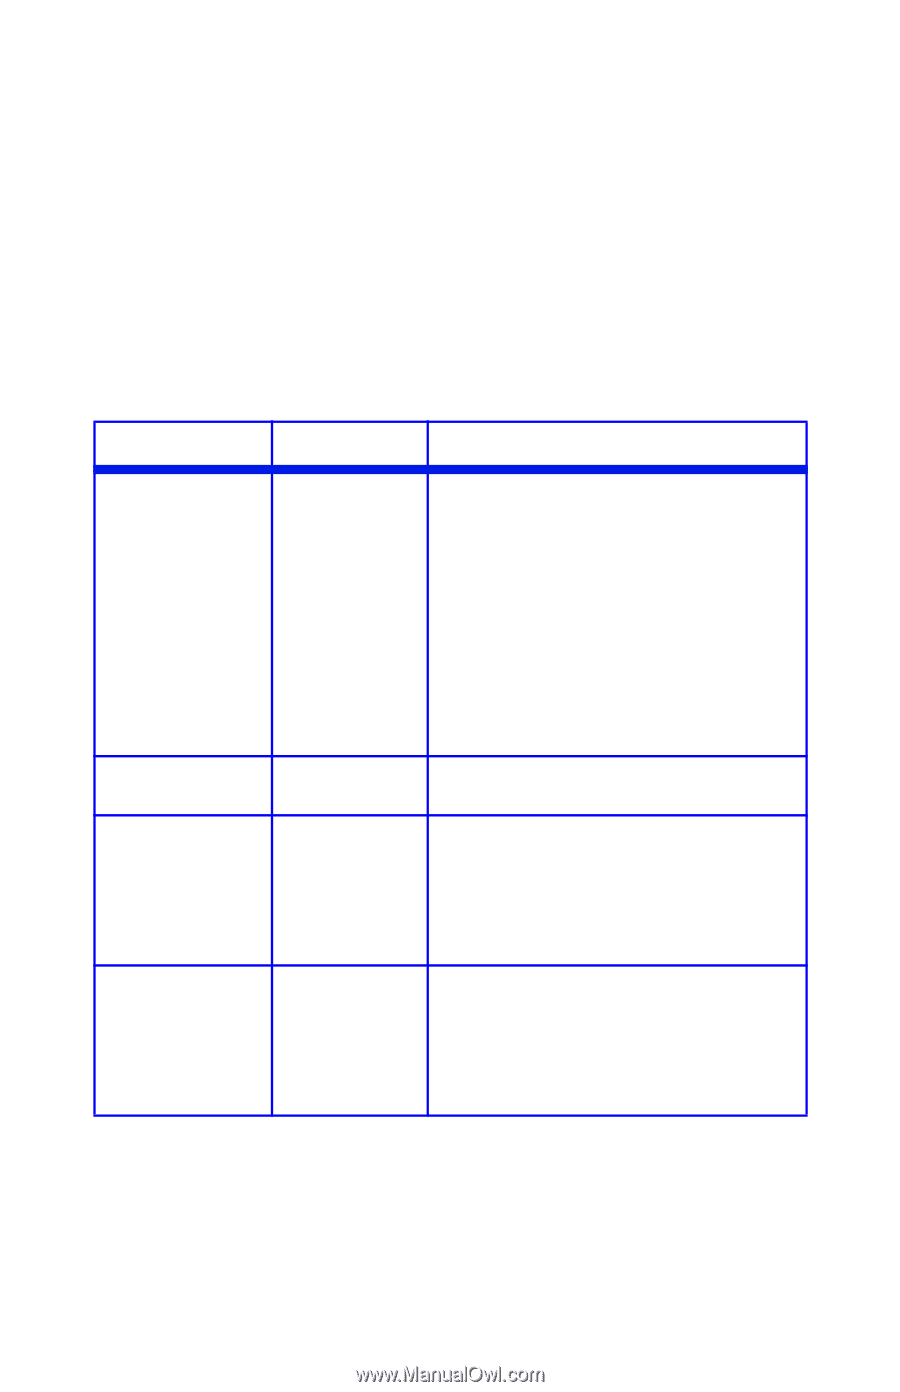
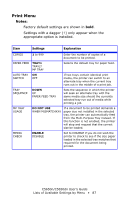
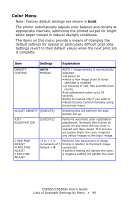
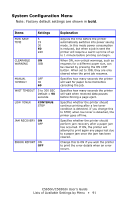
Color Menu Note: Factory default settings are shown in bold. The printer automatically adjusts color balance and density at appropriate intervals, optimizing the printed output for bright white paper viewed in natural daylight conditions. The items on this menu provide a means of changing the default settings for special or particularly difficult print jobs. Settings revert to their default values when the next print job is complete. Item Settings Explanation DENSITY CONTROL AUTO MANUAL AUTO = image density is automatically adjusted: • at power on • when a new image drum or toner cartridge is installed • at intervals of 100, 300 and 500 drum counts Auto adjustment takes up to 55 seconds. Switch to manual only if you wish to initiate Density Control manually using the printer menu. ADJUST DENSITY [EXECUTE] Selecting this will perform the auto density set up. AJST REGISTRATION [EXECUTE] Performs automatic color registration adjustment. Normally this is done at power on and when the top cover is opened and then closed. This process accurately aligns the cyan, magenta and yellow images to the black image. C REG FINE ADJUST M REG FINE ADJUST Y REG FINE ADJUST -3 to + 3 in Performs fine adjustment of image increments of 1 timing in relation to the black image Default = 0 component. A positive setting will darken the color; a negative setting will lighten the color. C5650n/C5650dn User's Guide Lists of Available Settings by Menu • 90
-
 1
1 -
2
-
3
-
4
-
5
-
6
-
7
-
8
-
9
-
10
-
11
-
12
-
13
-
14
-
15
-
16
-
17
-
18
-
19
-
20
-
21
-
22
-
23
-
24
-
25
-
26
-
27
-
28
-
29
-
30
-
31
-
32
-
33
-
34
-
35
-
36
-
37
-
38
-
39
-
40
-
41
-
42
-
43
-
44
-
45
-
46
-
47
-
48
-
49
-
50
-
51
-
52
-
53
-
54
-
55
-
56
-
57
-
58
-
59
-
60
-
61
-
62
-
63
-
64
-
65
-
66
-
67
-
68
-
69
-
70
-
71
-
72
-
73
-
74
-
75
-
76
-
77
-
78
-
79
-
80
-
81
-
82
-
83
-
84
-
 85
85 -
 86
86 -
 87
87 -
 88
88 -
 89
89 -
 90
90 -
 91
91 -
 92
92 -
 93
93 -
 94
94 -
 95
95 -
96
-
97
-
98
-
99
-
100
-
101
-
102
-
103
-
104
-
105
-
106
-
107
-
108
-
109
-
110
-
111
-
112
-
113
-
114
-
115
-
116
-
117
-
118
-
119
-
120
-
121
-
122
-
123
-
124
-
125
-
126
-
127
-
128
-
129
-
130
-
131
-
132
-
133
-
134
-
135
-
136
-
137
-
138
-
139
-
140
-
141
-
142
-
143
-
144
-
145
-
146
-
147
-
148
-
149
-
150
-
151
-
152
-
153
-
154
-
155
-
156
-
157
-
158
-
159
-
160
-
161
-
162
-
163
-
164
-
165
-
166
-
167
-
168
-
169
-
170
-
171
-
172
-
173
-
174
-
175
-
176
-
177
-
178
-
179
-
180
-
181
-
182
-
183
-
184
-
185
-
186
-
187
-
188
-
189
-
190
-
191
-
192
-
193
-
194
-
195
-
196
-
197
-
198
-
199
-
200
-
201
-
202
-
203
-
204
-
205
-
206
-
207
-
208
-
209
-
210
-
211
-
212
-
213
-
214
-
215
-
216
-
217
-
218
-
219
-
220
-
221
-
222
-
223
-
224
-
225
 |
 |