Oki ML421 Network User's Guide for OkiLAN 6020e - Page 74
Assign, Printer, Print Queue, Print Server, Printer/Queue Assignments, Assignments, PServer
 |
View all Oki ML421 manuals
Add to My Manuals
Save this manual to your list of manuals |
Page 74 highlights
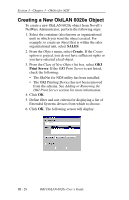
Section 3 - Chapter 3 - OkiNet for NDS 6. Select Assign. 7. Select or create a NetWare Printer object from the Printer/Queue Assignments dialog. 8. Select or create a NetWare Print Queue object from the Printer/Queue Assignments dialog. 9. Select OK to save your printer and queue selections. Note: To load balance print queue jobs, repeat steps 5 through 9 for another port. Create a new printer object for the OkiLAN 6020e port and then select the same print queue object. This will allow multiple printers to service a single print queue. 10. From the Assignments page, select OK to save changes. If you have selected PServer mode, you have completed all necessary steps. Continue to Configuring the OkiLAN 6020e Using OkiNet for NDS. 11. Select or create a NetWare Print Server object from the Assignments page. 12. Select a port to configure from the Assignments page, then select Assign. 13. Select or create a NetWare Printer object from the Printer/Queue Assignments dialog. 14. Select or create a NetWare Print Queue object from the Printer/Queue Assignments dialog. 15. Select OK to save your printer and queue selections. 16. From the Assignments page, select OK to save changes. 17. From the file server, restart the PSERVER.nlm. III - 30 OKI OkiLAN 6020e User's Guide
-
 1
1 -
2
-
3
-
4
-
5
-
6
-
7
-
8
-
9
-
10
-
11
-
12
-
13
-
14
-
15
-
16
-
17
-
18
-
19
-
20
-
21
-
22
-
23
-
24
-
25
-
26
-
27
-
28
-
29
-
30
-
31
-
32
-
33
-
34
-
35
-
36
-
37
-
38
-
39
-
40
-
41
-
42
-
43
-
44
-
45
-
46
-
47
-
48
-
49
-
50
-
51
-
52
-
53
-
54
-
55
-
56
-
57
-
58
-
59
-
60
-
61
-
62
-
63
-
64
-
65
-
66
-
67
-
68
-
 69
69 -
 70
70 -
 71
71 -
 72
72 -
 73
73 -
 74
74 -
 75
75 -
 76
76 -
 77
77 -
 78
78 -
 79
79 -
80
-
81
-
82
-
83
-
84
-
85
-
86
-
87
-
88
-
89
-
90
-
91
-
92
-
93
-
94
-
95
-
96
-
97
-
98
-
99
-
100
-
101
-
102
-
103
-
104
-
105
-
106
-
107
-
108
-
109
-
110
-
111
-
112
-
113
-
114
-
115
-
116
-
117
-
118
-
119
-
120
-
121
-
122
-
123
-
124
-
125
-
126
-
127
-
128
-
129
-
130
-
131
-
132
-
133
-
134
-
135
-
136
-
137
-
138
-
139
-
140
-
141
-
142
-
143
-
144
-
145
-
146
-
147
-
148
-
149
-
150
-
151
-
152
-
153
-
154
-
155
-
156
-
157
-
158
-
159
-
160
-
161
-
162
-
163
-
164
-
165
-
166
-
167
-
168
-
169
-
170
-
171
-
172
-
173
-
174
-
175
-
176
-
177
-
178
-
179
-
180
-
181
-
182
-
183
-
184
-
185
-
186
-
187
-
188
-
189
-
190
-
191
-
192
-
193
-
194
-
195
-
196
-
197
-
198
-
199
-
200
-
201
-
202
-
203
-
204
-
205
-
206
-
207
-
208
-
209
-
210
-
211
-
212
-
213
-
214
-
215
-
216
-
217
-
218
-
219
-
220
-
221
-
222
-
223
-
224
-
225
-
226
 |
 |