Olympus D-380 D-380 Quick Start Guide (762KB)
Olympus D-380 - Camedia 2MP Digital Camera Manual
 |
UPC - 050332137578
View all Olympus D-380 manuals
Add to My Manuals
Save this manual to your list of manuals |
Olympus D-380 manual content summary:
- Olympus D-380 | D-380 Quick Start Guide (762KB) - Page 1
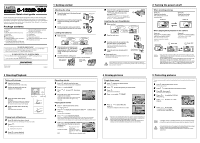
) USB cable Basic manual ; Quick start guide Software installation guide (included in the CD-ROM package) CD-ROM with Windows 98 USB driver software, Reference manual, and more. Warranty card/Registration card (not provided in some areas) Safety Precautions (booklet) SmartMedia Static-free case - Olympus D-380 | D-380 Quick Start Guide (762KB) - Page 2
to be taken with Olympus CAMEDIA-brand SmartMedia cards. Mode menus Mode menu functions are categorized into 4 tabs. Use and display the respective functions. Shooting mode to select a tab SEt CARD PIC CAMERA CAMERA tab PICTURE tab CARD tab SETUP tab MEtERING CAMERA tab METERING PICTURE tab
-
 1
1 -
 2
2
 |
 |

We’ve included this convenient Quick start guide to show you basic functions and
techniques that will help you quickly master your new camera. For more detailed
descriptions of procedures, as well as for additional information on more sophisticated
features not covered here, please refer to the printed “Basic Manual”, or the primary
“Reference Manual” on the CD-ROM.
Package contents
1
Getting started
Attaching the strap
1
Thread the short end of the strap through
the strap eyelet.
2
Thread the long end of the strap through the
loop that has already gone through the
eyelet.
3
Pull the strap tight, making sure that it is
securely fastened and will not come loose.
Loading the batteries
1
Make sure that:
2
Slide the battery compartment cover
in the direction of
(the direction
indicated by the
mark on the
cover), and lift it up in the direction
of
.
3
Insert the batteries, making sure
that they are correctly oriented as shown in the illustration.
4
Close the battery compartment cover in
the direction of
. While pressing the
mark, slide the cover in the
direction of
If the battery compartment cover will not close
easily, do not force it. Try pressing [OPEN] and
the
mark with both hands.
Inserting the card (SmartMedia)
1
Make sure that:
2
Open the card cover.
3
Insert the card as far as it will go in the
direction shown in the illustration.
There is an arrow inside the card cover,
indicating the direction in which the card
should be inserted.
4
Close the card cover securely until it
clicks.
Removing the card
Hold the card with your fingertips and pull it out in
the direction of the arrow.
2
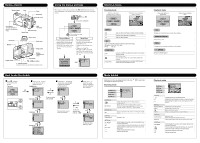
Turning the power on/off
When shooting pictures
When playing back pictures on the camera
C-120/D-380
C-120/D-380
C-120/D-380
C-120/D-380
Quick start guide
DIGITAL CAMERA
F
Camera
F
Strap
F
AA (R6) alkaline batteries (4 pieces)
F
USB cable
F
Basic manual
Quick start guide
F
Software installation guide (included in
the CD-ROM package)
F
CD-ROM with Windows 98 USB driver
software, Reference manual, and more.
F
Warranty card/Registration card (not
provided in some areas)
F
Safety Precautions (booklet)
F
SmartMedia
F
Static-free case
F
Index labels (2 pieces)
F
Write-protect adhesive seals (4 pieces)
F
SmartMedia instructions
OLYMPUS AMERICA INC.
Two Corporate Center Drive, Melville, NY 11747-3157, U.S.A. Tel. 631-844-5000
24/7 online automated help: http://support.olympusamerica.com/
Phone customer support: Tel. 1-888-553-4448 (Toll-free)
OLYMPUS OPTICAL CO. (EUROPA) GMBH.
Premises/Goods delivery: Wendenstra
β
e 14-18, 20097 Hamburg, Germany
Tel. 040-237730
Letters: Postfach 10 49 08, 20034 Hamburg, Germany
Printed in Japan
1AG6P1P1295--
VT348201
Strap eyelet
The lens barrier
is closed.
The green
lamp is off.
The monitor
is off.
Battery insertion
direction mark
When using AA
(R6) batteries
When using
lithium battery
packs
Never open the card cover, or remove the card or the batteries while the
camera is turned on. Doing so could destroy all data on the card. Destroyed
data cannot be restored.
The lens barrier
is closed.
The green
lamp is off.
The monitor
is off.
Card insertion
direction mark
•
If you open the lens barrier without the card inside the camera, the NO
CARD appears on the monitor. In this case, you can record pictures in the
camera’s internal memory.
•
To save battery power, the camera automatically enters the sleep mode
after about 3 minutes of non-operation. If the monitor is on, it will
automatically turn off. The camera activates again as soon as you lightly
press the shutter button or the
button. Whenever possible, turn the
camera off when you do not intend to take any pictures for a while.
Power on
Power off
Power on:
Open the lens barrier.
The camera turns on in the
shooting mode.
Power off:
Close the lens barrier.
The camera turns off.
Power ON
Power OFF
Power on:
Press the
(monitor) button
with the lens barrier closed.
The camera turns on in the
playback mode (the monitor
turns on).
Power off:
Press the
(monitor) button.
The camera turns off (the
monitor turns off).
With the lens
barrier closed
3 Shooting/Playback
Taking still pictures
1
Open the lens barrier.
Slide the lens barrier open until it clicks.
2
Position the target mark over the
subject in the viewfinder.
3
Press the shutter button gently
(halfway).
The green lamp on the right of the viewfinder
lights up. The exposure is locked as long as
the shutter button is kept pressed halfway.
4
Press the shutter button all the way
(fully).
The camera takes the picture.
Playing back still pictures
1
Press
with the lens barrier closed.
The monitor turns on and displays the last picture taken.
2
Press
.
: Displays the previous picture.
: Displays the next picture.
3
Press
to cancel playback.
The monitor and camera turn off.
Recording movies
1
Press
with the lens barrier open.
The top menu in the shooting mode is displayed.
2
Press
to select DRIVE.
3
Press
to select
, then press
.
4
Record the movie while observing your
subject on the monitor.
Press the shutter button fully to start recording.
Press the shutter button fully again to stop
recording.
Playing back movies
1
Press
with the lens barrier closed.
The monitor turns on.
2
Press
to display the desired picture with a
indicator, then
press
.
The top menu is displayed.
3
Press
to select MOVIE PLAYBACK.
The movie is played back after the green lamp on the right of the viewfinder
blinks and the movie data is downloaded to the camera. When the movie
reaches the end, the display returns automatically to the beginning of the movie.
4
Press
to display the MOVIE PLAYBACK
menu. Then select the desired opreation
and press
.
PLAYBACK
: Plays back the entire
movie again.
FRAME BY FRAME
: Plays back the movie
manually one frame at a
time.
EXIT
: Leaves the movie playback mode.
4
Erasing pictures
Single-frame erase
1
Press
with the lens barrier closed.
The monitor turns on.
2
Press
to select the picture you want to erase.
3
Press
The top menu is displayed.
4
Press
to select
ERASE.
5
Press
to select YES, then
press
.
The picture is erased and the menu is closed.
5
Protecting pictures
You are recommended to protect important pictures to avoid accidentally erasing
them.
1
Press
with the lens barrier closed.
The monitor turns on.
2
Press
to select the picture you want to protect.
3
Press
, then press
The mode menu is displayed.
4
Press
to select the PLAY tab,
then press
.
5
Press
to select
, then
press
.
6
Press
to select ON.
The selected picture is protected.
To close the menu, press
twice.
Target mark
Green lamp
•
Erasure is not possible if the picture you want to erase is protected or a
write-protect seal is attached to the card. Before erasing, unprotect the
picture or remove the write-protect seal from the card.
•
Once erased, pictures cannot be restored. Check each picture before
erasing to avoid accidentally erasing pictures you want to keep.
• The
indicator is displayed at the top right of the protected picture.
•
Protection on each picture remains even when the camera is turned off.
•
Protected pictures cannot be erased by the single-frame/all-frame erase
function, but they can be all erased with the format function.
•
Protection cannot be applied to pictures stored on a card with a write-
protect seal.