Olympus E-PM1 E-PM1 Instruction Manual (English)
Olympus E-PM1 Manual
 |
View all Olympus E-PM1 manuals
Add to My Manuals
Save this manual to your list of manuals |
Olympus E-PM1 manual content summary:
- Olympus E-PM1 | E-PM1 Instruction Manual (English) - Page 1
10. Customizing camera settings 11. Information 12. SAFETY PRECAUTIONS System chart Index Thank you for purchasing an Olympus digital camera. Before you start to use your new camera, please read these instructions carefully to enjoy optimum performance and a longer service life. Keep this manual in - Olympus E-PM1 | E-PM1 Instruction Manual (English) - Page 2
use of an accessory attachment not recommended by the manufacturer may cause a risk of fire, electric shock, or injury to persons. SAVE THESE INSTRUCTIONS Indications used in this manual The following symbols are used throughout this manual. # Cautions $ Notes % Tips g 2 EN Important information - Olympus E-PM1 | E-PM1 Instruction Manual (English) - Page 3
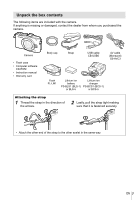
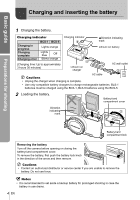
the dealer from whom you purchased the camera. Camera • Flash case • Computer software CD-ROM • Instruction manual • Warranty card Body cap Strap USB cable CB-USB6 AV cable (Monaural) CB-AVC3 Flash FL-LM1 Lithium ion battery PS-BLS1 (BLS-1) or BLS-5 Lithium ion charger PS-BCS1 (BCS-1) or BCS - Olympus E-PM1 | E-PM1 Instruction Manual (English) - Page 4
battery chargers to charge rechargeable batteries. BLS-1 batteries must be charged using the BCS-1, BLS-5 batteries using the BCS-5. 2 Loading the battery. Battery/card compartment cover Direction indicating mark 3 2 1 Battery/card compartment lock Removing the battery Turn off the camera - Olympus E-PM1 | E-PM1 Instruction Manual (English) - Page 5
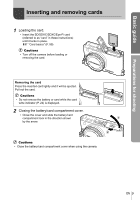
"card" in these instructions) until it locks in place. g "Card basics" (P. 99) # Cautions • Turn off the camera before loading or removing the card. Removing the card Press the inserted card lightly and it will be ejected. Pull out the card. # Cautions • Do not remove the battery or card while the - Olympus E-PM1 | E-PM1 Instruction Manual (English) - Page 6
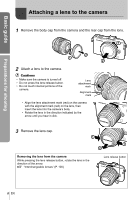
Attaching a lens to the camera Basic guide Preparations for shooting 1 Remove the body cap from the camera and the rear cap from the lens. 1 2 1 2 2 Attach a lens to the camera. # Cautions • Make sure the camera is turned off. • Do not press the lens release button. • Do not touch internal - Olympus E-PM1 | E-PM1 Instruction Manual (English) - Page 7
to the camera. • Slide the flash unit all the way in, stopping when it contacts the back of the shoe and is securely in place. UNLOCK switch 1 2 2 To use the flash, raise the flash head. • Lower the flash head when the flash is not in use. Removing the Flash Unit Press the - Olympus E-PM1 | E-PM1 Instruction Manual (English) - Page 8
the surface of the image sensor filter. • To turn off the power, press the ON/OFF button again. ON/OFF button ■ Monitor ISO-A 200 250 F5.6 Battery level 7 (green): Camera ready to shoot. Displayed for about 10 seconds after the camera is turned on. 8 (green): Low battery 9 (blinks red): Charge the - Olympus E-PM1 | E-PM1 Instruction Manual (English) - Page 9
Basic guide Preparations for shooting Setting the date/time Date and time information is recorded on the card together with the images. The file name is also included with the date and time information. Be sure to set the correct date and time before using the camera. 1 Display the menus. • Press - Olympus E-PM1 | E-PM1 Instruction Manual (English) - Page 10
1 Shutter button P. 13, 14, 36, 92 2 ON/OFF button P. 8 3 Strap eyelet P. 3 4 Lens attachment mark P. 6 5 Mount (Remove the body cap before attaching the lens.) 6 Hot shoe cover 7 Stereo microphone P. 62, 68 8 Self-timer lamp/AF illuminator P. 49/P. 82 9 Lens release button P. 6 0 Lens lock - Olympus E-PM1 | E-PM1 Instruction Manual (English) - Page 11
1 Accessory port P. 71, 81, 90 2 Monitor P. 24 3 Speaker 4 Hot shoe P. 60 5 R (Movie) button....P. 13, 15, 61, 65, 89 6 INFO (Information display) button P. 24, 25, 32 - 34, 38 7 MENU button P. 23 8 q (Playback) button P. 16, 63 9 Arrow pad Control dial* (j P. 16, 50 - 53 * In this manual - Olympus E-PM1 | E-PM1 Instruction Manual (English) - Page 12
and shutter speed. • The settings made in the advanced shooting modes are retained even if the camera is turned off. 3 Press Q. • In SCN and ART modes, a menu will be displayed. Use FG to highlight options and press Q to select. % Tips • Resetting camera settings: g "Restoring default or custom - Olympus E-PM1 | E-PM1 Instruction Manual (English) - Page 13
the settings selected in [nMode]. Movies: R button The camera automatically adjusts settings and records a movie. Adjust shutter speed and flash can not be used. # Cautions • Image size and quality for photographs are independent of movie frame size. • The autofocus and metering used in movie mode - Olympus E-PM1 | E-PM1 Instruction Manual (English) - Page 14
confirmation mark (( or n) will be displayed and focus will lock. ( Lenses that supports Hi-Speed Imager AF* n Lenses with other Four Thirds mounts * Visit our website for more information. • The shutter speed and aperture value that have been set automatically by the camera are displayed. 14 EN - Olympus E-PM1 | E-PM1 Instruction Manual (English) - Page 15
-by) mode to turn off the monitor and to cancel all actions. The camera activates again when you touch any button (the shutter button, q button, etc.). [Sleep]: g "Customizing camera settings" (P. 81) # Cautions • If the camera is used for extended periods, the temperature of the image pickup device - Olympus E-PM1 | E-PM1 Instruction Manual (English) - Page 16
Basic guide Basic operations Playback/Erasing Viewing Images „ Single-frame playback • Press the q button to display your most recent photograph or movie. Control dial Displays the Displays the next previous frame frame 2011.05.01 12:30 Still image L N 100-0020 20 q button „ Close-up playback - Olympus E-PM1 | E-PM1 Instruction Manual (English) - Page 17
Q to display the playback menu. Select [0] and press Q, and then press F to protect the image. Protected images are shown by a 0 (protect) icon. Press G to remove protection. 0 (protect) icon 2011.05.01 12:30 % Tips • Protecting or deleting multiple images: g "Selecting images" (P. 65) # Cautions - Olympus E-PM1 | E-PM1 Instruction Manual (English) - Page 18
the shutter button halfway to display the view through the lens in the monitor. Press Q to return to the art filter menu. „ Types of art filters j Pop Art k Soft Focus l Grainy Film m Pin Hole n Diorama o Dramatic Tone 2 Shoot. # Cautions • If [RAW] is currently selected for image quality, image - Olympus E-PM1 | E-PM1 Instruction Manual (English) - Page 19
Basic guide Basic operations Shooting in scene mode 1 Select SCN as the shooting mode. • g "Choosing a Shooting Mode" (P. 12) SCN 1 Portrait Q ISO 400 LN HD Exit Set 250 F5.6 01:02:03 1023 • Press Q or press the shutter button halfway to display the view through the lens in the monitor. - Olympus E-PM1 | E-PM1 Instruction Manual (English) - Page 20
Set Guide item Level bar/selection Change Color Saturation Clear & Vivid Flat & Muted Change Color Image Warm Cool Change Brightness Bright Dark Blur Background Blur Sharp Express Motions Blurred Motion* Stop Motion Shooting Tips • Tips For Child Photo • Tips For Pet Photo • Tips - Olympus E-PM1 | E-PM1 Instruction Manual (English) - Page 21
Vivid 0 Flat & Muted Set 4 Shoot. • Press the shutter button to shoot. • To clear the live guide from the display, press the MENU button. # Cautions • If [RAW] is currently selected for image quality, image quality will automatically be set to [YN+RAW]. • Live guide settings are not applied to the - Olympus E-PM1 | E-PM1 Instruction Manual (English) - Page 22
name Cursor Cursor P AAUTOO WB Auto IS OFF j Arrow WWBB AAUUTTOO 4:3 pad LF HD WB Arrow pad # Cautions • Some items are not available in some shooting modes. % Tips • For information on displaying or hiding the live control. [KControl Settings]: g "Customizing camera settings" (P. 81) 22 EN - Olympus E-PM1 | E-PM1 Instruction Manual (English) - Page 23
X Advanced shooting options q Playback and retouch options c Custom menu* # Accessory port menu* d Camera setup (e.g., date and language) * Not displayed at default settings. Tab Operation guide Shooting Menu 1 1 Card Setup Reset/Myset 2 Picture Mode D Image Aspect Back j 4:3 Set Press the MENU - Olympus E-PM1 | E-PM1 Instruction Manual (English) - Page 24
P. 41 s Shooting mode P. 12, 50 - 55 t Myset P. 35 u Flash intensity control P. 60 v ISO sensitivity P. 48 w AF mode P. 36 x Metering mode P. 41 y Flash mode P. 59 z Battery check 7 Lit up (green) : Ready for use (displayed for about ten seconds after the camera is turned on) 8 Lit up (green - Olympus E-PM1 | E-PM1 Instruction Manual (English) - Page 25
a Aspect ratio P. 48, 67 b 3D image P. 55 c Date and time P. 9 d Aspect border P. 48 e AF target P. 37 f Shooting mode P. 12, 50 - 53 g Exposure compensation P. 40 h Shutter speed P. 50 - 53 i Aperture value P. 50 - 53 j Focal length P. 100 k Flash intensity control P. 60 l White balance - Olympus E-PM1 | E-PM1 Instruction Manual (English) - Page 26
Live guide Shutter priority shooting White balance One-touch white balance Picture Mode Art filter (ART) AF target Zoom frame AF/zoom AF Focus lock Zoom frame AF/zoom AF Focus lock C-AF+TR (AF Tracking) 8 (Beep sound) Flash ISO/DIS Mode Image Stabilizer Anti-Shock Self-timer Remote cable Flash - Olympus E-PM1 | E-PM1 Instruction Manual (English) - Page 27
checking the level of the camera/Shooting with deliberate composition Zooming in on photos to check focus Self-portraits Sequential shooting Extending the useful life of the battery Increasing the number of pictures that can be taken Playback/Retouch Viewing images on a TV Viewing slideshows with - Olympus E-PM1 | E-PM1 Instruction Manual (English) - Page 28
a lens to the camera ...6 Attaching the flash unit 7 Power on 8 Setting the date/time 9 Names of parts and functions...10 Names of parts 10 Camera 10 Choosing a Shooting Mode ......12 Basic operations 14 Taking photographs/shooting movies 14 Playback/Erasing 16 Viewing Images 16 - Olympus E-PM1 | E-PM1 Instruction Manual (English) - Page 29
ends 53 Taking Panoramas 54 Taking pictures for a panorama 54 3D Photography 55 Recording multiple exposures in a single image (multiple exposure 56 Varying settings over a series of photographs (bracketing)..........57 Digital Zoom (Digital Tele-converter 58 Flash shooting 59 Using - Olympus E-PM1 | E-PM1 Instruction Manual (English) - Page 30
80 Rec View 80 c/# Menu Display 80 Firmware 80 Customizing camera settings 81 Before Using the Custom/ Accessory Port Menus ..........81 Custom Menu options 81 R AF/MF 81 S Button/Dial 82 T Release/j 83 U Disp/8/PC 83 V Exp/p/ISO 84 W #Custom 85 X K/Color/WB 85 Y Record/Erase 86 - Olympus E-PM1 | E-PM1 Instruction Manual (English) - Page 31
99 Battery and charger 100 Using your charger abroad .....100 Interchangeable lenses............100 M.ZUIKO DIGITAL lens specifications 101 Principal Accessories 102 Mount adapter 102 Remote cable (RM-UC1) .......102 Converter lenses 102 Macro arm light (MAL-1) ........102 Microphone set (SEMA - Olympus E-PM1 | E-PM1 Instruction Manual (English) - Page 32
when [On] is selected for [G/Info Settings] > [LV-Info]. g "Customizing camera settings" (P. 81) Choosing shooting controls Shooting options can be displayed by pressing Q. You can choose the types of display available using the [KControl Settings] option in the custom menus (P. 81). ART/SCN Art - Olympus E-PM1 | E-PM1 Instruction Manual (English) - Page 33
:30 15 Histogram display* * Displayed when [On] is selected for [G/Info Settings] > [q Info]. g "Customizing camera settings" (P. 81) Histogram display Display a histogram showing the distribution of brightness in the image. The horizontal axis gives the brightness, the vertical axis the number - Olympus E-PM1 | E-PM1 Instruction Manual (English) - Page 34
press the INFO button in the custom white balance menu (P. 43). compensation, aperture, and shutter speed can be adjusted camera shake (the image stabilizer Reset/MysetDelete all pictures in the 2 Picture Modme emory card or format j D the memory card. Image Aspect 4:3 Back Set 34 EN - Olympus E-PM1 | E-PM1 Instruction Manual (English) - Page 35
Function]: 1 g "Customizing camera settings" (P. 81) Basic photography/frequently-used options Using reset settings 1 Select [Reset/Myset] in shooting menu W (P. 107). 2 Select [Reset] and press Q. • Highlight [Reset] and press I to choose the reset type. • Settings affected by resets: g "Menu - Olympus E-PM1 | E-PM1 Instruction Manual (English) - Page 36
system lenses focus using [S-AF]. % Tips • The [Rls Priority S] (P. 83) and [Rls Priority C] (P. 83) options can be used to choose whether the shutter can be released when the camera is unable to focus. • [MF Assist] (P. 82) can be used to enable automatic zoom display when the lens focus ring - Olympus E-PM1 | E-PM1 Instruction Manual (English) - Page 37
chooses from the full set of focus targets. Select the focus target manually. The camera automatically chooses from the targets in the selected group. Focus lock If the camera is unable to focus on your chosen subject, select single target mode and use focus lock to focus on another subject at - Olympus E-PM1 | E-PM1 Instruction Manual (English) - Page 38
. $ Notes • Autofocus is available and pictures can be taken both when the zoom frame is displayed and when the view through the lens is zoomed in. % Tips • You can also use the R button to view the zoom frame and zoom displays. [Button Function]: g "Customizing camera settings" (P. 81) # Cautions - Olympus E-PM1 | E-PM1 Instruction Manual (English) - Page 39
border. i ISO 200 P 250 F5.6 0.0 LN HD 01:02:03 1023 4 Press the shutter button halfway to focus. i • When the camera focuses on the face in the white ISO border, the border will turn green. 200 • If the camera is able to detect the subject's eyes, it will LN HD display a green frame - Olympus E-PM1 | E-PM1 Instruction Manual (English) - Page 40
can be adjusted by ±3 EV. 1 Negative (-) No compensation (0) Positive (+) % Tips • To change the exposure adjustment interval. [EV Step]: g "Customizing camera settings" (P. 81) # Cautions • Exposure compensation is not available in A, M, or SCN modes. Previewing the effects of exposure - Olympus E-PM1 | E-PM1 Instruction Manual (English) - Page 41
AEL P 250 F5.6 0.0 01:02:03 38 "Customizing camera settings" (P. 81) AE lock Exposure locks and a B icon is displayed when the button is pressed once. Press the shutter button to take a picture. • Press the button again to cancel AE lock. % Tips • To lock exposure while the button is pressed - Olympus E-PM1 | E-PM1 Instruction Manual (English) - Page 42
the shutter speed is set to the slowest speed. In these cases, it is recommended that you use a tripod. • When using a tripod, set [Image Stabilizer] to [OFF]. • When using a lens with an image stabilization function, turn off the image stabilizer function of either the lens or the camera. • You - Olympus E-PM1 | E-PM1 Instruction Manual (English) - Page 43
White balance (WB) ensures that white objects in images recorded by the camera appear white. [AUTO] is suitable in most circumstances and the subject Q set by one- is under mixed lighting or lit by an unknown type (P. 44) touch WB. of flash or other light source. Custom white balance CWB 2000K - Olympus E-PM1 | E-PM1 Instruction Manual (English) - Page 44
settings and exit. % Tips • To display a test photograph taken at the selected white balance value, press the R button. • Adjusting all WB mode settings at once. [All >]: g "Customizing camera settings balance is measured again. Turning the power off does not erase the data. % Tips • If the subject - Olympus E-PM1 | E-PM1 Instruction Manual (English) - Page 45
Menu 1 1 Card Setup Reset/Myset 1 2 Picture Mode j D Image Aspect 4:3 Basic photography/frequently-used options Back Set 2 Select an option with Produces black and white tone. Custom Select one picture mode, set the parameters, and register the setting. j Pop Art k Soft Focus l - Olympus E-PM1 | E-PM1 Instruction Manual (English) - Page 46
Key Gradation for a bright subject. Low Key Gradation for a dark subject. Effect (i-Enhance) Sets the extent that the effect will be applied. D k k D B&W Filter (Monotone) Creates a black and white image. The filter color is brightened and the complementary color is darkened. N:Neutral - Olympus E-PM1 | E-PM1 Instruction Manual (English) - Page 47
(record mode) Select an image quality for photographs and movies according image size (Y, X, and W) and compression ratio (SF, F, N, and B). The options available can be selected using the [K Set] option in the custom menus. g "Customizing camera settings" (P. 81) Image size Name Pixel count - Olympus E-PM1 | E-PM1 Instruction Manual (English) - Page 48
files can be up to 4 GB in size or 29 minutes in length. *2 Image sensor output about 30 fps. *3 The frame rate may drop when an art filter is used. *4 Files may be up to 2 GB in size. Basic photography/frequently-used options Setting the image aspect You can change the aspect ratio (horizontal - Olympus E-PM1 | E-PM1 Instruction Manual (English) - Page 49
available for ISO sensitivity can be selected using [ISO Step]. Auto sensitivity can be enabled in M mode using [ISO-Auto]. g "Customizing camera settings" (P. 81) Sequential shooting/using the self timer 1 Basic photography/frequently-used options The camera will take photos while the shutter - Olympus E-PM1 | E-PM1 Instruction Manual (English) - Page 50
. # Cautions • The shutter speed and aperture displays flash if the camera is unable to achieve optimal exposure. See "Exposure warning display" (P. 103). % Tips • Using the control dial. [d Lock]: Changing the roles of the control dial. [Dial Function]: g "Customizing camera settings" (P. 81) 50 - Olympus E-PM1 | E-PM1 Instruction Manual (English) - Page 51
and let the camera automatically adjust shutter speed for optimal exposure. 1 Select A as the shooting mode. • g "Choosing a Shooting Mode" (P. 12) ART A SCN the focus point that appears to be in focus) in the monitor. [Button Function]: g "Customizing camera settings" (P. 81) R button % Tips • - Olympus E-PM1 | E-PM1 Instruction Manual (English) - Page 52
will blur a fast action scene. This blurring will give the impression of dynamic motion. Fast shutter speed Slow shutter speed % Tips • Using the control dial to adjust shutter speed. [d Lock]: Changing the roles of the control dial. [Dial Function]: g "Customizing camera settings" (P. 81) 52 EN - Olympus E-PM1 | E-PM1 Instruction Manual (English) - Page 53
ends when the shutter button is released. % Tips • Changing the roles of the control dial. [Dial Function]: Ending the exposure automatically after a set time. [Bulb Timer]: To fix the focus during manual focus shooting. [Bulb Focusing]: g "Customizing camera settings" (P. 81) # Cautions • To - Olympus E-PM1 | E-PM1 Instruction Manual (English) - Page 54
12) 2 ART A SCN n P A SETUP S M 2 Select [Panorama] and press Q. 3 Use FGHI to choose a pan direction. 4 Take a picture, using the guides to frame the ISO 200 shot. • Focus, exposure, and other settings are fixed at the M 250 F5.6 38 values for the first shot. 5 Take the remaining images - Olympus E-PM1 | E-PM1 Instruction Manual (English) - Page 55
the center focus point only. • Image size is fixed at 1920 × 1080. • 3D and manual focus lenses can not be used. • Depending on the lens and camera settings, the 3D effect may not be visible. • The camera will not go to sleep during 3D photography. • RAW photography is not available. • Frame coverage - Olympus E-PM1 | E-PM1 Instruction Manual (English) - Page 56
01:02:03 38 the lens as a guide to framing the next shot. % Tips • To overlay 3 or more frames: Select RAW for [K] and use the [Overlay] option to make repeated multiple exposures. • For more information on overlaying RAW images: g "Image overlay" (P. 68) # Cautions • The camera will not go to - Olympus E-PM1 | E-PM1 Instruction Manual (English) - Page 57
aperture and shutter speed (mode P), shutter speed (modes A and M), or aperture (mode S). • The camera brackets the value currently selected for exposure compensation. • The size of the bracketing increment changes with the value selected for [EV Step]. g "Customizing camera settings" (P. 81) AE - Olympus E-PM1 | E-PM1 Instruction Manual (English) - Page 58
"Customizing camera settings" (P. 81) AE BKT WB BKT FL BKT ISO BKT ART BKT Bracketing Off -3f 0.A3E--VG-3f 0.7EV -3f 1.0EV -- -- Back Set ART BKT (ART bracketing) Each time the shutter is released, the camera records multiple images, each with a different art filter settiing. You can turn art - Olympus E-PM1 | E-PM1 Instruction Manual (English) - Page 59
the pre-flashes, it takes about 1 second before the shutter is released. Do not move the camera until shooting is complete. • [!/#!(Red-eye reduction flash)] may not work effectively under some shooting conditions. • When the flash fires, the shutter speed is set to 1/160 sec. or slower. When shooting - Olympus E-PM1 | E-PM1 Instruction Manual (English) - Page 60
signal contacts that do not conform to Olympus specifications may damage the camera. • Use only with the camera in shooting mode M at shutter speeds slower than 1/160 s and at ISO settings other than [AUTO]. • Flash control can only be performed by manually setting the flash to the ISO sensitivity and - Olympus E-PM1 | E-PM1 Instruction Manual (English) - Page 61
] is selected, the setting for [Auto] is applied. • Stabilization is not possible when the camera shake is excessive. • When using a lens with the image stabilizer function, turn off the image stabilizer function of either the lens or the camera. • When the inside of the camera becomes hot, shooting - Olympus E-PM1 | E-PM1 Instruction Manual (English) - Page 62
the sound made by the lens and camera operating may be recorded. If desired, you can reduce these sounds by shooting with [AF Mode] set to [S-AF], or by % Tips • Recording movies with the shutter button: g "Recording movies with the shutter button" (P. 92) • Reducing wind noise: g "Microphone set ( - Olympus E-PM1 | E-PM1 Instruction Manual (English) - Page 63
, m, Erase % Tips • Changing the roles of the control dial. [Dial Function]: g "Customizing camera settings" (P. 81) Index display/calendar display „ Index display To view multiple pictures, press G (H) in full-frame playback. „ Calendar display Display the first picture taken on each date. EN 63 - Olympus E-PM1 | E-PM1 Instruction Manual (English) - Page 64
display View the pictures taken on the selected date full frame. % Tips • Changing the roles of the control dial. [Dial Function]: g "Customizing camera settings" (P. 81) Playback zoom (close-up playback) Zoom images in or out. U (I) INFO 2011.05.01 12:30 L N 100-0020 20 G (H) Single-frame - Olympus E-PM1 | E-PM1 Instruction Manual (English) - Page 65
button again. • Multiple pictures can be selected in index playback. 2011.05.01 12:30 21 Canceling all protections This function lets you cancel the protection of several images at one time. 1 Select [Reset Protect] in the q (playback) menu (P. 107). 2 Select [Yes] and press Q. All-frame erase - Olympus E-PM1 | E-PM1 Instruction Manual (English) - Page 66
playback and select the slideshow option. JPEG JPEG Edit R Rotate m < Back Set 2 Adjust settings. Start Start the slideshow. Images are displayed in order, starting with the current picture. BGM Set BGM (4 types) or turn overall volume of the camera speaker. Press HI to adjust the - Olympus E-PM1 | E-PM1 Instruction Manual (English) - Page 67
choose the size of the crop and FGHI to 5 position the crop. Playback options JPEG Edit O Set [Aspect]: Changes the aspect ratio of images from 4:3 (standard) to [3:2], [16:9], [6:6], or [3:4]. After changing the aspect ratio, use the arrow pad to specify the trimming position. [Black & White - Olympus E-PM1 | E-PM1 Instruction Manual (English) - Page 68
3 frames of RAW images taken with the camera can be overlaid and saved as a separate image. The image is saved with the record mode set at the time the image is saved. (If [RAW] is selected, the copy will be saved in [YN+RAW] format.) 1 With a RAW image displayed during playback, press Q and select - Olympus E-PM1 | E-PM1 Instruction Manual (English) - Page 69
) and audio input jack (white). Playback options 5 AV cable (included) 1 Use the camera to select the video signal format that matches that of the connected TV ([NTSC]/[PAL]). • [Video Out]: g "Customizing camera settings" (P. 81) 2 Connect the TV and camera. 3 Turn on the TV, and change "INPUT - Olympus E-PM1 | E-PM1 Instruction Manual (English) - Page 70
a TV that supports HDMI control. 1 Select [HDMI] in c Custom Menu (P. 81) tab U. 2 Select [HDMI Control] and choose [On]. 3 Operate the camera by using the TV remote control. • You can operate the camera by following the operation guide displayed on the TV. • During single-frame playback, you can - Olympus E-PM1 | E-PM1 Instruction Manual (English) - Page 71
press Q. • The image will be downloaded to the camera. • If prompted to provide a PIN code, enter 0000 and press Q. Receive Picture Receiving % Tips Cancel • To resize images to be transmitted or choose how long the camera searches for a destination: g "Customizing camera settings" (P. 81) EN - Olympus E-PM1 | E-PM1 Instruction Manual (English) - Page 72
or formatting albums. [Album Mem. Setup]: Removing protection from all images in the album. [Reset Protect]: Viewing album status (amount of memory remaining). [Album Mem. Usage]: g "Customizing camera settings" (P. 81) # Cautions • The OLYMPUS PENPAL can be used only in the region in which it was - Olympus E-PM1 | E-PM1 Instruction Manual (English) - Page 73
2 Follow the on-screen instructions on your computer. # Caution • If nothing is displayed on the camera screen even after connecting the camera to the computer, the battery may be exhausted. Use a full-charged battery. Multi-connector USB cable Smaller terminal Using OLYMPUS Viewer 2/[ib] USB - Olympus E-PM1 | E-PM1 Instruction Manual (English) - Page 74
recommended) [ib] Operating System Windows XP (Service Pack 2 or later) /Windows Vista / OLYMPUS Viewer 2" button and follow the on-screen instructions to install the software. Using OLYMPUS Viewer 2/[ib] OLYMPUS Viewer 2 Operating System Processor RAM Free Hard Drive Space Monitor Settings - Olympus E-PM1 | E-PM1 Instruction Manual (English) - Page 75
details, refer to your computer's manual. 2 Turn on the camera. USB 7 • The selection screen for the USB connection is displayed. 3 Press FG to select [Storage]. Press Q. Storage MTP Print Exit Set Using OLYMPUS Viewer 2/[ib] 4 The computer recognizes the camera as a new device. # Cautions - Olympus E-PM1 | E-PM1 Instruction Manual (English) - Page 76
(Digital Print Order Format) is a standard for recording the data that a printer or print service requires to automatically print pictures. Creating a print order 1 Press Q during playback and select [ - Olympus E-PM1 | E-PM1 Instruction Manual (English) - Page 77
Smaller terminal • Use a fully charged battery for printing. • When the camera is turned on, a dialog should be displayed in the monitor prompting you to choose a host. If it is not, select [Auto] for [USB Mode] in the camera custom menus. g "Customizing camera settings" (P. 81) 2 Use FG to select - Olympus E-PM1 | E-PM1 Instruction Manual (English) - Page 78
print another picture, use HI to select the image and press Q. • To exit, unplug the USB cable from the camera while the picture selection screen is displayed. Easy Print Start PC/Custom Print Custom printing 1 Follow the operation guide to set a print option. Selecting the print mode Select the - Olympus E-PM1 | E-PM1 Instruction Manual (English) - Page 79
be printed right away. 2011.05.01 12:30 Select Print 123-3456 15 Single Sets the number of prints. Date Prints the date and time recorded on the picture. File Name Prints the file name recorded on the picture. P Trims the picture for printing. Use the control dial to choose the crop 8 size - Olympus E-PM1 | E-PM1 Instruction Manual (English) - Page 80
it. c/# Menu Display Choose whether to display the custom menus or accessory port menu. 81 Firmware Your product's firmware version will be displayed. When you make inquiries about your camera or accessories or when you want to download software, you will need to state which - version - Olympus E-PM1 | E-PM1 Instruction Manual (English) - Page 81
is selected, the camera will continue to focus even when the shutter button is not pressed halfway. - Choose the AF target mode. 37 When set to [On], this resets the focus of the lens (infinity) each time the power is turned off. - Normally focus locks during the exposure when manual focus (MF - Olympus E-PM1 | E-PM1 Instruction Manual (English) - Page 82
Customizing camera settings 10 R AF/MF Option Focus Ring MF Assist P Set Home AF Illuminat. I Face Priority MENU c R Description g You can customize how the lens adjusts to the focal point by ) selecting the rotational direction of the focus ring. Near Near ) - Select [On] to automatically - Olympus E-PM1 | E-PM1 Instruction Manual (English) - Page 83
c T Option Description g Rls Priority S Rls Priority C If [On] is selected, the shutter can be released even when the camera is not in focus. This option can be set separately - for S-AF (P. 36) and C-AF (P. 36) modes. j H fps j L fps Choose the frame advance rates for [T] and [S]. Figures - Olympus E-PM1 | E-PM1 Instruction Manual (English) - Page 84
are performed for the selected period. The camera can be reactivated by pressing the shutter button - halfway. When set to [Off], you can turn off the beep sound that is emitted when the focus locks by pressing the shutter button. - Adjust playback volume. 17, 62, 66 Choose a mode for - Olympus E-PM1 | E-PM1 Instruction Manual (English) - Page 85
is only performed at slow shutter speeds. [On]: Noise the image. • Noise reduction turns off lens. • Compensation is not available for teleconverters or extension tubes. - • Noise may be visible at the edges of photographs taken at high ISO sensitivities. 10 Customizing camera settings - Olympus E-PM1 | E-PM1 Instruction Manual (English) - Page 86
Count F Back Set Number of pixels Compression rate Pixel Count Choose the pixel count for [X]- and [W]-size images. 1) Select [Pixel Count] in the c Custom Menu tab X. 2) Select [Xiddle] or Pixel Count used or from the highest number available on the card. [Reset]: When you insert a new - Olympus E-PM1 | E-PM1 Instruction Manual (English) - Page 87
Setting Choose the print resolution. [Auto]: Print resolution is selected automatically according to image size. - [Custom]: Press I to choose a print resolution. Copyright Settings • OLYMPUS does not accept liability for damages arising from disputes involving the use of [Copyright Settings]. - Olympus E-PM1 | E-PM1 Instruction Manual (English) - Page 88
Focus - - - Locked Locked Locked Locked - - - Exposure - Locked - - Locked - Locked - Locked - R button function When holding down AEL/AFL Focus Exposure - Locked - Locked S-AF - - Locked - Locked C-AF start - C-AF start - - Locked - Locked S-AF - Customizing camera settings - Olympus E-PM1 | E-PM1 Instruction Manual (English) - Page 89
position saved with [P Set Home] (P. 82). The home AF target position is indicated by a p icon. Press the button again to return to AF target mode. If the camera is turned off when the home position is selected, the home position will be reset. Press the button to select manual focus mode. Press the - Olympus E-PM1 | E-PM1 Instruction Manual (English) - Page 90
camera searches for a host. My Display information for your OLYMPUS PENPAL, including the name, OLYMPUS address, and supported services. Press Q to edit the device name. 72 PENPAL Picture Choose the size at which images are transmitted. Send Size [Size 1: Small]: Images are sent at a size - Olympus E-PM1 | E-PM1 Instruction Manual (English) - Page 91
tone y P. 46 4 Flash mode P. 59 9 Color space P. 85 5 Flash intensity control P. 60 0 P. 46 AF target P. 37 Saturation T P. 46 e Image stabilizer P. 42 # Cautions • Not displayed in movie record shutter button halfway to return to shooting mode. Customizing camera settings 10 EN 91 - Olympus E-PM1 | E-PM1 Instruction Manual (English) - Page 92
as well as the movie. 1 Select [Movie+Still] in c Custom Menu (P. 81) tab Z. 2 Select [On] and press Q. Custom I nMode P Movie+Still Off Movie R On Back Set # Cautions • This option is only available when the shutter button is used to record movies. Customizing camera settings 92 EN - Olympus E-PM1 | E-PM1 Instruction Manual (English) - Page 93
ash units with their remote sensors facing the camera. The illustration on the right shows the approximate ranges at which the flash units can be positioned. The actual control range varies with local conditions. 30° 60° 50° 50° 100° 30° 7m 5m Customizing camera settings # Cautions • We recommend - Olympus E-PM1 | E-PM1 Instruction Manual (English) - Page 94
in your pocket for a while. No picture is taken when the shutter button is pressed The camera has turned off automatically • The camera automatically enters sleep mode to reduce the drain on the battery if no operations are performed for a set period of time. g [Sleep] (P. 15) If no operations are - Olympus E-PM1 | E-PM1 Instruction Manual (English) - Page 95
tends to appear in images. The camera activates the noise-reduction process after shooting at slow shutter speeds. During which, shooting is not allowed. You can set [Noise Reduct.] to [Off]. g "Customizing camera settings" (P. 81) The date and time has not been set The camera is used with the - Olympus E-PM1 | E-PM1 Instruction Manual (English) - Page 96
unwanted pictures. Before erasing, download important images to a PC. 11 Card Setup Clean the contact area of the card with a dry cloth. Clean Card Format Set Card cannot be read. Card may not have been formatted. • Select [Clean Card], press Q and turn off the camera. Remove the card and wipe - Olympus E-PM1 | E-PM1 Instruction Manual (English) - Page 97
settings on the camera. 11 Print Error There is a problem with the printer and/or camera. Turn off camera and printer. Check the printer and remedy any problems before turning the power on again. Cannot Print Pictures recorded on other cameras may not be printed on this camera. The lens - Olympus E-PM1 | E-PM1 Instruction Manual (English) - Page 98
that is well ventilated. • Insert the battery periodically and test the camera's functions. • Remove dust and other foreign matter from the body and rear caps before attaching them. • Attach the body cap to the camera to prevent dust from getting inside when no lens is attached. Be sure to replace - Olympus E-PM1 | E-PM1 Instruction Manual (English) - Page 99
The following types of SD memory card (commercially available) can be used with this camera: SD, SDHC, SDXC, and Eye-Fi. For the latest information, please visit the Olympus website. SD card write protect switch The SD card body has a write protect switch. If you set the switch to the "LOCK" side - Olympus E-PM1 | E-PM1 Instruction Manual (English) - Page 100
. • Performing auto focus repeatedly by pressing the shutter button halfway in shooting mode. • Displaying images on the monitor for a prolonged period. • When connected to a computer or printer. • When using a drained battery, the camera may turn off without the low battery warning being displayed - Olympus E-PM1 | E-PM1 Instruction Manual (English) - Page 101
DIGITAL lens specifications „ Names of parts 1 Filter mount thread 2 Zoom ring (zoom lenses only) 3 Focus ring 4 Mount index 5 Electrical contacts 6 Front cap 7 Rear cap If the hood is attached to a lens with a decorative ring, rotate the ring to the left. „ Lens and camera combinations Lens - Olympus E-PM1 | E-PM1 Instruction Manual (English) - Page 102
as autofocus, may not be available. „ OM adapter (MF-2) Use with existing OLYMPUS OM System lenses. Focus and aperture must be adjusted manually. Image stabilization can be used. Input the focal length of the lens being used in the camera image stabilization settings. Remote cable (RM-UC1) Use when - Olympus E-PM1 | E-PM1 Instruction Manual (English) - Page 103
ISO sensitivity. S • Set the shutter speed faster. 125 F22 The subject is • Decrease the ISO sensitivity or use a overexposed. commercially available ND filter (for adjusting the amount of light). • The aperture value at the moment when its indication blinks varies with the lens type and focal - Olympus E-PM1 | E-PM1 Instruction Manual (English) - Page 104
* In Super FP mode, external flash units for use with this camera detect backlighting and emit a longer-than-normal flash. • #AUTO, $ can be set in A mode. 11 Minimum range The lens may cast shadows over objects close to the camera, causing vignetting, or be too bright Lens 14 - 42 mm Approximate - Olympus E-PM1 | E-PM1 Instruction Manual (English) - Page 105
mode Flash timing Upper limit of Fixed timing synchronization when flash timing*1 fires*2 P 1/ (lens focal length × 2) or synchronization A timing, whichever is slower 1/60 1/160 S The set shutter speed ― M *1 Can be changed using menu: 1/60 - 1/160 [# X-Sync.]: g "Customizing camera - Olympus E-PM1 | E-PM1 Instruction Manual (English) - Page 106
Count) Compression File File size 12 1/2.7 Approx. 0.5 JPEG Approx. 1.3 1968 678 XF 1/4 XN 1600×1200 1/8 Approx. 0.9 Approx. 0.5 984 1906 XB 1/12 Approx. 0.4 2653 WSF 1/2.7 Approx. 0.9 1034 WF 1/4 11 WN 1280×960 1/8 WB 1/12 WB 1/12 Approx. images. • The actual file size - Olympus E-PM1 | E-PM1 Instruction Manual (English) - Page 107
Menu Tab W Card Setup Function Reset/Myset Picture Mode K Still Picture Movie Image Aspect X j/Y Image Stabilizer AE BKT Bracketing WB BKT A - B G - M FL BKT ISO BKT ART BKT Frame Multiple Exposure Auto Gain Overlay w #RC Mode Digital Tele-converter Default ― ― jNatural YN - Olympus E-PM1 | E-PM1 Instruction Manual (English) - Page 108
Off Off Firmware ― *1 *2 *3 DD DDD D g 9 80 80 80 80 80 * Settings differ depending on the region where the camera is purchased. c Custom Menu Tab Function c R AF/MF AF Mode Still Picture Movie Full-time AF AF Area Reset Lens Bulb Focusing Focus Ring MF Assist P Set Home AF - Olympus E-PM1 | E-PM1 Instruction Manual (English) - Page 109
Settings q Info LV-Info G Settings ― Image Only, Overall Image Only, u O, Calendar DDD DD DD iAUTO KControl P/A/S/M Settings ART Live Guide Set All Reset - - DD D 85 W Keep Warm Color On #+WB Off DDD DDD Color Space sRGB DDD * Settings differ depending on the region where the camera - Olympus E-PM1 | E-PM1 Instruction Manual (English) - Page 110
±0 Off # Accessory Port Menu 11 Tab Function # A OLYMPUS PENPAL Share Default Please Wait - Information Address List - Address Book Search Timer 30 sec New Pairing - My OLYMPUS PENPAL - Picture Send Size Size 1: Small B OLYMPUS PENPAL Album Copy All - Reset Protect - Album - Olympus E-PM1 | E-PM1 Instruction Manual (English) - Page 111
on a 35 mm film camera Image pickup device Product type No. of total pixels No. of effective pixels Screen size Aspect ratio Live view Sensor Field of view Monitor Product type Total no. of pixels Shutter Digital camera with interchangeable lens system M.Zuiko Digital, Micro Four Thirds System - Olympus E-PM1 | E-PM1 Instruction Manual (English) - Page 112
Operation time: 12 sec., 2 sec. External flash Sync speed 1/160 s or slower Flash control mode TTL-AUTO (TTL pre-flash mode) External connector Multi-connector (USB connector, AV connector)/HDMI micro connector (type D)/Accessory port Power supply Battery Li-ion Battery ×1 Dimensions/weight - Olympus E-PM1 | E-PM1 Instruction Manual (English) - Page 113
SHOCK, DO NOT REMOVE COVER (OR BACK). NO USER-SERVICEABLE PARTS INSIDE. REFER SERVICING TO QUALIFIED OLYMPUS SERVICE PERSONNEL. An exclamation mark enclosed in a triangle alerts you to important operating and maintenance instructions in the documentation provided with the product. DANGER If the - Olympus E-PM1 | E-PM1 Instruction Manual (English) - Page 114
burns. SAFETY PRECAUTIONS DANGER • The camera uses a lithium ion battery specified by Olympus. Charge the battery with the specified charger. Do not use any 114 EN other chargers. • Never heat or incinerate batteries. • Take precautions when carrying or storing batteries to prevent them from coming - Olympus E-PM1 | E-PM1 Instruction Manual (English) - Page 115
the body cap when removing the lens. • Before storing the camera for a long period, remove the battery. Select a cool, dry location for storage to prevent condensation or mold from forming inside the camera. After storage, test the camera by turning it on and pressing the shutter release button - Olympus E-PM1 | E-PM1 Instruction Manual (English) - Page 116
battery and/or battery charger may result in fire or personal injury due to leakage, heating, ignition or damage to the battery. Olympus does not assume any liability for accidents or damage that may result from the use of a battery and/or battery charger that are not genuine Olympus accessories - Olympus E-PM1 | E-PM1 Instruction Manual (English) - Page 117
warrants that the enclosed Olympus® imaging product(s) and related Olympus® accessories (individually a "Product" and collectively the "Products") will be free from defects in materials and workmanship under normal use and service for a period of one (1) year from the date of purchase. If any - Olympus E-PM1 | E-PM1 Instruction Manual (English) - Page 118
sold you the Product or ship it postage prepaid and insured to any of our Olympus Service Centers. When returning Products for service, your package should include the following: 1 Sales receipt showing date and place of purchase. 2 Copy of this limited warranty bearing the Product serial number - Olympus E-PM1 | E-PM1 Instruction Manual (English) - Page 119
WARRANTY SERVICE International warranty service is available under this warranty. For customers in Europe "CE" mark indicates that this product complies with the European requirements for safety, health, environment and customer protection. "CE" mark cameras are intended for sales in Europe - Olympus E-PM1 | E-PM1 Instruction Manual (English) - Page 120
Guarantee does not apply to any other accessory equipment, such as the case, strap, lens cap and batteries. 4 Olympus's sole liability under this Guarantee shall to the OLYMPUS PENPAL. • The standards for camera file systems referred to in this manual are the "Design Rule for Camera File System/DCF - Olympus E-PM1 | E-PM1 Instruction Manual (English) - Page 121
. NO LICENSE IS GRANTED OR SHALL BE IMPLIED FOR ANY OTHER USE. ADDITIONAL INFORMATION MAY BE OBTAINED FROM MPEG LA, L.L.C. SEE HTTP://WWW.MPEGLA.COM 12 EN 121 SAFETY PRECAUTIONS - Olympus E-PM1 | E-PM1 Instruction Manual (English) - Page 122
Battery Charger Remote Operation RM-UC1 Remote Cable Connection Cable USB Cable/ AV Cable/ HDMI Cable Case / Strap*5 Shoulder Strap Camera Case MFT Retro Bag/ PEN Case Modern/ PEN Case Smart Underwater System Underwater case VF-1 Optical View Finder VF-2 Electronic View Finder Accessory - Olympus E-PM1 | E-PM1 Instruction Manual (English) - Page 123
OM Adapter 2 OM System Lenses MCON-P01 Macro Flash FL-14 Electronic Flash FL-50R Electronic Flash SRF-11 Ring Flash Set FL-36R Electronic Flash FL-300R Electronic Flash STF-22 Twin Flash Set RF-11 *2 Ring Flash FC-1 Macro Flash Controller TF-22 *2 Twin Flash *5 Some accessories may not - Olympus E-PM1 | E-PM1 Instruction Manual (English) - Page 124
q Playback Menu 107 d Setup Menu 80, 108 c Custom Menu 81, 108 # Accessory port menu 90, 110 R AF/MF 81 S Button/Dial 82 T Release/j 83 U Disp/8/PC 83 V Exp/p/ISO 84 W # Custom 85 X K/Color/WB 85 Y Record/Erase 86 Z Movie 87 b K Utility 88 A OLYMPUS PENPAL Share 90 B OLYMPUS PENPAL - Olympus E-PM1 | E-PM1 Instruction Manual (English) - Page 125
Compression rate 47 Continuous AF (C-AF 36 Converter lenses 102 Contrast 46 Copy All 72 Copyright Settings 87 Custom K 45 Custom white balance CWB 43 D Date/time setting X 9 Dial Direction 82 Dial Function 82 Digital ESP metering p 41 Digital Tele-converter 58, 89 Direct print 77 dpi - Olympus E-PM1 | E-PM1 Instruction Manual (English) - Page 126
84 ISO-Auto 84 ISO-Auto Set 84 J JPEG 47 JPEG Edit 67 L Lens 6, 100 Lithium ion battery 4, 100, 114 Lithium ion charger 4, 100 Live Control 22 Live Guide 20, 89 Live View Boost 83 Low Key 46 M Manual focus (MF 36 Manual shooting M 53 Metering 41 MF (manual focus 36, 89 MF Assist 82 - Olympus E-PM1 | E-PM1 Instruction Manual (English) - Page 127
Fix 67 Red-eye reduction flash 59 Reset Lens 81 Reset/Myset 35 Reset Protect 65, 90 Resizing Q 67 Rls 85 Shadow Adj 67 Sharpness 46 Shutter priority shooting S 52 Shutter speed 14, 52, 53 105 T Test Picture 89 Tone control 34, 40 Trimming P 67, 79 U Underwater wide/Underwater macro I/H - Olympus E-PM1 | E-PM1 Instruction Manual (English) - Page 128
10 83 or +49 40 - 237 73 48 99. Our Technical Customer Support is available from 9 am to 6 pm MET (Monday to Friday). Authorized Distributors United Kingdom: Olympus Service Department /Eire Olympus Imaging & Audio KeyMed House Stock Road Southend-on-Sea Essex SS2 5QH United Kingdom South - Olympus E-PM1 | E-PM1 Instruction Manual (English) - Page 129
9am to 9pm (Monday to Friday) ET VR876601
-
 1
1 -
 2
2 -
 3
3 -
 4
4 -
 5
5 -
 6
6 -
 7
7 -
8
-
9
-
10
-
11
-
12
-
13
-
14
-
15
-
16
-
17
-
18
-
19
-
20
-
21
-
22
-
23
-
24
-
25
-
26
-
27
-
28
-
29
-
30
-
31
-
32
-
33
-
34
-
35
-
36
-
37
-
38
-
39
-
40
-
41
-
42
-
43
-
44
-
45
-
46
-
47
-
48
-
49
-
50
-
51
-
52
-
53
-
54
-
55
-
56
-
57
-
58
-
59
-
60
-
61
-
62
-
63
-
64
-
65
-
66
-
67
-
68
-
69
-
70
-
71
-
72
-
73
-
74
-
75
-
76
-
77
-
78
-
79
-
80
-
81
-
82
-
83
-
84
-
85
-
86
-
87
-
88
-
89
-
90
-
91
-
92
-
93
-
94
-
95
-
96
-
97
-
98
-
99
-
100
-
101
-
102
-
103
-
104
-
105
-
106
-
107
-
108
-
109
-
110
-
111
-
112
-
113
-
114
-
115
-
116
-
117
-
118
-
119
-
120
-
121
-
122
-
123
-
124
-
125
-
126
-
127
-
128
-
129
 |
 |
Basic guide
Quick task index
Table of Contents
1.
Basic photography/frequently-
used options
2.
Other shooting options
3.
Flash shooting
4.
Shooting and viewing movies
5.
Playback options
6.
Sending and receiving images
7.
Using OLYMPUS Viewer 2/[ib]
8.
Printing pictures
9.
Camera setup
10.
Customizing camera settings
11.
Information
12.
SAFETY PRECAUTIONS
System chart
Index
Thank you for purchasing an Olympus digital camera. Before you start to use your new
camera, please read these instructions carefully to enjoy optimum performance and a longer
service life. Keep this manual in a safe place for future reference.
We recommend that you take test shots to get accustomed to your camera before taking
important photographs.
The screen and camera illustrations shown in this manual were produced during the
development stages and may differ from the actual product.
The contents in this manual are based on
fi
rmware version 1.0 for this camera. If there
are additions and/or modi
fi
cations of functions due to
fi
rmware update for the camera, the
contents will differ. For the latest information, please visit the Olympus website.
Instruction Manual
DIGITAL CAMERA