Olympus FE20 FE-360 Instruction Manual (English)
Olympus FE20 - 8.0 Megapixel Digital Camera Manual
 |
UPC - 050332166332
View all Olympus FE20 manuals
Add to My Manuals
Save this manual to your list of manuals |
Olympus FE20 manual content summary:
- Olympus FE20 | FE-360 Instruction Manual (English) - Page 1
Instruction Manual ● Thank you for purchasing an Olympus digital camera. Before you start to use your new camera, please read these instructions carefully to enjoy optimum performance and a longer service life. Keep this manual in a safe place for future reference. ● We recommend that you take test - Olympus FE20 | FE-360 Instruction Manual (English) - Page 2
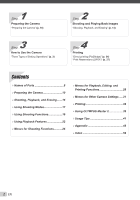
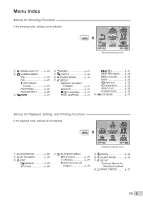
"Print Reservations (DPOF)" (p. 37) Contents ¾ Names of Parts 6 ¾ Preparing the Camera 10 ¾ Shooting, Playback, and Erasing.......14 ¾ Using Shooting , and Printing Functions 28 ¾ Menus for Other Camera Settings .....31 ¾ Printing 34 ¾ Using OLYMPUS Master 2 39 ¾ Usage Tips 41 ¾ Appendix - Olympus FE20 | FE-360 Instruction Manual (English) - Page 3
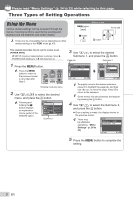
the previous screen in any Step after Step 2. IMAGE SILENT QUALITY MODE CAMERA RESET MENU SETUP P/AUTO SCENE DIS MODE EXIT MENU SET OK Shooting mode the E button displays an explanation (menu guide) of the selected option. SETUP 1 MEMORY FORMAT 2 BACKUP 3 ENGLISH PIXEL MAPPING EXIT - Olympus FE20 | FE-360 Instruction Manual (English) - Page 4
(exposure compensation) (p. 19) & button (macro) (p. 20) # button (ash) (p. 19) Y button (self-timer) (p. 20) g/E button (information display change/ menu guide) (p. 21, 22/p. 17) button (EASY PRINT) (p. 36) "/S button (backlight boost/erase) (p. 20/p. 16) Using the FUNC Menu (p. 21) Frequently - Olympus FE20 | FE-360 Instruction Manual (English) - Page 5
EXIT MENU SET OK Shooting mode top menu 1 D IMAGE QUALITY........ p. 24 2 K CAMERA MENU WB p. 25 ISO p. 25 R (Still images/ movies p. 25 PANORAMA p. 27 5 C P/AUTO p. 26 6 j SILENT MODE p. 33 7 x SETUP MEMORY FORMAT/ FORMAT p. 31 BACKUP p. 31 W (Language) ....... p. 31 PIXEL MAPPING - Olympus FE20 | FE-360 Instruction Manual (English) - Page 6
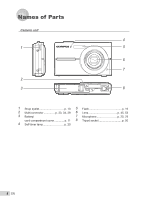
Names of Parts Camera unit 4 1 5 6 7 2 3 8 1 Strap eyelet p. 10 5 Flash p. 19 2 Multi-connector p. 33, 34, 39 6 Lens p. 45, 53 3 Battery/ 7 Microphone p. 25, 29 card compartment cover p. 11 8 Tripod socket p. 50 4 Self-timer lamp p. 20 6 EN - Olympus FE20 | FE-360 Instruction Manual (English) - Page 7
1 8 2 9 3 10 4 5 11 6 12 7 1 o button p. 13 10 g/E button 2 n/K button (shooting p. 14 (information display change/ 3 Card access lamp p. 46 menu guide p. 21, 22/p. 17 4 q button (playback p. 15 11 B button p. 3 5 Monitor p. 14, 41 12 Arrow pad p. 3 6 m button p. 3 F/P - Olympus FE20 | FE-360 Instruction Manual (English) - Page 8
p. 33 4 Macro/super macro p. 20 5 AF lock p. 17 6 Battery check p. 10 7 Flash standby/ camera shake warning/ flash charge p. 19, p. 41 8 AF target mark p. memory p. 47 12 Self-timer p. 20 13 Aperture value p. 14 14 Shutter speed p. 14 15 Exposure compensation p. 19 16 Compression/frame rate - Olympus FE20 | FE-360 Instruction Manual (English) - Page 9
of prints p. 37/p. 36 elapsed time/ 3 Adding sound p. 29 total recording time p. 15, 16 4 Protect p. 29 12 Current memory p. 47 5 Battery check p. 10 13 Compression/frame rate p. 24 6 Aperture value p. 14 14 ISO p. 25 7 Exposure compensation p. 19 15 Date and time p. 13 8 White - Olympus FE20 | FE-360 Instruction Manual (English) - Page 10
Charging the battery Lithium ion battery 3 ▼ Battery charger Digital camera Strap LI-42B Lithium Ion Battery LI-40C Battery Charger USB cable AV cable OLYMPUS Master 2 CD-ROM microSD Attachment Other accessories not shown: Instruction Manual (this manual), warranty card. Contents may - Olympus FE20 | FE-360 Instruction Manual (English) - Page 11
direction of the arrow to unlock, and then remove the battery. This camera allows the user to take pictures using the internal memory even when no xD-Picture Card (sold separately) is inserted. "Using an xD-Picture Card" (p. 46) "Number of storable pictures (still pictures)/recording length (movies - Olympus FE20 | FE-360 Instruction Manual (English) - Page 12
be referred to as microSD card) is also compatible with this camera using the microSD Attachment. "Using the microSD Attachment" (p. 48) 1 Insert the microSD card into the microSD Attachment. Insert the card entirely into the attachment. Arrow pad and operation guide The symbols 1243, displayed - Olympus FE20 | FE-360 Instruction Manual (English) - Page 13
is selectable. 1 Press the m button, and press klmn to select [x SETUP]. IMAGE SILENT QUALITY MODE CAMERA RESET MENU SETUP P/AUTO SCENE DIS MODE EXIT MENU SET OK 2 Press the B button. SETUP 1 MEMORY FORMAT 2 BACKUP 3 ENGLISH PIXEL MAPPING EXIT MENU NO SET OK 3 Use kl to select [W] and - Olympus FE20 | FE-360 Instruction Manual (English) - Page 14
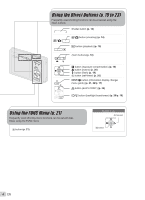
follows: 1 Press the B button. Current shooting mode display P Vertical grip 3 Press the shutter button halfway down to focus on the subject. ● When the camera focuses on the subject, the exposure is locked (shutter speed and aperture value are displayed), and the AF target mark changes to green - Olympus FE20 | FE-360 Instruction Manual (English) - Page 15
the picture, gently press the shutter button all the way down while being careful not to shake the camera. Viewing images 1 Press the q button. AUTO Press fully 1/400 F3.1 Image review screen To view images during shooting Pressing the q button enables playback of images. To return to shooting - Olympus FE20 | FE-360 Instruction Manual (English) - Page 16
Operations during movie playback Fast-forward: Press and hold down n. Rewind: Press and hold down m. Pause: Press the B button. Elapsed time/ Total recording time 2008.10.26 12:30 100-0004 IN 00:12 /00:34 During playback First (last) frame/frame advance: During pause, press k to display the first - Olympus FE20 | FE-360 Instruction Manual (English) - Page 17
AUTO To take underwater photos (Available in the FE-360/X-875/C-570 only) Select [k UNDERWATER WIDE1], [l UNDERWATER WIDE2]*1, [H UNDERWATER MACRO]. *1 When set to [l UNDERWATER WIDE2], the focus distance is automatically fixed to approx. 5.0 m (16.4 ft.). Be sure to use an underwater case. WB AUTO - Olympus FE20 | FE-360 Instruction Manual (English) - Page 18
mode) 1 Confirm the mode indicator is n. A mode indicator 8M NORM IN 4 Using the digital image stabilization mode (h mode) This mode enables the user to reduce blurring that is caused by a camera shake and subject movement. 1 Press the B button. Current shooting mode display AUTO QVGA 15 IN 00 - Olympus FE20 | FE-360 Instruction Manual (English) - Page 19
The zoom bar appearance identifies the status of the digital zoom. When using optical zoom and digital zoom 2 Use mn to select the setting option, and Exposure compensation) The standard brightness (appropriate exposure) set by the camera based on the shooting mode can be adjusted brighter or darker - Olympus FE20 | FE-360 Instruction Manual (English) - Page 20
Shooting closeups (Macro shooting) This function enables the camera to focus and shoot subjects at close distances. 1 Press the & button. P OFF SET OK OFF % & OFF 2 Use mn to select the setting option, and press - Olympus FE20 | FE-360 Instruction Manual (English) - Page 21
Changing the shooting information display The display of the screen information can be changed to best match the situation, such as for the need of clear view of the screen or for making a precise composition by using the grid display. 1 Press the g button. ● The displayed shooting information - Olympus FE20 | FE-360 Instruction Manual (English) - Page 22
Using Playback Features Index view and closeup view Index view enables quick selection of a target image. Closeup view (up to 10x magnification) allows checking of image details. 1 Press the zoom buttons. Single-image view W Closeup view Changing the image information display Shooting information - Olympus FE20 | FE-360 Instruction Manual (English) - Page 23
kl to select [YES], and press the B button. Erasing a picture from My Favorite does not erase the original picture recorded in the internal memory or to the card. To return to normal playback mode 1 Press the m button while playing back My Favorite images. 2 Use kl to [EXIT], press B button. 5 Use - Olympus FE20 | FE-360 Instruction Manual (English) - Page 24
sites. Suitable for playing pictures on wide screen TV. Shooting at high quality. Shooting at normal quality. Movies Submenu 1 IMAGE SIZE FRAME RATE Submenu 2 VGA (640×480) / QVGA (320×240) N 30fps*1/ O 15fps*1 *1 frames per second Application Select the image quality based on the image size - Olympus FE20 | FE-360 Instruction Manual (English) - Page 25
2 AUTO 64/100/200/400/ 800/1000 Application The camera automatically adjusts the sensitivity according to the shooting scene. The value No sound is recorded. Sound is recorded. When set to [ON], only the digital zoom can be used during movie recording. To record the movie with the optical zoom - Olympus FE20 | FE-360 Instruction Manual (English) - Page 26
CAMERA MENU X PANORAMA n/D: P f h Panorama shooting lets you create a panoramic picture, using the OLYMPUS Master 2 software on the provided CD-ROM. An Olympus xD-Picture Card is required for panoramic shooting. Cards by other manufacturers do not support shot. ● The part of the previous picture - Olympus FE20 | FE-360 Instruction Manual (English) - Page 27
UNDERWATER WIDE1*2/ l UNDERWATER WIDE2*2/ H UNDERWATER MACRO*2 *1 When the subject is dark, noise reduction is automatically activated. This approximately doubles the shooting time, during which no other pictures can be taken. *2 Available in the FE-360 Menu functions in [K CAMERA MENU] (p. 24 to - Olympus FE20 | FE-360 Instruction Manual (English) - Page 28
this camera. To listen to the sound, connect to a TV or PC. Registering images to the internal memory . ● The selected image is registered to the internal memory as a separate My Favorite image. Changing the image memory. The following is not available for registered My Favorite images: - Olympus FE20 | FE-360 Instruction Manual (English) - Page 29
ALL ERASE Application Images are individually selected and erased. All images in the internal memory or card will be erased. When erasing pictures in the internal memory, do not insert the card into the camera. When erasing pictures from the card, insert a card into the camera in advance. EN 29 - Olympus FE20 | FE-360 Instruction Manual (English) - Page 30
to the image data [< PRINT ORDER] < PRINT ORDER "Print reservations (DPOF)" (p. 37) Print reservation can be set only for still images that are recorded to a card. 30 EN - Olympus FE20 | FE-360 Instruction Manual (English) - Page 31
the internal memory or card. Non-Olympus cards and cards that have been formatted by a computer must be formatted with this camera before use. taking or viewing pictures before performing pixel mapping. If the camera is turned off during pixel mapping, be sure to perform it again. To adjust the - Olympus FE20 | FE-360 Instruction Manual (English) - Page 32
Still REC • Face detect All shooting settings, except for P mode, [IMAGE QUALITY], and the selected scene mode, return to default settings when the camera is turned off. Setting the date and time [X] x SETUP X X "Setting the date and time" (p. 13) To select the date display order 1 Press n after - Olympus FE20 | FE-360 Instruction Manual (English) - Page 33
"VIDEO (an input jack connected to the camera)." For details on changing the input source of the TV, refer to the TV's instruction manual. 4 Press the q button, and use turns off to save battery power. To resume standby mode Press any button. Turning off the camera sounds [j SILENT MODE] - Olympus FE20 | FE-360 Instruction Manual (English) - Page 34
you can print images directly without using a computer. To find out if your printer supports PictBridge, refer to the printer's instruction manual. *1 PictBridge is a standard for connecting digital cameras and printers of different makers and printing out pictures directly. The printing modes, paper - Olympus FE20 | FE-360 Instruction Manual (English) - Page 35
the B button. Submenu 2 Application PRINT This prints the image selected in Step 6. ALL PRINT This prints all images stored in the internal memory or card. MULTI PRINT This prints one image in a multiple layout format. ALL INDEX This prints an index of all images stored in the internal - Olympus FE20 | FE-360 Instruction Manual (English) - Page 36
CANCEL OK CONTINUE CANCEL SET OK 11 Press the m button. 12 When the message [REMOVE USB CABLE] is displayed, disconnect the USB cable from the camera and printer. PRINT CANCEL BACK MENU SET OK 36 EN - Olympus FE20 | FE-360 Instruction Manual (English) - Page 37
. This enables easy printing at a printer or print shop supporting DPOF by using only the print reservations on the card without a computer or a camera. *1 DPOF is a standard for storing automatic printout information from digital cameras. Print reservations can be set only for the images stored on - Olympus FE20 | FE-360 Instruction Manual (English) - Page 38
Reserving one print each of all images on the card [U] Resetting the print reservation data for selected images 1 Follow Steps 1 and 2 in [ - Olympus FE20 | FE-360 Instruction Manual (English) - Page 39
appears after starting the software. When you start OLYMPUS Master 2 for the first time after installation, "Default Settings" and "Registration" screen appear. Follow the instructions on the screen. Locate the position of the USB port by referring to your computer's instructions manual. 3 Use kl to - Olympus FE20 | FE-360 Instruction Manual (English) - Page 40
the Guide. For details on the operation, refer to the help guide of the software. Transferring and saving images without using OLYMPUS Master 2 This camera is operation is not guaranteed in the following cases. ● computers with USB ports installed using an expansion card, etc. ● computers without a - Olympus FE20 | FE-360 Instruction Manual (English) - Page 41
xD-Picture CardTM (sold separately) into the camera" (p. 11) ● Battery performance may have been reduced temporarily due to low temperature. Take the batteries out of the camera, and warm them by putting them in your pocket for a while. Card/Internal memory "An error message is displayed". "Error - Olympus FE20 | FE-360 Instruction Manual (English) - Page 42
selected image Use photo retouch software, etc. to edit the image on a computer. CARD-COVER OPEN g BATTERY EMPTY Operation problem Close the battery/card compartment cover. Battery problem Charge the battery. NO CONNECTION Connection problem Connect the camera and computer or printer correctly - Olympus FE20 | FE-360 Instruction Manual (English) - Page 43
subjects where autofocus is difficult In the following cases, after focusing on an object (by pressing the effective to compose the shot by holding the camera vertically to focus, and then returning to the whites as they appear. When taking pictures of black subjects, on the other hand, it is - Olympus FE20 | FE-360 Instruction Manual (English) - Page 44
quality Taking sharper pictures ● Taking pictures with the optical zoom Avoid using digital zoom (p. 19) to take pictures. ● Taking pictures at a internal memory and card" "Loading the battery and the xD-Picture card™ (sold separately) into the camera" (p. 11) "Using the microSD card/microSDHC card - Olympus FE20 | FE-360 Instruction Manual (English) - Page 45
the battery and card, and keep in a cool, dry place that is well ventilated. • Periodically insert the battery and test the camera functions. Avoid leaving the camera in places where chemical products are handled since this may result in corrosion. Battery and charger • This camera uses one Olympus - Olympus FE20 | FE-360 Instruction Manual (English) - Page 46
IMAGE], or [ALL ERASE] is performed, the data in the card is not completely erased. When disposing of the card, damage the card to prevent the disclosure of personal data. Readout/recording process of the card Never open the battery/card compartment cover while the camera is reading or writing data - Olympus FE20 | FE-360 Instruction Manual (English) - Page 47
SIZE C 640×480 E 320×240 FRAME RATE N O N O Recording length Internal memory Using a 1 GB xD-Picture Card With sound Without sound With sound Without sound connect the camera to a computer or other device to save the images, and then erase the images in the internal memory or card. [ERASE] - Olympus FE20 | FE-360 Instruction Manual (English) - Page 48
Attachment SAFETY PRECAUTIONS Do not use the attachment with Olympus digital cameras that do not support this microSD Attachment, as well as with other brands of digital cameras, computers, printers, and other devices that support xD-Picture Card. Doing so not only may damage the pictures taken - Olympus FE20 | FE-360 Instruction Manual (English) - Page 49
entangled in the camera strap, causing strangulation. • Accidentally swallowing the battery, cards or other small parts. • Accidentally fi Card or the microSD Attachment into the camera. If you insert a card by mistake, such as a microSD card, do not use force. Contact authorized distributors/service - Olympus FE20 | FE-360 Instruction Manual (English) - Page 50
electrical shocks or burns. DANGER • The camera uses a lithium ion battery specified by Olympus. Charge the battery with the specified charger. Do not use any other chargers. • Never heat or incinerate batteries. • Take precautions when carrying or storing batteries to prevent them from coming into - Olympus FE20 | FE-360 Instruction Manual (English) - Page 51
Handling Precautions • This camera uses a lithium ion battery specified by Olympus. Do not use any other type of battery. • If the battery's terminals get wet or greasy, camera contact failure may result. Wipe the battery well with a dry cloth before use. • Always charge a battery when using it for - Olympus FE20 | FE-360 Instruction Manual (English) - Page 52
may violate applicable copyright laws. Olympus assumes no responsibility for unauthorized photographing, use or other acts that infringe upon the rights of copyright owners. Copyright Notice All rights reserved. No part of these written materials or this software may be reproduced or used in - Olympus FE20 | FE-360 Instruction Manual (English) - Page 53
. 18 power supply cord, rated for 125 V 7 A, with a non-polarized NEMA 1-15P plug rated for 125 V 15 A". C C C C BF Asia Countries/Regions China Hong Kong India Indonesia Japan Korea (rep) Malaysia Philippines Singapore Taiwan Thailand Vietnam Voltage 220 200/220 230/240 127/230 100 220 240 220/ - Olympus FE20 | FE-360 Instruction Manual (English) - Page 54
not be obligated to perform preventive maintenance, installation, deinstallation, or maintenance. Olympus reserves the right to (i) use reconditioned, refurbished, and/or serviceable used parts (that meet Olympus's quality assurance standards) for warranty or any other repairs and (ii) make any - Olympus FE20 | FE-360 Instruction Manual (English) - Page 55
such products and accessories in accordance with the terms and duration of such manufacturers' warranties); (b) any Product which has been disassembled, repaired, tampered with, altered, changed, or modified by persons other than Olympus's own authorized service personnel unless repair by others is - Olympus FE20 | FE-360 Instruction Manual (English) - Page 56
the Product (unless it is a model on which Olympus does not place and record serial numbers). 3 A detailed description of the problem. 4 Sample prints, negatives, digital prints (or files on disk) if available and related to the problem. When service is completed, the Product will be returned to you - Olympus FE20 | FE-360 Instruction Manual (English) - Page 57
mm (D) (1.2 × 1.5 × 0.2 in.) Weight : Approx. 15 g (0.5 oz) Battery charger (LI-40C) Power requirements : AC 100 to 240 V (50 to 60 Hz) Approx. 65 g (2.5 oz) microSD Attachment Product type : Attachment for microSD card Operating Environment Temperature : -10 to 40 °C (14 °F to 104 °F) ( - Olympus FE20 | FE-360 Instruction Manual (English) - Page 58
Humidity : 30 % to 90 % (operation)/10 % to 90 % (storage) Power supply : One Olympus lithium ion battery (LI-42B / LI-40B) Dimensions : FE-360/X-875/C-570: 93.9 mm (W) × 55.6 mm (H) × 20.3 mm (D) (3.7 × 2.2 × 0.8 in.) (excluding protrusions) FE-20/X-15/C-25: 95.9 mm (W) × 57.2 mm (H) × 21.5 mm - Olympus FE20 | FE-360 Instruction Manual (English) - Page 59
boost 20 Frame rate 24 BACKUP 31 FUNC menu 21 Battery charger 10, 45 Beep Card microSD Card 12, 48 Lithium ion Battery 10, 11, 45 xD-Picture Card 11, 46 Compression 24 M Connecting PC 39 Macro 20 Printer 34 Maintenance TV 33 Camera care 45 CUSTOM PRINT 35 PIXEL MAPPING 31 MEMORY - Olympus FE20 | FE-360 Instruction Manual (English) - Page 60
, 27 Self-timer 20 Shooting 14 Shooting movies n 18 SILENT MODE j 33 SLIDESHOW y 28 Sound recording R 25 Strap 10 SUPER MACRO 20 T Turning on the camera 13 K n/q 31 U USB cable 34, 39 Using the Menu 3 V VIDEO OUT 33 60 EN - Olympus FE20 | FE-360 Instruction Manual (English) - Page 61
MEMO EN 61 - Olympus FE20 | FE-360 Instruction Manual (English) - Page 62
Printed in China VS865901
-
 1
1 -
 2
2 -
 3
3 -
 4
4 -
 5
5 -
 6
6 -
 7
7 -
8
-
9
-
10
-
11
-
12
-
13
-
14
-
15
-
16
-
17
-
18
-
19
-
20
-
21
-
22
-
23
-
24
-
25
-
26
-
27
-
28
-
29
-
30
-
31
-
32
-
33
-
34
-
35
-
36
-
37
-
38
-
39
-
40
-
41
-
42
-
43
-
44
-
45
-
46
-
47
-
48
-
49
-
50
-
51
-
52
-
53
-
54
-
55
-
56
-
57
-
58
-
59
-
60
-
61
-
62
 |
 |
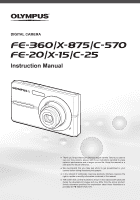
DIGITAL CAMERA
●
Thank you for purchasing an Olympus digital camera. Before you start to
use your new camera, please read these instructions carefully to enjoy
optimum performance and a longer service life. Keep this manual in a
safe place for future reference.
●
We recommend that you take test shots to get accustomed to your
camera before taking important photographs.
●
In the interest of continually improving products, Olympus reserves the
right to update or modify information contained in this manual.
●
The screen and camera illustrations shown in this manual were produced
during the development stages and may differ from the actual product.
Unless otherwise speci
ed, the explanation about these illustrations is
provided for FE-360/X-875/C-570.
Instruction Manual