Onkyo HT-S6300 Owner Manual - Page 21
Connecting Onkyo, Components, Step 1
 |
View all Onkyo HT-S6300 manuals
Add to My Manuals
Save this manual to your list of manuals |
Page 21 highlights
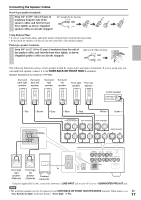
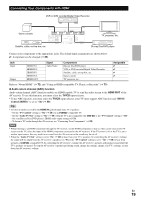
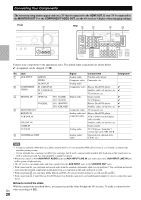
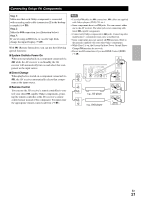
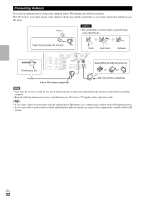
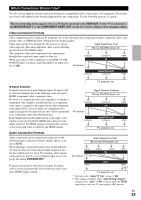
Connecting Onkyo V Components Step 1: Make sure that each Onkyo component is connected with an analog audio cable (connection % in the hookup examples) (➔ 20). Step 2: Make the V connection (see illustration below). Step 3: If you're using an RI Dock, or cassette tape deck, change the Input Display (➔ 27). With V (Remote Interactive), you can use the following special functions: ■ System On/Auto Power On When you start playback on a component connected via V while the AV receiver is on Standby, the AV receiver will automatically turn on and select that component as the input source. ■ Direct Change When playback is started on a component connected via V, the AV receiver automatically selects that component as the input source. ■ Remote Control You can use the AV receiver's remote controller to control your other V-capable Onkyo components, pointing the remote controller at the AV receiver's remote control sensor instead of the component. You must enter the appropriate remote control code first (➔ 61). Note • Use only V cables for V connections. V cables are supplied with Onkyo players (DVD, CD, etc.). • Some components have two V jacks. You can connect either one to the AV receiver. The other jack is for connecting additional V-capable components. • Connect only Onkyo components to V jacks. Connecting other manufacturer's components may cause a malfunction. • Some components may not support all V functions. Refer to the manuals supplied with your other Onkyo components. • While Zone 2 is on, the System On/Auto Power On and Direct Change V functions do not work. • Do not use RI connections if you use HDMI Control (RIHD) (➔ 49). IN L R TV/CD REMOTE CONTROL IN L R BD/DVD e.g., CD player e.g., DVD player R L ANALOG AUDIO OUT R L ANALOG AUDIO OUT En 21
-
 1
1 -
2
-
3
-
4
-
5
-
6
-
7
-
8
-
9
-
10
-
11
-
12
-
13
-
14
-
15
-
 16
16 -
 17
17 -
 18
18 -
 19
19 -
 20
20 -
 21
21 -
 22
22 -
 23
23 -
 24
24 -
 25
25 -
 26
26 -
27
-
28
-
29
-
30
-
31
-
32
-
33
-
34
-
35
-
36
-
37
-
38
-
39
-
40
-
41
-
42
-
43
-
44
-
45
-
46
-
47
-
48
-
49
-
50
-
51
-
52
-
53
-
54
-
55
-
56
-
57
-
58
-
59
-
60
-
61
-
62
-
63
-
64
-
65
-
66
-
67
-
68
-
69
-
70
-
71
-
72
-
73
-
74
-
75
-
76
 |
 |