Onkyo HT-S6300 Owner Manual - Page 5

Contents, Using the Remote Controller - home theater system

Page 5 highlights

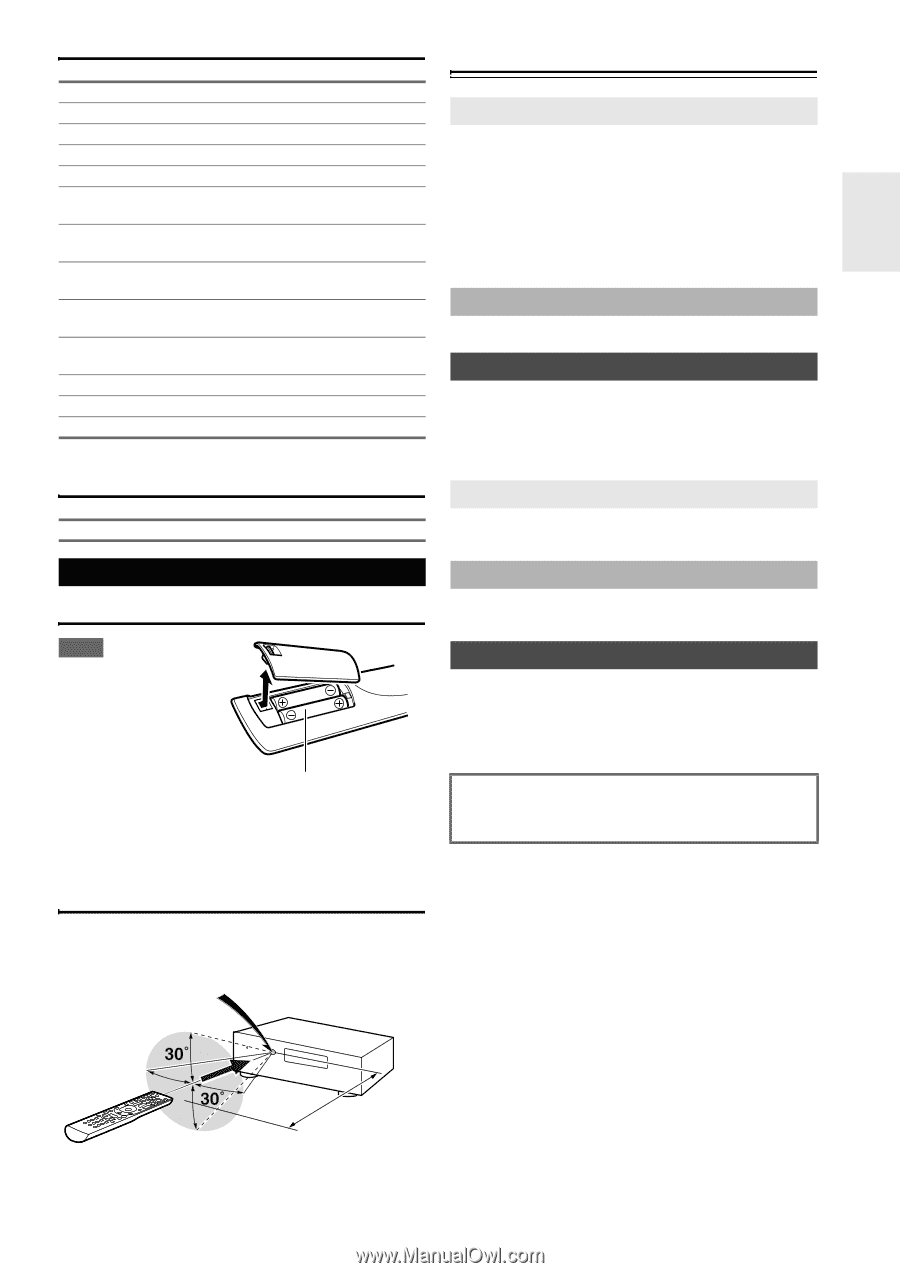
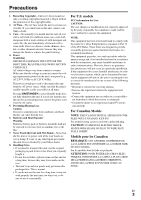
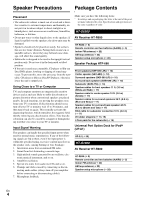
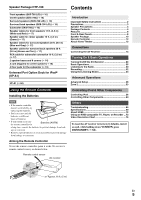
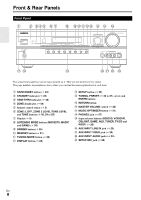
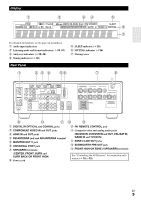
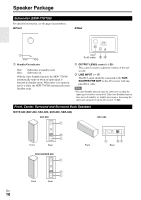
Speaker Package HTP-780 Contents Front speakers (SKF-780 L/R) (➔ 10) Center speaker (SKC-780) (➔ 10) Surround speakers (SKR-780 L/R) (➔ 10) Surround back speakers (SKB-780 L/R) (➔ 10) Subwoofer (SKW-780) (➔ 10) Speaker cables for front speakers 11 ft. (3.5 m) (White and Red) (➔ 17) Speaker cable for center speaker 10 ft. (3.0 m) (Green) (➔ 17) Speaker cables for surround speakers 26 ft. (8.0 m) (Blue and Gray) (➔ 17) Speaker cables for surround back speakers 26 ft. (8.0 m) (Brown and Tan) (➔ 17) RCA cable for subwoofer connection 10 ft. (3.0 m) (➔ 17) 2 speaker bases and 8 screws (➔ 14) 4 cork stoppers for center speaker (➔ 15) 4 floor pads for the subwoofer (➔ 15) Universal Port Option Dock for iPod® (UP-A1) UP-A1 (➔ 56) Using the Remote Controller Installing the Batteries Note • If the remote controller doesn't work reliably, try replacing the batteries. • Don't mix new and old batteries or different types of batteries. • If you intend not to use the remote controller for Batteries (AA/R6) a long time, remove the batteries to prevent damage from leak- age or corrosion. • Remove expired batteries as soon as possible to prevent damage from leakage or corrosion. Aiming the Remote Controller To use the remote controller, point it at the AV receiver's remote control sensor, as shown below. Remote control sensor AV receiver Introduction Important Safety Instructions 2 Precautions 3 Speaker Precautions 4 Package Contents 4 Features 6 Front & Rear Panels 8 Speaker Package 10 Remote Controller 12 About Home Theater 13 Connections Connecting the AV Receiver 14 Turning On & Basic Operations Turning On/Off the AV Receiver 24 Basic Operations 25 Listening to the Radio 30 Recording 32 Using the Listening Modes 33 Advanced Operations Advanced Setup 38 Zone 2 53 Controlling iPod & Other Components Controlling iPod 56 Controlling Other Components 60 Others Troubleshooting 64 Specifications 69 About HDMI 72 Using an RIHD-compatible TV, Player, or Recorder ... 73 Video Resolution Chart 75 To reset the AV receiver to its factory defaults, turn it on and, while holding down VCR/DVR, press ON/STANDBY (➔ 64). Approx. 16 ft. (5 m) En 5

  • 1
  • 2
  • 3
  • 4
  • 5
  • 6
  • 7
  • 8
  • 9
  • 10
  • 11
  • 12
  • 13
  • 14
  • 15
  • 16
  • 17
  • 18
  • 19
  • 20
  • 21
  • 22
  • 23
  • 24
  • 25
  • 26
  • 27
  • 28
  • 29
  • 30
  • 31
  • 32
  • 33
  • 34
  • 35
  • 36
  • 37
  • 38
  • 39
  • 40
  • 41
  • 42
  • 43
  • 44
  • 45
  • 46
  • 47
  • 48
  • 49
  • 50
  • 51
  • 52
  • 53
  • 54
  • 55
  • 56
  • 57
  • 58
  • 59
  • 60
  • 61
  • 62
  • 63
  • 64
  • 65
  • 66
  • 67
  • 68
  • 69
  • 70
  • 71
  • 72
  • 73
  • 74
  • 75
  • 76

5
En
Speaker Package HTP-780
Universal Port Option Dock for iPod
®
(UP-A1)
Installing the Batteries
Note
If the remote controller
doesn’t work reliably, try
replacing the batteries.
Don’t mix new and old
batteries or different
types of batteries.
If you intend not to use
the remote controller for
a long time, remove the batteries to prevent damage from leak-
age or corrosion.
Remove expired batteries as soon as possible to prevent damage
from leakage or corrosion.
Aiming the Remote Controller
To use the remote controller, point it at the AV receiver’s
remote control sensor, as shown below.
Contents
Important Safety Instructions
.........................................
2
Precautions
.......................................................................
3
Speaker Precautions
........................................................
4
Package Contents
............................................................
4
Features
............................................................................
6
Front & Rear Panels
.........................................................
8
Speaker Package
............................................................
10
Remote Controller
..........................................................
12
About Home Theater
......................................................
13
Connecting the AV Receiver
.........................................
14
Turning On/Off the AV Receiver
...................................
24
Basic Operations
............................................................
25
Listening to the Radio
....................................................
30
Recording
........................................................................
32
Using the Listening Modes
............................................
33
Advanced Setup
.............................................................
38
Zone 2
..............................................................................
53
Controlling iPod
.............................................................
56
Controlling Other Components
.....................................
60
Troubleshooting
.............................................................
64
Specifications
.................................................................
69
About HDMI
.....................................................................
72
Using an RIHD-compatible TV, Player, or Recorder ... 73
Video Resolution Chart
..................................................
75
Front speakers (SKF-780 L/R) (
10)
Center speaker (SKC-780) (
10)
Surround speakers (SKR-780 L/R) (
10)
Surround back speakers (SKB-780 L/R) (
10)
Subwoofer (SKW-780) (
10)
Speaker cables for front speakers 11 ft. (3.5 m)
(White and Red) (
17)
Speaker cable for center speaker 10 ft. (3.0 m)
(Green) (
17)
Speaker cables for surround speakers 26 ft. (8.0 m)
(Blue and Gray) (
17)
Speaker cables for surround back speakers 26 ft.
(8.0 m) (Brown and Tan) (
17)
RCA cable for subwoofer connection 10 ft. (3.0 m)
(
17)
2 speaker bases and 8 screws (
14)
4 cork stoppers for center speaker (
15)
4 floor pads for the subwoofer (
15)
UP-A1 (
56)
Using the Remote Controller
Batteries (AA/R6)
Remote control sensor
AV receiver
Approx. 16 ft. (5 m)
Introduction
Connections
Turning On & Basic Operations
Advanced Operations
Controlling iPod & Other Components
Others
To reset the AV receiver to its factory defaults, turn it
on and, while holding down
VCR/DVR
, press
ON/STANDBY
(
64
).