Onkyo HT-S6300 Owner Manual - Page 54
Setting the Powered Zone 2, Using Zone 2, Controlling Zone 2 from the AV receiver
 |
View all Onkyo HT-S6300 manuals
Add to My Manuals
Save this manual to your list of manuals |
Page 54 highlights
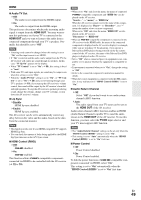
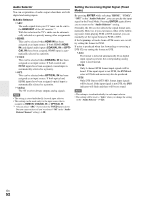
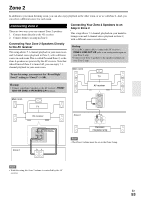
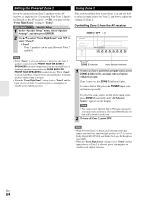
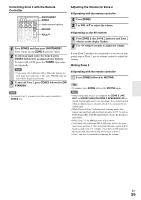
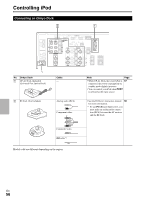
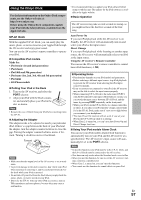
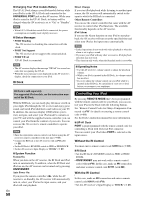
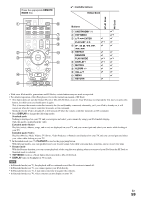
Setting the Powered Zone 2 If you've connected your Zone 2 speakers to the AV receiver, as explained in "Connecting Your Zone 2 Speakers Directly to the AV receiver" (➔ 53), you must set the "Front High/Zone2" setting to "Zone2". Main menu Speaker Setup 1 In the "Speaker Setup" menu, select "Speaker Settings", and then press ENTER. 2 Use R/X to select "Front High/Zone2" and F/S to select "Zone2". ` Zone2: Zone 2 speakers can be used (Powered Zone 2 enabled). Using Zone 2 This section explains how to turn Zone 2 on and off, how to select an input source for Zone 2, and how to adjust the volume for Zone 2. Controlling Zone 2 from the AV receiver ZONE 2 OFF - /+ Note • When "Zone2" is selected and Zone 2 turned on, the Zone 2 speakers connected to the FRONT HIGH OR ZONE 2 SPEAKERS terminals output sound, but the surround back or front high speakers connected to the SURR BACK OR FRONT HIGH SPEAKERS terminals do not. When "Zone2" is selected and Zone 2 turned off, the surround back or front high speakers output sound as normal. • When the "Front High/Zone2" setting is set to "Zone2" and the input selector of Zone 2 is selected, power consumption on standby mode slightly increases. ZONE 2 indicator Input selector buttons 1 To turn on Zone 2 and select an input source, press ZONE 2 followed by an input selector button within 8 seconds. Zone 2 turns on, the ZONE 2 indicator lights. To select AM or FM, press the TUNER input selector button repeatedly. To select the same source as that of the main room, press ZONE 2 repeatedly until "Z2 Selector: Source" appears on the display. Note • You cannot select different AM or FM radio stations for your main room and Zone 2. The same FM/AM radio station will be heard in each room. 2 To turn off Zone 2, press OFF. Note • While Powered Zone 2 is being used, listening modes that require surround back and front high speakers (6.1/7.1), such as Dolby Digital EX, DTS-ES, and Dolby Pro Logic IIz Height are unavailable. • When the "Front High/Zone2" setting is set to "Zone2" and the input selector of Zone 2 is selected, power consumption on standby mode slightly increases. En 54
-
 1
1 -
2
-
3
-
4
-
5
-
6
-
7
-
8
-
9
-
10
-
11
-
12
-
13
-
14
-
15
-
16
-
17
-
18
-
19
-
20
-
21
-
22
-
23
-
24
-
25
-
26
-
27
-
28
-
29
-
30
-
31
-
32
-
33
-
34
-
35
-
36
-
37
-
38
-
39
-
40
-
41
-
42
-
43
-
44
-
45
-
46
-
47
-
48
-
 49
49 -
 50
50 -
 51
51 -
 52
52 -
 53
53 -
 54
54 -
 55
55 -
 56
56 -
 57
57 -
 58
58 -
 59
59 -
60
-
61
-
62
-
63
-
64
-
65
-
66
-
67
-
68
-
69
-
70
-
71
-
72
-
73
-
74
-
75
-
76
 |
 |