Onkyo TX-DS575x Owner Manual - Page 19
When Multi channel input is selected as a source, Using the Power On Volume function
 |
View all Onkyo TX-DS575x manuals
Add to My Manuals
Save this manual to your list of manuals |
Page 19 highlights
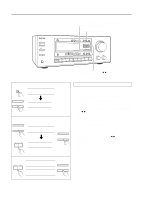
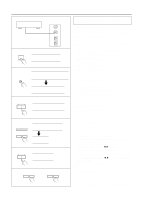
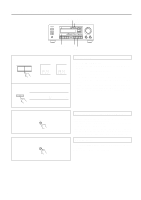
Selecting a sound source 1 2 4-1 4-2 LEFT SUBWOOFER CENTER L-SURROUND RIGHT R-SURROUND When Multi channel input is selected as a source Follow the steps below to adjust the level of each speaker if you have selected MULTI CH INPUT. 1. Press MODE AUDIO button on the remote controller. 2. Press MULTI CH button on the remote controller. You cannot select any listening mode. 3. Play the device connected to the MULTI CHANNEL INPUT jack. 4. Adjust the volume level of each speaker. 4-1. Press the CH SEL button to select the desired speakers. 4-2. Use the LEVEL +/- button to change the volume level of the speakers. You can adjust the volume level of each speaker individually. Adjust the level while listening to the sound in the listening position. You can adjust the level of the front, center, and surround speakers in the range between -12dB and +12dB. You can adjust the subwoofer level in the range between - 30dB and +12dB. Note • Adjusting the volume level of each speaker for the MULTI CH INPUT source does not affect the speaker level adjusted by the Test Tone function, and vice versa. • If the speaker level is set to +1dB or higher, the maximum level indicated on the display will change if you raise the volume level. Refer to "About volume (VOLUME)" on page 20 for more information. SP/SYS 1 SETUP 2 ENTER or ENTER / SCAN PRESET/ MODE ADJ DOW N UP DOWN 3 MASTER VOLUME UP 4 ENTER or ENTER / SCAN Using the Power On Volume function This function automatically selects the volume level you set last time. Follow the steps below: How to set the Power On Volume function: 1. Press the SP/SYS SETUP button repeatedly to select "POWER ON VOLUME." 2. Press the ENTER/SCAN or ENTER button. The unit displays "PWR ON VOL=OFF" or the current volume level. If "PWR ON VOL=OFF" appears, press the PRESET/MODE ADJ√/® button to display the current level (PWR ON VOL=XX). 3. Use the MASTER VOLUME control to set the desired level. 4. Press the ENTER/SCAN or ENTER button to complete the setting. Note: If the PWR ON VOL parameter is set to OFF, the Power On Volume function is disabled. In this case, when you turn on the power to the unit next time, it will use the volume level that was set when you turned off the power. 19
-
 1
1 -
2
-
3
-
4
-
5
-
6
-
7
-
8
-
9
-
10
-
11
-
12
-
13
-
 14
14 -
 15
15 -
 16
16 -
 17
17 -
 18
18 -
 19
19 -
 20
20 -
 21
21 -
 22
22 -
 23
23 -
 24
24 -
25
-
26
-
27
-
28
-
29
-
30
-
31
-
32
-
33
-
34
-
35
-
36
-
37
-
38
-
39
-
40
-
41
-
42
-
43
-
44
 |
 |
