Onkyo TX-SR373 Owners Manual - English
Onkyo TX-SR373 Manual
 |
View all Onkyo TX-SR373 manuals
Add to My Manuals
Save this manual to your list of manuals |
Onkyo TX-SR373 manual content summary:
- Onkyo TX-SR373 | Owners Manual - English - Page 1
Operating Instructions AV RECEIVER TX-SR373 - Onkyo TX-SR373 | Owners Manual - English - Page 2
Distance 29 The Input Assign menu 29 The Auto Power Down menu 29 The HDMI Setup menu 30 7 Additional information Troubleshooting 31 General 31 HDMI 32 Important information regarding the HDMI connection 32 USB messages 32 Resetting the main unit 33 Cleaning the unit 33 Specifications - Onkyo TX-SR373 | Owners Manual - English - Page 3
that you've received the following supplied accessories: • Setup microphone • Remote control • AAA size IEC R03 dry cell batteries (to confirm system operation) x2 • AM loop antenna • FM wire antenna • Quick start guide • Safety Brochure *This document is an online instruction manual. It is not - Onkyo TX-SR373 | Owners Manual - English - Page 4
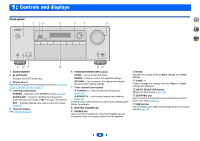
USB MASTER VOLUME 8 2 4 31 PHONES TONE SETUP MIC USB 5V / 0.5A AV RECEIVER TX-SR373 9 10 11 12 1 ÍON/STANDBY 2 BLUETOOTH Switches to the BT Audio input 3 Remote sensor Receives the signals from the remote control (see Operating range of remote control on page 7). 4 Listening mode buttons - Onkyo TX-SR373 | Owners Manual - English - Page 5
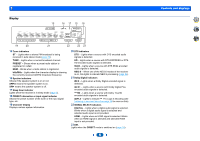
. kHz/MHz - Lights when the character display is showing the currently received AM/FM broadcast frequency. 16 Speaker indicators Shows if the speaker system the speaker system is off. 17 Sleep timer indicator Lights when the receiver is in sleep mode (page 6). 18 PRESET information or input signal - Onkyo TX-SR373 | Owners Manual - English - Page 6
Onkyo components with the remote control. 3 USB control buttons Use to control the USB source. Operations other than USB are not possible. 4 Receiver control buttons Q (QUICK MENU) - Use to access the Audio options (page 25). - Press to access the Setup 18). 10 LATE NIGHT Turns ON and OFF the LATE - Onkyo TX-SR373 | Owners Manual - English - Page 7
on the battery's (-) terminals. This can cause batteries to leak or overheat. Operating range of remote control The remote control may not work properly if: • There are obstacles between the remote control and the receiver's remote sensor. • Direct sunlight or fluorescent light is shining onto the - Onkyo TX-SR373 | Owners Manual - English - Page 8
your equipment Placing the speakers By connecting the left and right front speakers (L/R), the center speaker (C), the left and right surround speakers (SL/SR), and the subwoofer (SW), a 5.1 ch surround system can - Onkyo TX-SR373 | Owners Manual - English - Page 9
the speakers The receiver will work with just two stereo speakers (the front speakers in the diagram) but using at least three speakers is recommended, and a complete setup is best for surround sound. Up to two powered subwoofers can be connected. The same signal is output from each of the - Onkyo TX-SR373 | Owners Manual - English - Page 10
receiver supports the functions described below through HDMI connections. • Digital transfer of uncompressed video (contents protected by HDCP (1080p/24, 1080p/60, etc.)) • 3D signal transfer • Deep Color signal transfer • x.v.Color signal transfer • Audio Return Channel (see The HDMI Setup menu - Onkyo TX-SR373 | Owners Manual - English - Page 11
audio cables Commercially available coaxial digital audio cables or optical cables should be used to connect digital components to this receiver. Coaxial digital audio cable Optical cable Note • When connecting optical cables, be careful when inserting the plug not to damage the shutter protecting - Onkyo TX-SR373 | Owners Manual - English - Page 12
supports the HDMI Audio Return Channel function, the sound of the TV is input to the receiver via the HDMI terminal, so there is no need to connect an audio cable. In this case, set ARC at HDMI Setup to ON (see The HDMI Setup menu on page 30). - Please refer to the TV's operation manual - Onkyo TX-SR373 | Owners Manual - English - Page 13
Blu-ray Disc/ DVD player (or other playback component) with no HDMI terminal to the receiver. Important • When the receiver and TV are connected by composite cable, the OSD function allowing display of the receiver's settings, operations, etc., on the TV's screen cannot be used. In this case, watch - Onkyo TX-SR373 | Owners Manual - English - Page 14
external antennas (see Using external antennas below). fig. a fig. b 3 Place the AM antenna on a flat surface and in a direction giving the best reception. 4 Connect the FM wire antenna into the FM antenna socket. For best results, extend the FM antenna fully and fix to a wall or door frame. Don - Onkyo TX-SR373 | Owners Manual - English - Page 15
authorized service center or your dealer for a replacement. • The receiver should be disconnected by removing the mains plug from the wall socket when not in regular use, e.g., when on vacation. USB SETUP MIC USB 5V / 0.5A AV RECEIVER TX-SR373 USB mass storage device This receiver Connecting - Onkyo TX-SR373 | Owners Manual - English - Page 16
corresponding HDMI cable. 3 Connect the microphone to the SETUP MIC jack on the front panel. Make sure there are no obstacles between the speakers and the microphone. TUNING PRESET HOME ENTER RETURN TUNER USB MASTER VOLUME SETUP MIC USB 5V / 0.5A AV RECEIVER TX-SR373 If you have a tripod - Onkyo TX-SR373 | Owners Manual - English - Page 17
problem, turn off the power and check the speaker connections. 11 Make sure "OK" is selected, then press ENTER. If the screen in step 10 is left untouched for 10 seconds and ENTER is not pressed in step 11, the AccuEQ Room Cal. setup . If there are any instructions showing in the front panel - Onkyo TX-SR373 | Owners Manual - English - Page 18
receiver (press ÍRECEIVER). • Make sure the setup microphone is disconnected. 2 Switch the TV input to the input that connects this receiver. For example, if you connected this receiver . Turn down the volume of your TV so that all sound is coming from the speakers connected to this receiver. - Onkyo TX-SR373 | Owners Manual - English - Page 19
playing an analog signal. To prevent noise, make the proper digital connections (page 11) and set the signal input to C1/O1 (digital). • Some DVD players don't output DTS signals. For more details, refer to the instruction manual supplied with your DVD player. Input function BD/DVD HDMI Input - Onkyo TX-SR373 | Owners Manual - English - Page 20
the USB interface on the front of this receiver. Important • Onkyo cannot guarantee compatibility (operation and/or bus power) with all USB mass storage devices and assumes no responsibility for any loss of data that may occur when connected to this receiver. Note • This includes playback of WMA/MP3 - Onkyo TX-SR373 | Owners Manual - English - Page 21
Press the BLUETOOTH. 2 Turn on the power to the BLUETOOTH capable device that you wish to pair with, and perform pairing procedure on it. • This unit will be displayed as "Onkyo TX-SR373" on all BLUETOOTH capable devices that you have. Pairing will start. • Place the BLUETOOTH capable device close - Onkyo TX-SR373 | Owners Manual - English - Page 22
this unit and the device equipped with BLUETOOTH wireless technology. Precautions regarding connections to products supported by this unit • Complete connections for all devices supported by this unit, including all audio cords and power cables before connecting them to this unit. • After completing - Onkyo TX-SR373 | Owners Manual - English - Page 23
4 Listening to station presets You will need to have some presets stored to do this. See Saving station presets on page 22 if you haven't done this already. ... Press PRESET +/- to select the station preset you want. Naming preset stations For easier identification, you can name all of your preset - Onkyo TX-SR373 | Owners Manual - English - Page 24
listening mode you want. SURR DSP TREBLE BLUETOOTH STEREO LISTENING MODE SURROUND DSP B D/DVD CBL receiver. Listening in surround sound SURR SURROUND Using this receiver When the headphones are connected, STEREO can only be settings made in the Manual SP Setup (speaker setting, X.Over - Onkyo TX-SR373 | Owners Manual - English - Page 25
current status/mode of the receiver, certain options may not is a problem. OFF ON connected display supports the automatic audio/video synchronizing capability ('lip-sync') for HDMI. If you find the automatically set delay time unsuitable, set A.DLY to OFF and adjust the delay time manually - Onkyo TX-SR373 | Owners Manual - English - Page 26
the Fixed PCM Setting menu The Fixed PCM Audio options are not displayed by default. Perform the following operations to display them. 1 Switch the receiver into standby. 2 While holding down RETURN on the front panel, hold ÍON/STANDBY. The setting switches between display and hide each time you - Onkyo TX-SR373 | Owners Manual - English - Page 27
Assign - Specify what you've connected to the (CD) audio input (see The Input Assign menu on page 29). • Auto Power Down - Sets to automatically turn off the power when the receiver has not operated for several hours (see The Auto Power Down menu on page 29). • HDMI Setup - Set the audio return - Onkyo TX-SR373 | Owners Manual - English - Page 28
not connect a subwoofer choose NO (the bass frequencies are output from other speakers). 4 When you're finished, press . You return to the Manual SP Setup menu and let your ears judge which sounds best. If you're having problems, the easiest option is to route all the bass sounds to the subwoofer - Onkyo TX-SR373 | Owners Manual - English - Page 29
turn off the receiver after a specified time has passed (when the power has been on with no operation for several hours). • Default setting: OFF 1 Select 'Auto Power Down' from the Setup. Setup 1.AccuEQ Room Cal. 2.Manual SP Setup 3.Input Assign 4.Auto Power Down 5.HDMI Setup 4.Auto Power - Onkyo TX-SR373 | Owners Manual - English - Page 30
Room Cal. 2.Manual SP Setup 3.Input Assign 4.Auto Power Down 5.HDMI Setup 5.HDMI Setup a.ARC OFF b.Standby Through [ OFF ] c.4k60p Setting Return Return 2 Choose the 'ARC' setting you want. When a TV supporting the HDMI Audio Return Channel function is connected to the receiver, the sound - Onkyo TX-SR373 | Owners Manual - English - Page 31
. Refer to the relevant device's instruction manual for details. If this does not work, turn OFF the ARC function. If this is the case, listen to the TV audio after connecting this unit and the TV with an audio cable. OVERHEAT shows in the display and the power turns off. # The temperature within - Onkyo TX-SR373 | Owners Manual - English - Page 32
was deleted from this receiver or the BLUETOOTH wireless technology device. Reset the pairing. # Check that the profile is correct. Use a BLUETOOTH wireless technology device that supports A2DP profile. HDMI No picture or sound. # If the problem still persists when connecting your HDMI component - Onkyo TX-SR373 | Owners Manual - English - Page 33
OK appears in the display to indicate that the receiver has been reset to the factory default settings. Cleaning the unit the surface. Specifications Amplifier section Continuous average power output of 80 watts* per channel, range 2.4 GHz Supported BLUETOOTH profiles A2DP Supported Codec . . - Onkyo TX-SR373 | Owners Manual - English - Page 34
Furnished Parts Setup microphone 1 Remote control 1 Dry cell batteries (AAA size IEC R03 2 AM loop antenna 1 FM wire antenna 1 Quick start guide Safety Brochure Note • Specifications and the design are subject to possible modifications without notice, due to improvements. The BLUETOOTH® word - Onkyo TX-SR373 | Owners Manual - English - Page 35
price. Our General Public Licenses are designed to make sure that you have the freedom to distribute copies of free software (and charge for this service if you wish), that you receive they have is not the original, so that any problems introduced by others will not reflect on the original authors - Onkyo TX-SR373 | Owners Manual - English - Page 36
Program by all those who receive copies directly or indirectly through you, may differ in detail to address new problems or concerns. Each version is given a this. Our decision will be guided by the two goals of YOU ASSUME THE COST OF ALL NECESSARY SERVICING, REPAIR OR CORRECTION. 12. IN - Onkyo TX-SR373 | Owners Manual - English - Page 37
Please contact an Onkyo distributor referring to Onkyo SUPPORT site. http://www.intl.onkyo.com/support/ 2-3-12 104-0028 The above-mentioned information is subject to change without prior notice. Visit the Onkyo web site for the latest update. (C) Copyright 2017 Onkyo & Pioneer Corporation Japan
-
 1
1 -
 2
2 -
 3
3 -
 4
4 -
 5
5 -
 6
6 -
 7
7 -
8
-
9
-
10
-
11
-
12
-
13
-
14
-
15
-
16
-
17
-
18
-
19
-
20
-
21
-
22
-
23
-
24
-
25
-
26
-
27
-
28
-
29
-
30
-
31
-
32
-
33
-
34
-
35
-
36
-
37
 |
 |

AV RECEIVER
Operating Instructions
TX-SR373