Onkyo TX-SV444 Owner Manual
Onkyo TX-SV444 Manual
 |
View all Onkyo TX-SV444 manuals
Add to My Manuals
Save this manual to your list of manuals |
Onkyo TX-SV444 manual content summary:
- Onkyo TX-SV444 | Owner Manual - Page 1
ON KILTO TX-SV444 Audio Video Control Receiver 1 - Audio Video Karaoke Control Receiver Instruction Manual O O CONTENTS Features 2 Important Safeguards 3 Precautions 4 Supplied accessories 4 Setting the voltage selector and tuning step frequency (Worldwide models only) 4 Control - Onkyo TX-SV444 | Owner Manual - Page 2
the Onkyo Audio Video Control Receiver. Please read this manual thoroughly before making connections and turning on the power. Followinng the instructions in this manual will enable you to obtain optimum performance and listening enjoyment from your new Audio Video Control Receiver. Please - Onkyo TX-SV444 | Owner Manual - Page 3
that described in the operating instructions. All other servicing should he referred to qualified service personnel. 19. Outdoor Antenna Grounding- If an outside antenna is connected to the receiver, he sure the antenna system is grounded so as to provide some protection against voltage surges and - Onkyo TX-SV444 | Owner Manual - Page 4
Fuse The fuse is located inside the chassis and is not user-serviceable. If power does not come on. contact your Onkyo authorized service Remote controller (RC-326S for TX-SE500, RC-327S for TX-SV444) 2 Batteries (size AA, R6, or UM-3) The following accessories are only available for worldwide models - Onkyo TX-SV444 | Owner Manual - Page 5
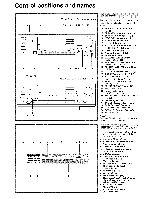
Monitor indicator d. Speakers A/B indicators e. Video input selector indicators f. Audio Mute indicator g. 3-D Bass indicator h. FM Mute On/Off indicator i. FM Stereo indicator j. Tuned indicators k. RDS station received indicator (European model only) 1. Sleep indicator m. Memory indicator - Onkyo TX-SV444 | Owner Manual - Page 6
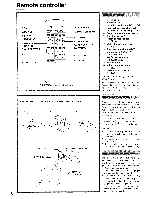
on 0 0 (±) ±. ) • (±)- Ocr'O- I NARA°. NE CONTROL LEVEL VOLUME I I o LI) O ONKYO HEW, COP.'S LEP 8. SUR. MODE 9. MULTI-CH INPUT 10. TUNER 11. KARAOKE 12. KEY CONTROL 13. MUTING 14. VOLUME 15. LEVEL (TX-SE500's remote controller shown) Remote controller 1. Sleep button [17] 2. Power button - Onkyo TX-SV444 | Owner Manual - Page 7
Audio equipment connections • On each pair of input jacks, the lower jack (marked R, red) corresponds to the right channel, and the upper jack (marked L, white) to the left channel. • Please refer to the instruction manual of each component when making any connections. • This receiver is designed - Onkyo TX-SV444 | Owner Manual - Page 8
and the upper jack (marked L, white) to the left channel. • Please refer to the instruction manual of each component when making any connections. Video Disc Player I I I AUDIO OUT VIDEO OUT Monitor TV VIDEO IN ti 43 0 0 0 0 CENTER SPEAKER .„,NTOR IDL P0NT SPE.... R - - T t DODO El EICIEI - Onkyo TX-SV444 | Owner Manual - Page 9
0 REAP PP EPS 10 0 [0 • This receiver will automatically switch on approximately three to five seconds after the TV comes on. • If a mono TV is used, connect the audio output of the TV to the TV/AUX "L" jack. I DVD 5.1 CH PLAYER DVD Player 000 VIDEO OUT FRONT OUT SURROUND OUT SUBWOOFER OUT - Onkyo TX-SV444 | Owner Manual - Page 10
to connect a second pair of front speakers. • This receiver is designed to produce optimum sound quality when speakers with ED " f1 :1 0 • °Kayo. 10 0 10 0 Center speaker and Subwoofer Subwoofer Speaker Amplifier 0 0 0 0O0 000 Center Speaker Active subwoofer O O U 660 10 1.714,-;1-7 71- - Onkyo TX-SV444 | Owner Manual - Page 11
the sound. Placing a subwoofer speaker To enjoy powerful bass sounds, install a subwoofer with a built-in power amplifier. The placement of the Subwoofer does not affect the final quality of the sound image too much, therefore as its exact placement is not critical, you can install it more with the - Onkyo TX-SV444 | Owner Manual - Page 12
(1) Insert the end of the cable. r:2) Clamp it in place with pliers. • This adaptor is included if your receiver is a worldwide model. Directional linkage type splitter To TX-SV444/TX-SE500 To TV (or VCR) 1 O Insert into the hole. 2 3 O Directional linkage Do not use the same antenna for - Onkyo TX-SV444 | Owner Manual - Page 13
only. Extend the antenna and move it in various directions until the clearest signal is received. Fix it with push pins or similar in the position giving the least amount of distortion. U.S.A. and Canadian models Other models 75 ohms coaxial cable or 300 ohms ribbon wire ANTENNA M 7512 FM 300i1 - Onkyo TX-SV444 | Owner Manual - Page 14
are able to operate each component with the remote controller of the receiver. This means you can control your whole system with just one remote controller. (The R I mark is an Onkyo mark.) Connections for remote control (RI) TX-SV444 or TX-SE500 0 0 0 RI CD Player RI I I Cassette Tape Deck - Onkyo TX-SV444 | Owner Manual - Page 15
models) or SYSTEM • ON • OP, (Other models) Connecting the power Before plugging in the receiver VIDEO that the audio muting is instructions of that unit. 4. Set the volume to appropriate level using the MASTER VOLUME control or VOLUME A(up)/Y(down) buttons on the remote controller. These controls - Onkyo TX-SV444 | Owner Manual - Page 16
the STAND-BY indicator will go off. If your receiver is not a U.S.A. or Canadian model: Press the SYSTEM button to turn on the receiver. The display will light up. Press the POWER button on the remote controller to put the receiver in Standby mode. The STANDBY indicator will light up. The STAND-BY - Onkyo TX-SV444 | Owner Manual - Page 17
the Surround mode is used. (The sound from the headphones may sound a little distant.) Temporary muting Press the MUTING button on the remote controller. The AUDIO MUTE indicator will Klink and the sound from the speakers or headphones will be switched off by the receiver's audio muting circuits - Onkyo TX-SV444 | Owner Manual - Page 18
PS (Program Service Name) information is received, the RDS indicator lights up and name of the station is displayed. • RDS reception is only available on the TX-SV444 European model, and only in areas where RDS broadcasts are available. Listening to a stereo radio stations (FM mode) If you - Onkyo TX-SV444 | Owner Manual - Page 19
button again and scanning will stop. Use Remote controller Press the GROUP button and choose the group. Press the PRESET (-4 or lo-) button. CLEAR -- MEMORY FMMUTE1MODE II IJ Cancelling preset stations SPEAKERS A VIDEO E FM MUTE .TUNED/ ON STEREO 11/I 1 I1 I_I I_I I I I / I. MHz GROUP - Onkyo TX-SV444 | Owner Manual - Page 20
mode This receiver is provided with 3 kinds of Surround modes. Select a mode by pressing the SURROUND MODE button. When using the remote controller, press the SUR. MODE button. Make your choice of modes mode will be automatically recalled. Surround Modes DOLBY PRO LOGIC By using video tape - Onkyo TX-SV444 | Owner Manual - Page 21
to set the volume level. I 7. Use the PARAMETER SELECTOR A or ► button to select TEST OFF mode. And, press the PARAMETER CONTROLLER ► button. The test tone (pink noise) will start. Using the remote controller, press the TEST TONE but- ton. Refer to "Test tone" on page 23 for details. 8. Adjust - Onkyo TX-SV444 | Owner Manual - Page 22
SURROUND MODE 0 SUR MODE [ SURROUND MODE SURROUND MODE MULTI-CH imPuT - ED' _ STEPPER VIDEO 11 mode. Setting the Multi Channel surround parameters 1. Press the MULTI CH INPUT but to put the receiver in MULTI-CH mode CONTROLLER to "ON- to reproduce an optimal sound for the home theater - Onkyo TX-SV444 | Owner Manual - Page 23
speakers in site and power. The center speaker will receive the full frequency range. PHANTOM: Use this setting when speakers, producing a similar result. SURROUND MODE DOLBY PRO LOGIC : , ESKER:: Center characteristics of the audio program. because a short delay in the audio signal coming from - Onkyo TX-SV444 | Owner Manual - Page 24
(Tx-SE500 only) KARAOKE SURROUND MODE MIC LEVEL KEY CONTROL MASTER VOLUME as ,== INPUT SELECTOR 0 0 SUR. MODE KARAOKE KEY CONTROL VOLUME Input selector SPEAKERS ECHO LEVEL MIC PARAMETER CONTROLLER LEVEL 1 MASTER vO-UME 2 MIC LEVEL 2 ECHO LEVEL MI MIC 2 O 1.) 3 VIDEO VD - Onkyo TX-SV444 | Owner Manual - Page 25
to record. 3. Put the tape deck in recording mode. Begin playing the source. Set the proper recording level using the controls on the tape deck used for recording. • Please read the instruction manuals concerning the operation of each unit. ODE0.1AOF VIDEO-2C,R I VAR. TAPENIONFORI AM PHONO CD - Onkyo TX-SV444 | Owner Manual - Page 26
playback of the video con- nected to the VIDEO-1 terminal and also start the sound source. Then start recording on the VCR that is connected to the VIDEO-2 terminal. Refer to the video disc player, video camcorder. DVD or VCR instruction manuals for additional information. 3 VIDEO-NV, 4 NAM% TAPP - Onkyo TX-SV444 | Owner Manual - Page 27
Troubleshooting guide If a problem occurs while you are using the remote controller, fi rst operate the unit using the front panel controls to confirm that it is not due to a malfunction (or worn out batteries) of the remote controller. Trouble Cause Remedy No power. • Power cord is - Onkyo TX-SV444 | Owner Manual - Page 28
(IFIF A) VIDEO SECTION Signal sensitivity and impedance: 1 Vp-p. 75 ohms (VDP/VCR input. output) TUNER SECTION FM Tuning Range: Usable Sensitivity Mono: Stereo: 50 dB Quieting Sensitivity Mono: Stereo: Capture Ratio: Image Rejection Ratio U.S.A. & Canadian models: Other area models: 87.5 - 108
-
 1
1 -
 2
2 -
 3
3 -
 4
4 -
 5
5 -
 6
6 -
 7
7 -
8
-
9
-
10
-
11
-
12
-
13
-
14
-
15
-
16
-
17
-
18
-
19
-
20
-
21
-
22
-
23
-
24
-
25
-
26
-
27
-
28
 |
 |
TX-SV444
1
—
Audio
Video
Karaoke
Control
Receiver
Features
2
Connecting
Onkyo
components
Setting
the
voltage
selector
and
tuning
step
Using
preset
stations
19
Speaker
placement
11
Specifications
28