Onkyo TX-SV636 Owner Manual
Onkyo TX-SV636 Manual
 |
View all Onkyo TX-SV636 manuals
Add to My Manuals
Save this manual to your list of manuals |
Onkyo TX-SV636 manual content summary:
- Onkyo TX-SV636 | Owner Manual - Page 1
equipment connections 12 , ''Setting the surround parameters - .36 Optional power amplifier connections 14 Listening in another room 42 Making speakers connections 15 Troubleshooting guide 44 Making antenna connections 16 Specifications 46 Connection for multiple-room remote control 18 - Onkyo TX-SV636 | Owner Manual - Page 2
and turning on the power. Following the instructions in this manual will enable you to obtain optimum performance and listening enjoyment from your new A/V Tuner Amplifier. Please retain this manual for future reference. Features • 100 Watts per channel into 8 ohms (stereo) ■ 85 Watts to left/center - Onkyo TX-SV636 | Owner Manual - Page 3
trouble. the user should seek the services of a qualified electrician. hider no circumstances should the user attempt to defeat the polarization of the plug. 12. Power-Cord Protection - Power in own responsibility, that the ONKYO product described in this instruction manual is in compliance with the - Onkyo TX-SV636 | Owner Manual - Page 4
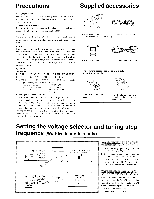
Models without a voltage selector can only be used in areas where the power supple is the same as that of the unit. Turning off the power switch does not shut off the power com- pletely. So the power cord should he reinmed from AC outlet when not in use for a prolonged time. 1 Remote controller - Onkyo TX-SV636 | Owner Manual - Page 5
or J-Box Receiver: Model No. 780-10 * Connecting Block: Model No. 789-4O * 120V AC Power Supply: Model No. 781C-00 • The following accessory is necessary for operation of components not manufactured by Onkyo: * Mini-Emitter: Model No. 282-00 • Use the secondary remote control model indicated below - Onkyo TX-SV636 | Owner Manual - Page 6
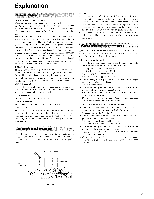
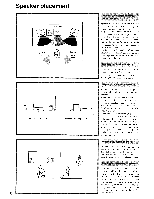
position. They can also be placed facing the ceiling or walls to reflect the sound. Placing a subwoofer speaker To enjoy powerful bass sounds, install a subwoofer with a built-in power amplifier. The placement of the Subwoofer does not affect the final quality of the sound image too much, therefore - Onkyo TX-SV636 | Owner Manual - Page 7
[ ] ) below. 1. STAND-BY/RECEIVED indicator 110, 23] 2. POWER button [22, 23] 3. MR OFF button and indicator [42] 4. BY-PASS button [33] 5. DSP MODE button [33, 37] 6. DOLBY PRO LOGIC button [33,36] 7. MEMORY button [20, 25, 26] 8. FM MUTE/MODE button [24, 26] 9. Remote control sensor 110] 10. GROUP - Onkyo TX-SV636 | Owner Manual - Page 8
Remote controller Connecting the TX-SV636 and an Onkyo audio device bearing RI (Remote Interactive) mark (such as a compact disc player or cassette tape deck) allows you to control the connected Onkyo products using the TX-SV636's remote controller. Refer to "Connections for remote control" on page - Onkyo TX-SV636 | Owner Manual - Page 9
select a channel. MUTE button This button temporarily switches off the sound from the speakers or headphones by operating this unit's audio muting circuits. The AUDIO MUTING indicator will flash. Pressing the button again or using the POWER button on the remote controller to turn the power on will - Onkyo TX-SV636 | Owner Manual - Page 10
remote controller following the illustration below. Remote control sensor STAND-BY/RECEIVED indicator 30' 30* TX-SV636 approx. 5 m (16 feet) TX-SV636 between units. • This unit's remote controller cannot be used to control Onkyo turntables. • An RI remote control cable equipped with a 3.5mm - Onkyo TX-SV636 | Owner Manual - Page 11
is total 120 watts. U.S.A. and Canadian models Capacity is total 120 watts. AC Outlets Connections The SWITCHED outlets are switched on and off by the POWER button on the front panel or remote controller. (Note for European model: the remote controller cannot be used when the POWER button on the - Onkyo TX-SV636 | Owner Manual - Page 12
to the right channel, and the upper jack (marked L, white) to the left channel. • Please refer to the instruction manual of each OUT AUDIO OUT Video Cassette Recorder Video Cassette Recorder • The IPM (Intelligent Power Management) function can operate only if a TV is connected to the VIDEO - Onkyo TX-SV636 | Owner Manual - Page 13
Video equipment connections IPM (Intelligent Power Management) System To use the IPM function you VIDEO OUT AUDIO OUT Monitor TV VIDEO IN 11,)1 00 a a coca 6666 °on ®Si 9.) 1I0 NO TX MIS • This unit will automatically switch on approximately three to five seconds after the TV comes on. • If - Onkyo TX-SV636 | Owner Manual - Page 14
connect the corresponding speakers to those power amplifiers. Front Speakers L ch Rch Another Room Center Speaker C0 0 Power amplifier, integrated amp. or additional receiver a I 0 0 0 0 O 0 0 0 Power amplifier, integrated amp. or additional receiver o ei o o g 0) bra !, a" SPLAPANS - Onkyo TX-SV636 | Owner Manual - Page 15
551 0,0 0 0 0 0i0 01010 GIG 0 ,OO,[O,O OfO...c:)•O 0. 0 0 cie o, o FRONT SPEAKER REMOTE R ch. FRONT SPEAKER REMOTE Lch. Connecting the front, rear and remote speakers If you want to use the Surround effects, the Rear and Center speakers must be connected. Please refer to "Connecting the Center - Onkyo TX-SV636 | Owner Manual - Page 16
1 ' Insert the end of the cable. 2, Clamp it in place with pliers. • This adaptor is included if your TXSV636 is a worldwide model. Directional linkage type splitter To TX-SV636 a - To TV or VCR) VOW 1Directional linkage Do not use the same antenna for both FM and TV (or VCR) reception since - Onkyo TX-SV636 | Owner Manual - Page 17
it in the direction and position where you receive the clearest sound. Put it as far as possible away from the main unit, TV set, speaker cords and power cord. U.S.A. and Canadian models ANTENNA Outdoor antenna European and Worldwide models ANTENNA Outdoor antenna O_ FM 511 Connecting an - Onkyo TX-SV636 | Owner Manual - Page 18
enable remote control operation. MAIN ROOM 1. Onkyo components (a) 3. Connecting TX-SV636 \ block Speaker Main ,\ Speaker Mein (Main room (Main room) \ \\ \ \ Power supply ® SUB ROOM Remote controller 4. Dinky Link or J-Box Receiver 2. Speaker Remote Sub room) 2. Speaker Remote Sub - Onkyo TX-SV636 | Owner Manual - Page 19
, then connect it to the TX-SV636. B. Using a remote controller to operate components not displaying Onkyo's H I mark from the sub-room 3. Remote Emitter HE-50(AC) TP111 Power supply \ MAIN ROOM 5. Remote Emitter Head HE-10 4. Components(c) TX-SV636 N .\ Speaker Main(Ma n room) 1. Components - Onkyo TX-SV636 | Owner Manual - Page 20
function MEMORY =====. . omo 000 VIDEO-1 > E; 1..1 7 .15 You can use the remote controller to operate all the onscreen display function. Switching between the NTSC and PAL systems If your TX-SV636 is an U.S.A. or Canadian models: The on-screen display function is only available when an NTSC TV - Onkyo TX-SV636 | Owner Manual - Page 21
Therefore the background color which you have selected will not be displayed. Superimpose Mode It is possible to set the on-screen display so that it is to display the message, or when you want to check the Auto/Manual tuning for TV/BS devices connected to the Image input. Character Position You - Onkyo TX-SV636 | Owner Manual - Page 22
Press the POWER button. Please refer to the "Power button and Stand-by/Received indicator" explanation on the page 23. MASIPNEARKEEMROSTE I MAIN I Remote controller (Co MAIN / A Remote controller a5>vm„,:00TAnPE.T2 .uuM 06r.,. 0co 0 Vrt.....szadmararova-rdwrirmrle.file oNKYo Men, *5* np - Onkyo TX-SV636 | Owner Manual - Page 23
up and the STAND-BY/RECEIVED indicator will go off. If your TX-SV636 is a European model: Press the POWER hutton to turn on this unit. The display will light up. Press the POWER button on the remote controller to put this unit in Standby mode. The STAND-BY/ RECEIVED indicator will light up. The - Onkyo TX-SV636 | Owner Manual - Page 24
Receiving stations 1'9'0/10 DIRECT TUNING FM MUTE/MODE o® 0 • 2 3 24 FM ...DOWN TUNING UP • FM AM DIRECT TUNING I _f [I a I 7 2 I 5 I 8 f 3 Il 6 II 6 1 FM MUTE/MODE FM 41DOWN TUNING UP II. AM Manual tuning 1. Press the FM or AM button. 2. Use the TUNING UP/DOWN buttons to change the - Onkyo TX-SV636 | Owner Manual - Page 25
received is an RDS station with a PS (Program Service RDS function. (RDS function is only for features of European model.) Recalling preset stations 1. Press the GROUP button to select the desired group. 2-a. Input the memory number you wish to receive will stop. Use Remote controller Set the device - Onkyo TX-SV636 | Owner Manual - Page 26
. Cancelling preset stations 1. Select the station as explained in the previous section. 2. Press the FM MUTE/MODE button while holding down the MEMORY button. " _ _" will be shown on the channel display. • Once the preset station has been cancelled, the memory location can be used to store another - Onkyo TX-SV636 | Owner Manual - Page 27
Receiving RDS (European models only) RDS reception is only available on the European model, and only in areas where RDS broadcasts are available. What is RDS? Many FM stations now transmit RDS signals which give additional information. RDS provides you with various services so that (for example) - Onkyo TX-SV636 | Owner Manual - Page 28
Receiving RDS (European models only) SCAN 'DOWN TUNING UPI. O-- 1 PTY/TP [ 23 DOWN TUNING I JV SCAN 4 SCAN I I P55/TP 2 SCAN DISPLAY Character or Programme Service Name Radio Text 28 (1. I PTY/TP DISPLAY Searching for a station which broadcasts your favorite category (PTY scan) 1. Press - Onkyo TX-SV636 | Owner Manual - Page 29
models enter characters while receiving an FM broadcast RDS station. "RDS...PS" is 5 CHARACTER Entering new characters To name 1 CH of GROUP B as "ONKYO- . for example, operate as follows. (Example: FM broadcast at 89. MODE button. All the characters entered for this station will be cleared. 29 - Onkyo TX-SV636 | Owner Manual - Page 30
speakers or headphones. Make all connections between the tape deck and the unit as shown in the Audio equipment connections diagram (page I I ). When recording a tape while the Multiple Room Remote Control the tape deck connected to TAPE-1 to recording mode. Use on-screen Press the ENTER button. - Onkyo TX-SV636 | Owner Manual - Page 31
is off, any source signals can be monitored through the speakers or the headphones (this is normal operation). • If deck . nstruction manuals for more details. • Set the recording level using the controls on the tape deck jacks. Refer to each instruction manual for information concerning video-disc - Onkyo TX-SV636 | Owner Manual - Page 32
UP/DOWN button or the CH (up)/ (down) button on the remote controller. The picture will he sent to the monitor TV and the FM stereo sound to the speakers connected to this unit. 4. To record the TV picture with FM sound, receive the TV broadcast using one VCR (connected to VIDEO-2 (or VIDEO - Onkyo TX-SV636 | Owner Manual - Page 33
in. • When you are not playing in surround: press the BY- PASS button on the main unit or press the SUR. MODE A or V button on the remote control to select BY-PASS. • When using the multi-source, the surround mode will be turned off. • Refer to page 35 using the on screen display. 33 - Onkyo TX-SV636 | Owner Manual - Page 34
This unit is provided with 5 kinds of Surround modes. Select a mode by pressing the DOLBY PRO LOGIC button, DSP MODE button or BY-PASS button. When using the remote control, press the SUR. MODE A or V button. Make your choice of modes depending on the type of music you are listening to, the media - Onkyo TX-SV636 | Owner Manual - Page 35
ToT ne ON pp Level Cal . , DEFAULT coralm,,a, Center Mode Cen ._er Mode=',1DEBAND ONKYO Le v el Cal . ▪ - - 1) Center Level= IP. cursor button to select the center mode. - NIORMAL < >WIDEBANDE-->PHANTOM - Onkyo TX-SV636 | Owner Manual - Page 36
Device selector INPUT SELECTOR 2 DOLBY PRO LOGIC 3 RI PARAMETER SELECTOR ► 4 Yi PARAMETER CONTROLLER 5 6 7 9 PARAMETER SELECTOR ► CO Remote controller ID: A SUR. MODE eiD 4- TEST 0, 0$ CH.SEL - LEVEL M PARAMETER CONTROLLER ► Refer to page 33 for basic operation of surround play. Refer to pages 37 - Onkyo TX-SV636 | Owner Manual - Page 37
sent frequencies below 100Hz. and these will be split between the front L and R speakers. WIDEBAND: Use this setting when using a center speaker similar to the L and R stereo speakers in size and power. The center speaker will receive the full frequency range. PHANTOM: Use this setting when a center - Onkyo TX-SV636 | Owner Manual - Page 38
to +12 dB (maximum). • When the center mode is set to PHANTOM, you cannot adjust the center level here. • When the test tone is on, if you press any button on the main unit or the remote control other than MASTER VOLUME, CENTER LEVEL, REAR LEVEL. SPEAKERS •44.111111,41h.MAIN, DIMMER or MUTING - Onkyo TX-SV636 | Owner Manual - Page 39
(:( De_ay T i me Delay Time 1 4 PARAMETER CONTROLLER ► 2 .4 PARAMETER SELECTOR ► Explanation 3: Delay time the audio signal coming from the rear speakers gives the impression that it had to Setup Sur DeLBY de =PRO LOGIC nn Center Mode=WIDEBAND(MP DetayTime = 20mS nn TestTone = OFF - Onkyo TX-SV636 | Owner Manual - Page 40
. Main unit 1. Use the PARAMETER SELECTOR -4 or IP- button to select Theater size. 2. Use the PARAMETER CONTROLLER -4 or l.but- ton to alter the theater size. • When using the Hall, Live and Arena surround modes, set the Hall size in the same manner used to set the Theater size. ,ize ola.almsro Th - Onkyo TX-SV636 | Owner Manual - Page 41
The number is the ratio of hall breadth to length. On screen Move the cursor to Sur. Mode using A or V cursor button and use the 4 or 10- cursor button to select HALL. . 2. Use the PARAMETER CONTROLLER -4 or ► but- ton to alter the hall shape. ONKYO Szape >1.2< >1.4< (r 7,3 DeeperMOWider 41 - Onkyo TX-SV636 | Owner Manual - Page 42
room to the FRONT SPEAKERS REMOTE terminals on the TX-SV636. Remote control from another room can be done by employing the Multiple Room Remote System ( ITR ). Refer to the connections for Multiple Room Remote Control. Be sure to operate the remote control pointing at the Remote Sensor. (See pages - Onkyo TX-SV636 | Owner Manual - Page 43
10. • If you are using a component that doesn't support the Onkyo RI system, be sure to point the emitter of the remote control toward the component. • Make sure that the components are connected correctly. • Make sure that the MR OFF button on the TX-SV636 is off. The MR OFF indicator should be off - Onkyo TX-SV636 | Owner Manual - Page 44
Troubleshooting guide If a problem occurs, first operate the unit using the Front panel controls to confirm that it is not due to a malfunction (or worn out batteries) of the remote control. Trouble Cause Remedy No power. • Power cord is disconnected. • There is external noise in the computer - Onkyo TX-SV636 | Owner Manual - Page 45
button, then press the SPEAKERS MAIN button. 2. After "clear" is displayed, the preset memory and parameters stored in the memory, such as surround, are initialized and will return to the factory settings. Problem with the RC-P101S/P201S remote controller If the remote controller does not operate - Onkyo TX-SV636 | Owner Manual - Page 46
AMPLIFIER SECTION Power Output Stereo mode Front Main L/R channels: 100 watts per channel, min. RMS at 8 ohms, both channels driven from 20 Hz to 20 kHz with no more than 0.08% total harmonic distortion. Continuous Power output: 2 x 120 watts at 8ohms (DIN) Surround mode and Multi source mode
-
 1
1 -
 2
2 -
 3
3 -
 4
4 -
 5
5 -
 6
6 -
 7
7 -
8
-
9
-
10
-
11
-
12
-
13
-
14
-
15
-
16
-
17
-
18
-
19
-
20
-
21
-
22
-
23
-
24
-
25
-
26
-
27
-
28
-
29
-
30
-
31
-
32
-
33
-
34
-
35
-
36
-
37
-
38
-
39
-
40
-
41
-
42
-
43
-
44
-
45
-
46
 |
 |

ONKVO
TX
SV636
Audio
Video
Control
Tuner
Amplifier
Instruction
Manual
CONTENTS
Features
2
Using
the
On
display
Important
Safeguards
3
'asic
operations
22
Precautions
4
Receiving
stations
24
Supplied
accessories
......
4
Using
preset
stations
25
Setting
the
voltage
selector
and
tuning
step
Receiving
RDS
(European
models
only)
27
frequency
(Worldwide
models
only)
4
Entering
station
names
Explanation
5
(European
models
only)
29
Speaker
placement
6
Recording
a
source
30
Control
positions
and
names
7
Basic
operationrof
Surround
play
33
8
Use
of
surround
mode
34
11
Parameter
selector
34