Optoma DC300I User Manual
Optoma DC300I Manual
 |
View all Optoma DC300I manuals
Add to My Manuals
Save this manual to your list of manuals |
Optoma DC300I manual content summary:
- Optoma DC300I | User Manual - Page 1
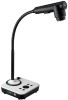
DC300i Visualiser USER MANUAL Please read this manual carefully before operating the document camera and keep it for reference 1 - Optoma DC300I | User Manual - Page 2
this device directly under sunlight or near heaters. Do not place this device near water. Keep the camera away from acid or alkali gas. Do not place this document camera in humid, dusty, windy or vibrant locations. The recommended operating environment is: Temperature: 0ºC-45ºC(32ºF-113ºF) Humidity - Optoma DC300I | User Manual - Page 3
USER MANUAL INDEX 1. INTRODUCTION / WARRANTY 4 2. PARTS IDENTIFICATION 5 3. CONTROL PANEL 6 4. INPUTS AND OUTPUTS 6 5. CONNECTIONS 7 5.1. COMPUTER CONNECTION 7 5.2. VGA OUTPUT CONNECTION 7 6. REMOTE CONTROL 8/9 7. VISUALISER OR VIDEO MODE 9 8. OPERATING THE VISUALISER 10 9. FEATURES 11 - Optoma DC300I | User Manual - Page 4
with sensible use it will give years of faithful service. Like many of us, referring to the user manual is often a last resort so we recommend you give you peace of mind, even so, you need to take care of your DC300i and understand what's covered and what's not. What's covered In general the unit - Optoma DC300I | User Manual - Page 5
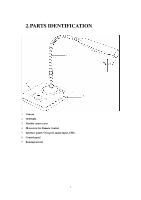
2.PARTS IDENTIFICATION 7 1. Camera 2. LED light 3. Flexible camera arm 4. IR receiver for Remote Control 5. Interface panel (VGA port, mains input, USB). 6. Control panel 7. Kensington lock 5 - Optoma DC300I | User Manual - Page 6
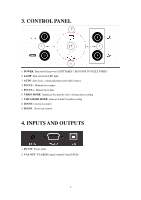
light. 3. AUTO: Auto focus, colour adjustment and white balance. 4. FOCUS -: Manual focus minus 5. FOCUS +: Manual focus plus 6. VIDEO MODE: Optimised for smooth video viewing and recording 7. VISUALISER MODE: General default Visualiser setting 8. ZOOM +: Zoom in control 9. ZOOM - :Zoom out control - Optoma DC300I | User Manual - Page 7
5. CONNECTIONS 5.1. COMPUTER CONNECTION 5.2. VGA OUTPUT CONNECTION 7 - Optoma DC300I | User Manual - Page 8
- 8. Focus: Manual focus + 9. Zoom: Zoom out control - 10. Zoom: Zoom in control + 11. Rotation: Rotate the image in 180 degree steps 12. Snap: Save an image (up to 12 internal capacity or endless when connected to a PC. 13. VISUALISER MODE: Optimised for smooth video viewing and recording - Optoma DC300I | User Manual - Page 9
brightness control - 7. VISUALISER OR VIDEO MODE ? Visualiser Mode The DC300i defaults to visualiser mode each time the camera provides smooth video viewing & recording at 22 fps. It's an ideal setting for active subjects. CHANGING THE MODE ON THE VISUALISER BASE To change from the default visualiser - Optoma DC300I | User Manual - Page 10
VGA cable connect between the visualiser and the output devise i.e. Projector or monitor/TV. Via the 15pin VGA port. USB Connection The USB port allows you to view the camera output via the PC. You will need to install the PC software which is described later in this manual. Once connected it will - Optoma DC300I | User Manual - Page 11
. DC300i's advanced optical system features high speed auto focus capability that ensures instant auto focus when you quickly zoom in and out of any object. You can also manually adjust focus to satisfy any special viewing needs by pressing "ZOOM+"or - "ZOOM ". FOCUS ADJUSTMENT When the Visualiser - Optoma DC300I | User Manual - Page 12
views of one object side by side. IMAGE SAVE (Only available from the remote control) The DC300i can store up to 12 images in its internal memory. IMAGE RECALL (Only available from the still images and video clips from the visualiser to your computer. (Note: You will need to install the supplied - Optoma DC300I | User Manual - Page 13
shall not be less than the following requirements • Operating system: Windows XP • CPU: Pentium 4 1.8Ghz • Physical memory: 512M • Video memory: 64M 10.2 USB FUNCTION 、1 SOFTWARE INSTALLATION Click to run the software installation package, the following dialogue appears, click "Next": Read the - Optoma DC300I | User Manual - Page 14
The following dialogue box appears, click "Next": The default installation directory is Program Files, C: \ Program Files \, you can select a different installation directory, as shown: 14 - Optoma DC300I | User Manual - Page 15
Click "Change" to change the directory, as shown: Click "OK", the following figure appears. Click "Next". 15 - Optoma DC300I | User Manual - Page 16
Click "Install" to complete installation, as shown: Click "Finish" to complete the installation, as shown: 16 - Optoma DC300I | User Manual - Page 17
Then you will see the following notice, which is an installation package for 2005 environment. If your PC already has this installed, click "No" to exit, otherwise, click "Yes" to install it. 17 - Optoma DC300I | User Manual - Page 18
、2 SOFTWARE START Double click the short cut number, see below: on the desktop, then click Device, select the right images will be automatically saved into the default destination folder. The path and file name are displayed in software status bar on the bottom of the window. Shown below: 18 - Optoma DC300I | User Manual - Page 19
Left click to start recording. During recording the settings button will be inactive. Detailed information is displayed on the software status bar in the bottom of the window. The video is automatically saved in the default folder or pre-set folder. : SETTING The captured images and recorded - Optoma DC300I | User Manual - Page 20
Save the captured images into a different folder Click the button next to the "select a folder to save picture files" text box to set the path for captured images. Save the recorded video into a different folder and set up parameters for videos Click the button next to the "Select a folder to save - Optoma DC300I | User Manual - Page 21
: IMAGE MODIFY Click , you will see the interface: Graphic selection and move Clicking Line allows to select and move lines, circles etc to a different position within the image. Clicking Allows you to create lines within the image. 21 - Optoma DC300I | User Manual - Page 22
Click to change the setting of the chosen line: Line width: change the width of the line. X, Y: change the position of the line. Color: change the color of the line. Width, Height: Change the angle of the line. Rectangle Click to place a rectangle in the image, shown as below: Click to change - Optoma DC300I | User Manual - Page 23
Line width: change the line width of the rectangle. X, Y: change the position of the rectangle. Color: change the line color of the rectangle. Fill Color: Tick it to fill color in the rectangle. Width, Height: Change the shape of the rectangle by changing the angle of two adjacent lines of the - Optoma DC300I | User Manual - Page 24
Line width: change the line width of the circle. X, Y: change the position of the circle. Color: change the line color of the circle. Fill Color: Tick it to fill color in the circle. Width, Height: change the size of the circle. Curve Click to place a curve in the image, shown as below: Click to - Optoma DC300I | User Manual - Page 25
Line width: change the line width of the curve. X, Y: change the position of the curve. Color: change the line color of the curve. Graphic default setting Click to change the setting of the graphic: Graphic delete Click to delete the chosen graphic. Delete all the graphic Click to delete all - Optoma DC300I | User Manual - Page 26
Operating temperature Dimensions Power supply Weight(net) DC300i 1/3" CMOS 2 Megapixel 9x optical, 12x digital 12/22 Max:16.5"x11.7", Min: 0.1"x0.1" Auto/manual XGA, SXGA Auto/manual Yes Yes Yes,12images Yes(via USB) Yes Yes Yes Yes Yes Slave×1(USB camera) Yes(360°controllable) LED light box Yes - Optoma DC300I | User Manual - Page 27
12. TROUBLE-SHOOTING: Symptoms Possible causes/counter-measures No image 1. Power cord is not properly connected. 2. Cables are not properly connected. 3. Power switch is not turned on. 4. The built-in fuse is broken: Change fuse. 5. Change the output resolution. Image bending 1. Camera - Optoma DC300I | User Manual - Page 28
13. PACKING LIST Item Power cord Power adaptor(12V/2A) VGA cable USB cable(2.0) Remote control User manual(CD) Quantity 1 1 1 1 1 1 28
-
 1
1 -
 2
2 -
 3
3 -
 4
4 -
 5
5 -
 6
6 -
 7
7 -
8
-
9
-
10
-
11
-
12
-
13
-
14
-
15
-
16
-
17
-
18
-
19
-
20
-
21
-
22
-
23
-
24
-
25
-
26
-
27
-
28
 |
 |

1
DC300i
Visualiser
USER MANUAL
Please read this manual carefully before operating the document camera and keep it for reference