Optoma EP610H User Manual
Optoma EP610H Manual
 |
View all Optoma EP610H manuals
Add to My Manuals
Save this manual to your list of manuals |
Optoma EP610H manual content summary:
- Optoma EP610H | User Manual - Page 1
Overview 5 Connecting the Projection Display 8 Powering On/Off the Projection Display 9 Adjusting the Image Size 10 User Controls User Controls 12 OSD Menus 14 Appendices Troubleshooting 18 Maintenance 20 Specifications 23 Compatibility Modes 24 - Optoma EP610H | User Manual - Page 2
unit to cool down and follow all changing instruction. ! Warning- This product will detect the life of the lamp itself. Please be sure to change the lamp when it shows warning messages. ! Warning- After changing a new lamp, please reset the lamp life timer from OSD menu. ! Warning- Before switching - Optoma EP610H | User Manual - Page 3
English 3 Introduction About the Product This product, designed with a high-powered UHP lamp, is an SVGA data/video portable projection display. The outstanding feature of it are listed as follows: q 8.9 lbs. (4.0 kgs) lightweight compact design q True SVGA, 800 x - Optoma EP610H | User Manual - Page 4
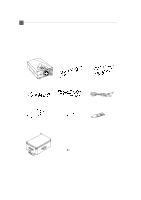
unit is complete. Contact your dealer immediately if anything is missing. LCD Projection Display Power Cord VGA Cable X 2 S-Video Cable User's Manual RCA Audio/ Video Cable Audio-in Cable for Computer Warranty Card Remote Control Hard Carrying Case With Detachable Wheels & Handle Batteries - Optoma EP610H | User Manual - Page 5
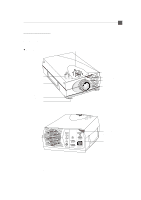
Installation Product Overview w Main Unit Panel Controls English 5 Speakers Carrying Handle Elevator Releasing Button Elevator Foot Remote Control Receiver Zoom Ring Focus Ring Projection Lens Air Filter Remote Control Receiver Connector Ports * There are two elevator releasing buttons and - Optoma EP610H | User Manual - Page 6
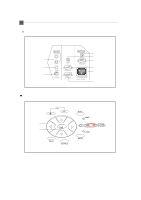
English 6 w Connection Ports Audio Input for Computer Composite Video Connector S-Video Connector w Panel Controls Four Directional Select Keys Enter Audio Output Connector Audio Input Connector Monitor Loop-Through Connector Computer 2 Input Connector Power Connector Computer 1 Input Connector - Optoma EP610H | User Manual - Page 7
w Remote Control Power/Standby Keystone Resync Tracking Volume Four Directional Select Keys Menu English 7 Reset Freeze/CLR Zoom In / Zoom Out Source Mute Enter - Optoma EP610H | User Manual - Page 8
English 8 Connecting the Projection Display RCA Audio Video Cable S-Video Cable Audio Cable Monitor Cable VGA Cable Audio Cable Power Cord - Optoma EP610H | User Manual - Page 9
connected. The projector will detect your computer source automatically. 5. If necessary, make adjustments to the image from the projector's On-Screen the lamp module. Please contact your local dealer or distributor for replacement lamp and refer to " Changing the lamp"(Page 21) in the manual. * - Optoma EP610H | User Manual - Page 10
Raise the projection display to the desired angle and then press the elevator release buttons to release the elevator foot. ‚ Fine-tune the height by manually turnig each foot. (Refer to the following figures below) Screen Elevator Foot Elevator Releasing Button - Optoma EP610H | User Manual - Page 11
English 11 w Adjusting the Image Size [ ] Maximum ( ) Minimum [27"] (20") [100"] [60"] (76") (45") [150"] (114") [200"] (153") [260"] (197") Max. 27" 60" 100" 150" 200" 260" Screen (inch) Min. 20" 45" 76" 114" 153" 197" Distance(ft.) 3.8' 8.4' 14' 21' 28' 36' Screen Size - Optoma EP610H | User Manual - Page 12
English 12 User Controls User Control Overview There are two ways for you to control the functions: panel control and remote control. w Panel Control w Remote Control - Optoma EP610H | User Manual - Page 13
lamp on and off when the main power switch is turned on. Menu 4Press "Menu" to open the on-screen display (OSD) menus and to switch among different menus. To exit OSD, press the "Freeze/CLR" button or select the " Exit Menu" icon and press "Enter" button. The projector the projector to the - Optoma EP610H | User Manual - Page 14
of settings. When in computer source, the OSD will be the "Computer OSD". When in Video source, the OSD will be the " Video OSD". The projector will detect the source automatically. 4To open the OSD menus, press the "Menu" button on the Remote Control or Panel Control. 4To select among different - Optoma EP610H | User Manual - Page 15
adjusts tracking, frequency and vertical and horizontal position for most computers. * The image options are available only for computer sources. The projector can set these options automatically for video sources. Audio 4Volume l Press the left button to decrease the volume. l Press the right - Optoma EP610H | User Manual - Page 16
: Stereo sound effect. l Stereo-enhance: Stereo-enhance sound effect. Projection 4Front-Desktop The factory default setting. 4Rear-Desktop When you select this function, the projector reverses the image so you can project behind a translucent screen. 4Front-Ceiling When you select this function, the - Optoma EP610H | User Manual - Page 17
4Lamp Warning Choose this function to show or hide the warning message when the lamp changing warning message displayed. 4Lamp Reset Reset the lamp setting only when the lamp changing is done. Exit Menu 4Exit Menu When you like to close the OSD menus, choose this item and select " YES" to exit menu - Optoma EP610H | User Manual - Page 18
English 18 Appendices Troubleshooting If you are experiencing trouble with the projection display, refer to the following. If the problem persists, please contact your local dealer or our service center. Problem: No image appears on screen. 4 Ensure all the cables and power connections are correctly - Optoma EP610H | User Manual - Page 19
monitor freezes, restart all the equipment and the projection display. Problem: The screen of the Notebook or PowerBook computer is not displaying to make it compatible with the product. Problem: Image is out of focus 4 Adjust the Focus Ring on the projector lens. 4 Make sure the projection screen - Optoma EP610H | User Manual - Page 20
English 20 Problem : The screen is outstretched when displaying 16:9 DVD. The projector itself will automatically detect 16:9 DVD and adjust the aspect ratio by digitization 4:3 aspect ratio type on your DVD player, please select 4:3 OnScreen-Display(OSD) function of the projector for your display. - Optoma EP610H | User Manual - Page 21
English 21 Maintenance w Cleaning the Air Filter 4Cleaning Procedure: 1. Turn off the power. 2. Remove the air filter cover. 3. Remove the air filter from the filter cover. 4. Clean the air filter with a vacuum cleaner. 5. Place the air filter back in position. Make sure the air filter is fully - Optoma EP610H | User Manual - Page 22
possible. Make sure the projection display has been cooled for at least 60 minutes before changing the lamp. ! Warning: Lamp compartment is hot! Allow it to cool before changing lamps! 4 Lamp Changing Procedure: 1. Turn off the power and allow the projection display to cool down. 2. Disconnect the - Optoma EP610H | User Manual - Page 23
the 2 screws of the lamp module and pull out the lamp module by the handle. Lamp Handle Lamp Screws 5. Replace the new lamp module by the handle and tighten the screws. Lamp Handle 6. Place the lamp cover back in position and lock the 2 screws. 7. Remember to reset the lamp life timer from OSD menus - Optoma EP610H | User Manual - Page 24
English 24 Specifications LCD panel Lamp Number of Pixels Displayable Color Projection Lens Image Size 0.9" poly-silicon panels x 3 - tr=12ms, tf=30ms response time - 350:1 contrast ratio - 150-watt UHP lamp - 800 pixels (H) X 600 lines (V) - 16.7M colors - F1.8 ~2.0, f 38~50mm w/ 1.3 X - Optoma EP610H | User Manual - Page 25
Compatibility Modes Mode Resolution IBM & VESA VGA IBM & VESA VGA IBM & VESA VGA IBM & VESA VGA IBM & VESA VGA IBM & VESA VGA IBM & VESA VGA IBM & VESA VGA IBM & VESA VGA IBM & VESA VGA VESA SVGA VESA SVGA VESA SVGA VESA SVGA VESA SVGA *VESA XGA *VESA XGA *VESA XGA * VESA XGA Apple Macintosh LC
-
 1
1 -
 2
2 -
 3
3 -
 4
4 -
 5
5 -
 6
6 -
 7
7 -
8
-
9
-
10
-
11
-
12
-
13
-
14
-
15
-
16
-
17
-
18
-
19
-
20
-
21
-
22
-
23
-
24
-
25
 |
 |

English
1
Usage Notice
Precautions
..........................................................................................
2
Introduction
About the Product
.................................................................................
3
Package Overview
...............................................................................
4
Installation
Product Overview
.................................................................................
5
Connecting the Projection Display
.......................................................
8
Powering On/Off the Projection Display
...............................................
9
Adjusting the Image Size
......................................................................
10
User Controls
User Controls
.......................................................................................
12
OSD Menus
.........................................................................................
14
Appendices
Troubleshooting
....................................................................................
18
Maintenance
.........................................................................................
20
Specifications
.......................................................................................
23
Compatibility Modes
.............................................................................
24
Table of Contents