Optoma GB-200 User Manual
Optoma GB-200 Manual
 |
View all Optoma GB-200 manuals
Add to My Manuals
Save this manual to your list of manuals |
Optoma GB-200 manual content summary:
- Optoma GB-200 | User Manual - Page 1
instructions. Heed all warnings. Turn off and unplug the power plug from the AC outlet before cleaning the unit. Use a soft dry cloth with mild detergent to clean the housing. Only use attachments/accessories certified by the manufacturer. Refer all servicing to certified service - Optoma GB-200 | User Manual - Page 2
Max.), Non-condensing Storage: -20°C ~ 60°C, 80%RH (Max.), Non-condensing Package Overview The following parts are included in the carton. (*) GB-200 Blending Box AC Power Cord User's guide (CD) Warranty card Due to different applications in each country, some regions may have different - Optoma GB-200 | User Manual - Page 3
Product Overview Front Back 1 1. Front Side: LED indicators and Power Switch 2. Rear Side: Input / Output and control panel LED Light Message Status Power On (Normal) Standby HDMI Rx. Failed HDMI Tx. Failed Warp Failed HDMI Rx. and Tx. Failed HDMI Rx. and Warp Failed HDMI Tx. and Warp Failed LED - Optoma GB-200 | User Manual - Page 4
I/O and Control Panel IP Definition Switch XXX (192.168.0.xxx); xxx can be 10 ~ 250 Default IP for Channel A is 192.168.0.11 Default IP for Channel B is 192.168.0.12 - Optoma GB-200 | User Manual - Page 5
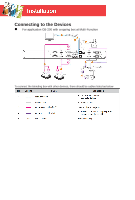
Connecting to the Devices For application GB-200 with cropping box at Multi-Function To connect the blending box with other devices, there should be cables listed as below - Optoma GB-200 | User Manual - Page 6
is application at Blending project To connect the blending box with other devices, there should be cables listed as below The HDMI/DVI Splitter should support EDID reading feature that support to read GB-200's EDID from PC side - Optoma GB-200 | User Manual - Page 7
- Optoma GB-200 | User Manual - Page 8
1: Open the "Internet Protocol (TCP/IP) Properties" Go to the start up menu and click Control Panel". Click on "Network and Internet Connections". Warping Box supports Windows XP, Windows Vista (Home), Windows7 (Home); Warping Box does NOT - Optoma GB-200 | User Manual - Page 9
Click on "Network Connections". You should now see your "LAN (local area network)" icon. Right click the "LAN (local area network) icon" and click on "Properties" at the bottom of the drop down window. (*) Please disconnect the wireless network before setting computer's IP address. - Optoma GB-200 | User Manual - Page 10
Step 2: Set the computer's IP Address. Highlight the "Internet Protocol (TCP/IP)" and click the "Properties" button. In the "Internet Protocol (TCP/IP) Properties" window, check the radio button for "Use the following IP address". Set computer's IP address to the same network group with (NOTE - Optoma GB-200 | User Manual - Page 11
Setting the Computer's Proxy Server Step 1: Click on "Internet Options" You can find it in the following path: "Start up menu -> Control Panel -> Network and Internet Connections -> Internet Options". Or open the web browser and select the "Tools" menu and then choose the "Internet Options". Or - Optoma GB-200 | User Manual - Page 12
Step 3: Do NOT check the "Use a proxy server for your LAN" option. Click the "OK" button to save and apply the settings. - Optoma GB-200 | User Manual - Page 13
The default IP address of blending box is A (192.168.0.11) and B (192.168.0.12). If user (NOTE #6) needs to modify IP address, please follow instruction. Step 1: Use flat screw to adjust the default IP address A ( 192.168.0.11) and B (192.168.0.12) in rear panel into other IP address when - Optoma GB-200 | User Manual - Page 14
Step 3: Installing the GB-200 AP Step 4: After installation is finishing, clicking the icon "GB-200.exe" on desktop - Optoma GB-200 | User Manual - Page 15
Multi-Function Project Create New Multi-Function Project The box can be operated following two scenarios: "Multi-Function" and" Blending." "Multi-function" includes following feature" (i) Warp: Adjust image to do geometry correction for curve, cylinders screen...etc (ii) Color :Adjust color - Optoma GB-200 | User Manual - Page 16
After installation AP, clicking GB-200 icon follows the steps to install Step 1: Create "New Multi-Function" Project. User can create channels for blending Press Multi-Function again; the second channel icon will show. If you need - Optoma GB-200 | User Manual - Page 17
Connected Icon: Sleep Icon: The channel is selected icon : The channel is connected and selected icon : How to delete the Channel: Press 【delete】buttons after the channel was selected - Optoma GB-200 | User Manual - Page 18
source port 】:HDMI or DVI 3. Editing 【IP address 】at this channel that should be as same as one of IP address at rear panel of GB-200 BOX and click【Connect】to link 4. After the channel network is linked well with green hook on the icon of channel ,Clicking 【Synchronize】to load - Optoma GB-200 | User Manual - Page 19
Step 3: 【Warp】 Settings Press "Warp" on top bar to open【Warp】page 1. Adjustment Pattern Overview H Overlap : Modify the size of Horizontal overlap area V Overlap : Modify the size of Vertical overlap area Grid Color : Color of Pattern line (*1) Adjust Point : Present the point you are adjusting (*1) - Optoma GB-200 | User Manual - Page 20
X and Y axis of the select point for reference (*2)Press left click of mouse with green hook at 【Blank】to send pure Black image when need Guide line for warp adjustment Adjust outer Cursors then inner of cursors For example: adjust outer 16 red points first then adjust 9 green points at following - Optoma GB-200 | User Manual - Page 21
1. The color settings of Cursor for Color adjustment Press left click of mouse with green hook for 【Show Cursor】and right click of mouse on the 【Color】 to change the cursor color via Red/Green/Blue adjustment 2. Adjust Grid number: Range are 2x2, 3x3, 5x4, 9x7 Use mouse to adjust or Key broad 【Ctrl】 - Optoma GB-200 | User Manual - Page 22
Step 5: 【Edge Blending】 Settings Press" Edge Blending " on top bar to open 【Edge Blending】page 1. Select which edge of image to modify : Top/Bottom/Right/Left At position Green frame Press left click with green hook for 【Enable】then Input the start point and width of Blending area and press key - Optoma GB-200 | User Manual - Page 23
4. After all channels are enable of Test Pattern and are with interval color : Green or Purple 5. Call out Step 3 Warp page to match overlap with 4 blocks between each projector If the percentage in step 3 is too small to warp correctly 4 blocks is matching or the overlapping is too huge to warp too - Optoma GB-200 | User Manual - Page 24
Step 6: 【Black Level】Settings Press" Black Level " on top bar to open 【Black Level】page and Press left click with green hook for 【Enable】 1. At position Green frame Press left click with green hook for【Enable】and select Gamma number for whole black level adjustment Notes: This Gamma number is - Optoma GB-200 | User Manual - Page 25
3. At position Blue frame (i) Choosing one number(color) of Palette at Orange frame to define a quadrangle with this color (ii) Use mouse or key broad 【W】、【A】、【S】、【D】to select the point become a hollow point (like ) for control following settings And Use right click on the selected point( like a - Optoma GB-200 | User Manual - Page 26
Save Config file Click 【File】【Save】 Information appears at display Red Screen Saving the setting of Warp Green Screen Saving the setting of color adjustment Red+Green+Blue+Cyan Saving the setting of Edge Blending Red+Green+Blue+Cyan Saving the setting of Black Level +Yellow+purple - Optoma GB-200 | User Manual - Page 27
Open the previous setting Clicking【File】【Open】 Remember to click【Synchronization All】to synchronize all channels. - Optoma GB-200 | User Manual - Page 28
end-user to do image blending at multi-projectors with native resolution for each projector from PC Source. After installation AP, clicking GB-200 icon follows the steps to install Step 1: Create" New Blending" Project will go into Blending box process. Step 2: The following page defines the output - Optoma GB-200 | User Manual - Page 29
Select Resolution: Range XGA/WXGA/1080P Choice box output resolution (projector's native resolution) Select Input Port: Click【Next】button Blending Box Project only support when source is PC and the OS must be Window 7 or Windows XP . - Optoma GB-200 | User Manual - Page 30
【Next】button The ideal condition: the overlap's percentage at optical should be same the overlap's percentage (the setting in GB-200's AP). In real case, please input the overlap percentage at GB-200 AP should be equal or less ( < = )the percentage at optical if you want to use warping settings to - Optoma GB-200 | User Manual - Page 31
Step 4: Configure each channel's IP address in each Boxes into AP. The IP range is from 192.168.0.10 to 192.168.0.250 (1) Select and Click the number(channel) inside the image (2) Change IP address to match each channel's IP address in Boxes (3) Click【Apply】 button to access (4) Repeat above process - Optoma GB-200 | User Manual - Page 32
setting at AP into Box 5-2 If OS is Windows XP(Not for Windows 7), the image will become orange after press 【OK】,Please remembering to change manually the high resolution timing. Detail settings will be Case E of "Trouble Shooting" in final page - Optoma GB-200 | User Manual - Page 33
Step 6: Click【Warp】 page to match overlap with 4 blocks between each projector(*) If the percentage of Horizontal Overlap and Vertical overlap at step 3 is too small to warp 4 four block matching correct or the overlapping is to huge to warp, please go back to step 1 again to Create" New Blending" - Optoma GB-200 | User Manual - Page 34
Change the size of overlap area Click 【Overlap】【Change Overlap Area...】 Must Click【Warp】page to enable this function 1. Adjust overlap area 2. Click【Preview】to preview the expected result - Optoma GB-200 | User Manual - Page 35
+ Blue +Cyan + BOX is saving Black Level settings Yellow+ Purple screen In Blending Project: Orange screen There is no input source or the timing won't support - Optoma GB-200 | User Manual - Page 36
settings BOX is saving Edge Blending settings BOX is saving Black Level settings In Blending Project: There is no input source or the timing won't support 援 - Optoma GB-200 | User Manual - Page 37
Delete GB-200 Channel Or Press (Del) Sound Effect Config file Auto Save - Optoma GB-200 | User Manual - Page 38
Compatibility Timing at Multi-Function Project XGA and WXGA only support 60Hz output. It might have frame tear when input timing is 50Hz - Optoma GB-200 | User Manual - Page 39
Compatibility Timing table at Blending Project (XGA) Layout 1H 2V 1H 3V 1H 4V XGA@60Hz 2H 1V 3H1V 2H2V Overlap (%) H: 0 H: 10 H: 20 H: 30 H: 40 H: 50 H: 0 H: 10 H: 20 H: 30 H: 40 H: 50 H: 26 H: 36 H: 46 H: 50 V: 0 V: 10 V: 20 V: 30 V: 40 V: 50 V: 21 V: 30 V: 40 V: 50 H: 25 V: 23 H: 40 V: 38 H: 50 - Optoma GB-200 | User Manual - Page 40
send multi-native resolutions to multi-projector and GB102 can operate all features under "Multi-Function" Project at this case。 ※ If customer need professional technical support ,please call Optoma For operating correct on Blending feature, the recommend OS in PC will be windows 7 and Windows XP - Optoma GB-200 | User Manual - Page 41
Project Case E: It will take100 second to source input signal if you press "Synchronize" before input signal connect to GB-200. Please make sure the HDMI/DVI Splitter that must supports to read Box's EDID from PC And Make sure OS is Window 7 that allow PC to creating customized timing If - Optoma GB-200 | User Manual - Page 42
- Optoma GB-200 | User Manual - Page 43
After open New Blending Project at Step 6 Please check the total resolution and select this timing under Display Properties settings Remember the total resolution at position Red frame Use right click to open following page and click Properties then Click Advanced at position Red frame Click - Optoma GB-200 | User Manual - Page 44
-
 1
1 -
 2
2 -
 3
3 -
 4
4 -
 5
5 -
 6
6 -
 7
7 -
8
-
9
-
10
-
11
-
12
-
13
-
14
-
15
-
16
-
17
-
18
-
19
-
20
-
21
-
22
-
23
-
24
-
25
-
26
-
27
-
28
-
29
-
30
-
31
-
32
-
33
-
34
-
35
-
36
-
37
-
38
-
39
-
40
-
41
-
42
-
43
-
44
 |
 |

Safety Information
Do
Read, keep, and follow instructions.
Heed all warnings.
Turn off and unplug the power plug from the AC outlet before cleaning the unit.
Use a soft dry cloth with mild detergent to clean the housing.
Only use attachments/accessories certified by the manufacturer.
Refer all servicing to certified service partner. Repair service is required once the
device has been damaged in any way, such as power-supply cord or plug is damaged, liquid
has been spilled or objects have fallen into the apparatus, the apparatus has been exposed
to rain or moisture, does not operate normally, or has been dropped.
Do Not
Use this apparatus near water.
Use abrasive cleaners, waxes or solvents to clean the unit.
Install near any heat sources such as radiators, heaters, stoves, or other apparatus
(including amplifier) that produce heat.
To reduce the risk of fire or electric shock, do not expose this unit to rain or
moisture.
Open or disassemble the unit as this may cause electric shock.
Near any appliance generating a strong magnetic field.
Use in direct sunlight.
To reduce the risk of fire or electric shock, do not expose this appliance to rain or
moisture. Dangerous high voltages are present inside the enclosure. Do not open the cabinet.
Refer servicing to qualified personnel only.