Optoma H55 User Manual
Optoma H55 Manual
 |
View all Optoma H55 manuals
Add to My Manuals
Save this manual to your list of manuals |
Optoma H55 manual content summary:
- Optoma H55 | User Manual - Page 1
Panel Control & Remote Control 13 On-Screen Display Menus 16 How to Operate 16 Image-I (Computer mode 17 Image-I (Video mode 18 Image-II (Computer mode 19 Image-II (Video mode 20 Audio 21 Language 21 Management 22 Appendices Troubleshooting 23 Changing the Lamp 25 Specifications 26 - Optoma H55 | User Manual - Page 2
precautions and maintenance as recommended in this user's guide to maximize the life of your remote control is equipped with a Class II laser that emits radiation. Warning- When the lamp reaches the end of its life, it will burn out and may make a loud popping sound. If this happens, the projector - Optoma H55 | User Manual - Page 3
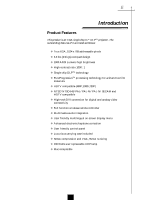
Introduction Product Features This product is an XGA single chip 0.7" DLPTM projector. The outstanding features of it are listed as follows: u True remote controller u Multimedia audio integration u User friendly multilingual on-screen display menu u Advanced electronic keystone correction u User - Optoma H55 | User Manual - Page 4
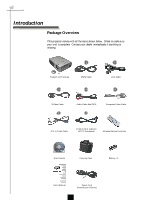
is missing. 1 2 Projector with lens cap 3 RS232 Cable 4 VGA Cable 5 S-Video Cable 6 Audio Cable Jack/RCA 7 Composite Video Cable DVI to D-Sub Cable D-Sub to RCA Cable for HDTV/Component Wireless Remote Controller User's Guide Carrying Case Battery x 2 User's Manual Power Cord - Optoma H55 | User Manual - Page 5
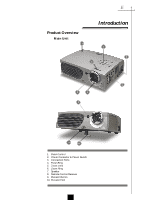
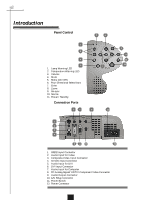
English Product Overview Main Unit 7 Introduction 1 2 6 3 5 4 8 9 10 1. Panel Control 2. Power Connector & Power Switch 3. Connection Ports 4. Focus Ring 5. Zoom Lens 6. Zoom Ring 7. Speaker 8. Remote Control Receiver 9. Elevator Button 10. Elevator Foot 5 - Optoma H55 | User Manual - Page 6
English Introduction Panel Control 1 3 4 5 1. Lamp Warning LED 2. Temperature Warning LED 3. Volume 4. Mute 5. Menu (On/Off) 6. Four Directional Select Keys 7. Enter 8. Zoom 9. Re-sync 10. Source 11. Power /Standby Connection Ports 5 7 2 6 7 9 - Optoma H55 | User Manual - Page 7
English Introduction Full Function Wireless Remote Controller Backlight Enter Menu Computer Source HDTV Source Brightness Contrast Keystone Correction Zoom Power Four Directional Select Keys Re-sync 16:9/4:3 Aspect Ratio Video Source S-Video Source Freeze Color Temperature Mute Volume 7 - Optoma H55 | User Manual - Page 8
Video Cable 6. DVI to D-Sub Cable 7. D-Sub to RCA Cable for HDTV/ Component S-Video Output 6 RGB 2 7 Digital Tuner Output Antenna v To ensure the projector works well with your computer, please configure the display mode of your graphic card to make it less than or equal to 1024 X 768 - Optoma H55 | User Manual - Page 9
power cord and signal cable are securely connected. 3. Turn on the main power switch on the side of the projector and allow the projector to warm up for 1-2 minutes. 4. Turn on the lamp by pressing "Power/Standby" button on the control panel. Ž The startup screen will display and count down for 20 - Optoma H55 | User Manual - Page 10
. You will see a message "Over Temperature" on the onscreen display. The projector will automatically shut itself down. Under normal conditions, the projector can be switched on again for your presentation. If the problem persists, you should contact your local dealer or Optoma service center. 10 - Optoma H55 | User Manual - Page 11
release the button to lock the elevator foot into position. 3. Use Ž to fine-tune tilt-adjustment. To lower the projector: 1. Press the elevator button. 2. Lower down the projector, then release the button to lock the elevator foot into position. 3. Use Ž to fine-tune tilt-adjustment. 1 Elevator - Optoma H55 | User Manual - Page 12
the image, rotate the focus ring until the image is clear. The projector will focus at distances from 3. 7 feet to 40.7 feet (1. x 13.2" 3.7' 98" 79" 78.4" x 58.8" 62.4" x 46.8" 13.1' v This graph is for user's reference only. 123" 197" 246" 305" 98" 157" 197" 244" 98.4" x 73.8" 157.6" x - Optoma H55 | User Manual - Page 13
Control Backlit 4 When you press "Backlit" button, all buttons on remote controller will flash fluorescent yellow. Return to normal mode, press "Backlit" button again. Power 4 Refer to the "Power On/Off the Projector" section on page 9~10. Four Directional Select Keys 4 Use to select items - Optoma H55 | User Manual - Page 14
English User Controls PC 4 Press "PC" to choose RGB, DVI-Digital, DVI-Analog sources. HDTV Press the "Freeze" button to still the screen image. Keystone 4 Adjust image distortion caused by tilting the projector. (±16 degrees) Zoom 4 When you press "Zoom" button, the zoom icon appears on the screen. - Optoma H55 | User Manual - Page 15
English User Controls Use the Panel Control Power / Standby 4 Refer to the "Power On/Off the Projector" section on page 9~10. Source 4 Press "Source" to choose RGB, DVI-Digital, DVI-Analog, S-Video, Composite, Component and HDTV sources. Re-Sync 4 Automatically synchronizes the projector to the - Optoma H55 | User Manual - Page 16
English User Controls On-Screen Display Menus How to operate 4The Projector has multilingual On-Screen Display( OSD will be the " Video OSD". The projector will detect the source automatically. 4To open the OSD menu, press the "Menu" button on the Remote Control or Panel Control. 4 When OSD is - Optoma H55 | User Manual - Page 17
English Computer mode Language Management Image-I Image-II Audio Brightness Zoom Contrast Keystone Color Temp. User Controls Image-I (Computer mode) u u u Brightness Adjusting the brightness of the image. 4 Press the to darken image. 4 Press the u to lighten the image. Contrast The - Optoma H55 | User Manual - Page 18
English User Controls Video mode Language Management Image-I Image-II Audio Brightness Tint Contrast Sharpness Color Image-I (Video mode) u u u u u Brightness Adjusting the brightness of the image. 4 Press - Optoma H55 | User Manual - Page 19
English Computer mode Language Management Image-I Image-II Audio Frequency H. Position Tracking V. Position 16:9 / 4:3 Reset Yes No User Controls Image-II (Computer mode) vReset : Reset items include both Image-I and Image-II settings. u u Frequency "Frequency" is for changing the - Optoma H55 | User Manual - Page 20
English User Controls Video mode Language Management Image-I Image-II Audio Keystone Color Temp. 16:9 / 4:3 Reset Yes No Image-II (Video mode) vReset : Reset items include both Image-I and Image-II settings. Keystone Correction Adjust image distortion caused by tilting the projector. - Optoma H55 | User Manual - Page 21
English Computer / Video mode Language Management Image-I Image-II Audio Volume Stereo / Mono Treble Mute Bass Audio User Controls Volume u u u 4 Press the to decrease the volume. 4 Press the u to increase the volume. Treble The treble setting controls the higher frequencies of your - Optoma H55 | User Manual - Page 22
you select this function, the projector reverses and turns the image upside down at same time. You can project from behind a translucent screen with ceiling mounted projection. Signal Type Select signal type between RGB, HDTV and Component video sources. Lamp Reminding Choose this function to - Optoma H55 | User Manual - Page 23
English Appendices Troubleshooting If you are experiencing trouble with the projector, refer to the following. If the problem persists, please contact your local dealer or Optoma service center. Problem : No image appears on screen. 4 Ensure all the cables and power connections are correctly and - Optoma H55 | User Manual - Page 24
, please select 4:3 On Screen-Display(OSD) function of the projector for your display. Problem : Image is reversed. 4 To open "Menu" then select "Management" to adjust the projection. Problem : Lamp burns out or makes a popping sound 4 When the lamp reaches its end of life, it will burn out and may - Optoma H55 | User Manual - Page 25
has been cooled down for at least 30 minutes before changing the lamp. 4 Lamp Changing Procedure: 1. Turn off the power to the projector by pressing the Power/Standby button. 2. Allow the projector to cool down at least 30 minutes. 3. Turn off the main power switch. 4. Disconnect the power cord - Optoma H55 | User Manual - Page 26
English Appendices Specifications Light Valve Contrast Ratio Lamp Number of Pixels Displayable Color Projection Safety Regulation - Single Chip DLPTM Technology - 1000:1 (Full On / Full Off) - 200W User Replaceable UHP Lamp - 1024 pixels(H) X 768 lines(V) - 16.7M colors - F/2.44~2.69 f=28.8~34 - Optoma H55 | User Manual - Page 27
English Appendices Compatibility Modes Mode VESA VGA VESA VGA VESA VGA VESA VGA VESA VGA VESA VGA VESA VGA SVGA SVGA SVGA SVGA SVGA VESA XGA VESA XGA VESA XGA VESA XGA VESA XGA * VESA SXGA * VESA SXGA MAC LC13" MAC II 13" MAC 16" MAC 19" * MAC MAC G4 MAC G4 MAC G4 I MAC DV I MAC DV I MAC DV *
-
 1
1 -
 2
2 -
 3
3 -
 4
4 -
 5
5 -
 6
6 -
 7
7 -
8
-
9
-
10
-
11
-
12
-
13
-
14
-
15
-
16
-
17
-
18
-
19
-
20
-
21
-
22
-
23
-
24
-
25
-
26
-
27
 |
 |

E
nglish
1
Usage Notice
Precautions
...........................................................................................
2
Introduction
Product Features
...................................................................................
3
Package Overview
................................................................................
4
Product Overview
..................................................................................
5
Main Unit
..........................................................................................
5
Panel Control
....................................................................................
6
Connection Ports
..............................................................................
6
Full function wireless remote controller
.............................................
7
Installation
Connecting the Projector
.......................................................................
8
Powering On/Off the Projector
...............................................................
9
Power On the Projector
....................................................................
9
Power Off the Projector
....................................................................
10
Adjusting the Projected Image
...............................................................
11
Adjusting the Projector Height
..........................................................
11
Adjusting the Projector Zoom/Focus
.................................................
12
Adjusting Projection Image Size
.......................................................
12
User Controls
Panel Control & Remote Control
............................................................
13
On-Screen Display Menus
....................................................................
16
How to Operate
................................................................................
16
Image-I (Computer mode)
................................................................
17
Image-I (Video mode)
.......................................................................
18
Image-II (Computer mode)
...............................................................
19
Image-II (Video mode)
......................................................................
20
Audio
................................................................................................
21
Language
.........................................................................................
21
Management
.....................................................................................
22
Appendices
Troubleshooting
.....................................................................................
23
Changing the Lamp
...............................................................................
25
Specifications
........................................................................................
26
Compatibility Modes
..............................................................................
27
Table of Contents