Optoma H57 User Manual
Optoma H57 Manual
 |
UPC - 796535115950
View all Optoma H57 manuals
Add to My Manuals
Save this manual to your list of manuals |
Optoma H57 manual content summary:
- Optoma H57 | User Manual - Page 1
Projector Zoom / Focus 14 User Controls 15 Control Panel & Remote Control 15 On-Screen Display Menus 18 How to operate ...18 Menu Tree ...19 Language ...20 Image-I ...21 Image-II ...23 Image-III ...24 Management ...26 PIP ...28 Appendices 29 Troubleshooting 29 Replacing the lamp 33 Ceiling - Optoma H57 | User Manual - Page 2
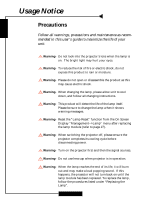
messages. Warning- Reset the "Lamp Reset" function from the On Screen Display "Management-->Lamp" menu after replacing the lamp module (refer to page 27). Warning- When switching the projector off, please ensure the projector completes its cooling cycle before disconnecting power. Warning- Turn - Optoma H57 | User Manual - Page 3
English Usage Notice Do: ™ Turn off the product before cleaning. ™ Use a soft cloth moistened with mild detergent to clean the display housing. ™ Disconnect the power plug from AC outlet if the product is not being used for a long period of time. Don't: ™ Block the slots and openings on the unit - Optoma H57 | User Manual - Page 4
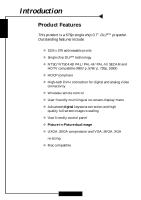
Product Features This product is a 576p single chip 0.7" DLPTM projector. Outstanding features include: ‹ 1024 x 576 addressable pixels ‹ -I connection for digital and analog video connectivity ‹ Wireless remote control ‹ User friendly multilingual on-screen display menu ‹ Advanced digital keystone - Optoma H57 | User Manual - Page 5
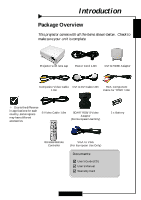
shown below. Check to make sure your unit is complete. Projector with lens cap Power Cord 1.8m DVI to HDMI Adaptor Composite Video Cable DVI to Use Only) 2 x Battery Wireless Remote Controller VGA to VGA (For European Use Only) Documents: ; User's Guide (CD) ; User's Manual ; Warranty Card 5 - Optoma H57 | User Manual - Page 6
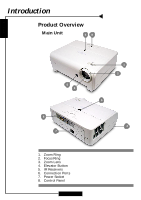
English Introduction Product Overview Main Unit 58 5 3 6 7 1. Zoom Ring 2. Focus Ring 3. Zoom Lens 4. Elevator Button 5. IR Receivers 6. Connection Ports 7. Power Socket 8. Control Panel 6 1 2 5 4 - Optoma H57 | User Manual - Page 7
English Control Panel Introduction 2 1 3 6 8 5 10 9 7 8 4 1. Temp Indicator LED 2. Power Indicator LED 3. Lamp Indicator LED 4. Power/Standby 5. Source 6. Four Directional Select Keys 7. Enter 8. Keystone Correction 9. Menu (On/Off) 10. Re-sync 7 - Optoma H57 | User Manual - Page 8
Video Input ) 2. VGA Connector (PC Analog Signal/HDTV/Component Video Input) 3. RS232 Input Connector 4. Component Video Input Connector 5. S-Video Input Connector 6. Composite Video Input Connector 7. Power Socket 8. KensingtonTM Lock Port 8 - Optoma H57 | User Manual - Page 9
English Introduction Wireless Remote Controller 7 3 4 1 2 5 8 6 10 12 9 11 13 14 16 15 18 17 22 19 23 20 21 24 25 1. Power On/Off 2. Re-sync 3. Display Hide 4. Freeze . OK (Enter) 19. Menu 20. Contrast 21. Color 22. Brightness 23. Display Mode 24. Reset 25. RGB Adjustment 9 - Optoma H57 | User Manual - Page 10
English Installation Connecting the Projector 7 DVD Player, Settop Box, HDTV receiver RGB DVI RS232 2 4 10 9 1 8 6 S-Video Output 3 5 Video Output 1. Power Cord 2. DVI to HDMI Adaptor 3. Composite Video Cable 4. DVI to VGA 5. S-Video Cable 6. RCA Component Cable for YPbPr 7. SCART RGB/S- - Optoma H57 | User Manual - Page 11
the Projector 1. Remove the lens cap. 2. Ensure that the power cord and signal cable are securely connected. The Power LED will turn red. 3. Turn on the lamp by pressing "Power/Standby" button on the control panel. n The startup screen will display for 30 seconds and the Power LED will flash green - Optoma H57 | User Manual - Page 12
intervals), it indicates a problem with the lamp. Turn off the projector and disconnect the power cord from the electrical outlet, then contact your local dealer or our service center. See page 31. ™ When the "LAMP" indicator flashes red (1 second intervals), it indicates the fan failed. Stop using - Optoma H57 | User Manual - Page 13
English Installation Adjusting the Projected Image Adjusting the Projector Image Height The projector is equipped with an elevator foot for adjusting the image height. To raise the position. 3. Use p to fine-tune the display angle. 1 1 Elevator Button 3 2 Tilt Adjusting Wheel Elevator Foot 13 - Optoma H57 | User Manual - Page 14
English Installation Adjusting the Projector Zoom / Focus You may turn the zoom ring to zoom in or out. To focus the image, rotate the focus ring until the image is clear. The projector will focus at distances from 4.9 to 32.8 feet (1.5 to 10.0 meters). Zoom Ring Focus Ring 14 - Optoma H57 | User Manual - Page 15
English User Controls Control Panel & Remote Control There are two ways for you to control the functions: Remote Control and Control Panel. Control Panel Remote Control Using the Control Panel Power/Standby 4 Refer to the "Power On/Off the Projector" section on pages 11-12. Source 4 Press - Optoma H57 | User Manual - Page 16
English User Controls Using the Remote Control Power 4 Refer to the "Power On/Off the Projector" section on pages 11-12. Re-Sync 4 Automatically synchronizes the projector to the input source. Display Hide 4 "Hide" immediately turns the screen gray. Press "Hide" a second time to restore the - Optoma H57 | User Manual - Page 17
User Controls CONT (Contrast) 4 Controls the degree of difference between the lightest and darkest parts of the picture. MODE (Display Mode) 4 Select the display mode from Cinema, Normal, Vivid, Dynamic and User. COLOR (Colour) 4 Adjust a video image from black and white to fully satu rated color - Optoma H57 | User Manual - Page 18
User Controls English On Screen Display Menus The Projector has multilingual On Screen Display menus that allow you to make image adjustments and change a variety of settings. The projector will automatically detect the source. How to operate 1. To open the OSD menu, press "Menu " on the Remote - Optoma H57 | User Manual - Page 19
Dynamic/User Bild-II R Brightness/G Brightness/B Brightness/R Contrast/G Contrast/B Contrast High/Mid./Low 16:9/4:3/Letterbox/Window Horizontal Position/Vertical Position Horizontal Keystone/Vertical Keystone Front Desktop/Front Ceiling/Rear Desktop/Rear Ceiling Lamp Reset/Brite Mode Lamp Hours/Lamp - Optoma H57 | User Manual - Page 20
English User Controls Computer / Video Mode Image - I Language Image - II Management Image - III PIP Language Language Choose the multilingual OSD menu . Use the select your preferred language. Press "Menu" to finalize the selection. or key to 20 - Optoma H57 | User Manual - Page 21
of pictures: Cinema, Normal, Vivid ,Dynamic and User. You can customize contrast, brightness, color, tint, sharpness, and gamma for each preset mode. Contrast The contrast controls the degree of difference between the lightest and darkest parts of the picture. Adjusting the contrast changes the - Optoma H57 | User Manual - Page 22
English User Controls Computer / Video Mode Language Image - I Management Image - II PIP Image - III Display mode Cinema Normal Vivid Dynamic User Contrast Brightness Colour Tint Sharpness Gamma Image-I ™ "Sharpness" function is not supported under YPbPr and YCbCr source. Sharpness - Optoma H57 | User Manual - Page 23
Press OK to adjust Colour temp. Mid DLP gamma DLP white peaking Reset Press OK to reset User Controls Image-II RGB Press OK to adjust the R (Red), G (Green), or B (Blue) for brightness and contrast. Color Temp. The color temp control adjusts the color temperature of the image. At a higher - Optoma H57 | User Manual - Page 24
English User Controls Computer/Video Mode Language Image - I Management Image - II PIP Image - III Format Frequency Phase Position Press OK to adjust Keystone Press OK to adjust Zoom - Optoma H57 | User Manual - Page 25
Keystone Press OK to adjust Zoom User Controls Image-III ™"Position" function is not supported under DVI-I source. Position Adjust the right. Keystone (Keystone Correction) Adjust image distortion caused by tilting projector. (±16 degrees) Press OK to adjust Vertical keystone Horizontal - Optoma H57 | User Manual - Page 26
When you select this function, the projector reverses and turns the image upside down at same time. You can project from behind a translucent screen with ceiling mounted projection. Lamp Press OK to adjust. Lamp reminding Yes No Lamp hours Lamp reset Yes No Brite mode On Off 26 - Optoma H57 | User Manual - Page 27
Image - II Management Image - III PIP Menu location Projection Lamp Press OK to adjust Source lock On Off User Controls Management 4 Lamp Reminding: Select this function to show or hide the warning message when the lamp replacing reminder message is displayed. The message will show up when - Optoma H57 | User Manual - Page 28
English User Controls Computer/Video Mode Image - I Language Image - II Management Image - III PIP PIP On Off screen position on the display screen. Source Change Choose the input source of the projector on the PIP screen. Swap Choose "Yes" to swap main screen and PIP screen each other. 28 - Optoma H57 | User Manual - Page 29
to the "Replacing the lamp" section. 4 Make sure you have removed the lens cap and the projector is switched on. 4 Ensure that the "Hide" feature is not enabled. Problem: Partial, scrolling or incorrectly displayed image. 4 Press the "Re-Sync" button on the Remote Control or Control Panel. 4 If - Optoma H57 | User Manual - Page 30
, restart all the equipment and the projector. Problem: The screen of the Notebook or PowerBook: In Control Panels, open the PowerBook Display to select Video Mirroring "On". Problem: Image is page 24. 4 Change the monitor color setting from your computer. Problem: Image has vertical flickering bar 4 - Optoma H57 | User Manual - Page 31
To replace the lamp, follow the procedures in the "Replacing the Lamp". Seepage 33. Problem: LED lighting message Message Power LED Green Red Standby State Warming Cooling Normal Error (Lamp failed) Error (Fan failed) Error (Over Temp.) Flashing Flashing Temp LED Lamp LED Flashing Flashing - Optoma H57 | User Manual - Page 32
sure air in and outlets are no blocked 3 Clean the dust filter If the problem persists in spite of the above, please contact a service centre for repair. 4 Fan Failed : The projector will switch off automatically. Please contact a service centre for repair. 4Replacing the lamp : Lamp life exceed 32 - Optoma H57 | User Manual - Page 33
risk of personal injury, do not drop the lamp module or touch the lamp bulb. The bulb may shatter and cause injury if it is dropped. Lamp Changing Procedure: 1. Switch off the power to the projector by pressing the Power button. 2. Allow the projector to cool down at least 30 minutes. 3. Disconnect - Optoma H57 | User Manual - Page 34
English Appendices Ceiling Mount Installation 1. To prevent damaging your projector, please use the ceiling mount package for installation. 2. If you wish to use a third party ceiling mount kit please ensure the screws used to attached a mount to the projector met the following specifications:
-
 1
1 -
 2
2 -
 3
3 -
 4
4 -
 5
5 -
 6
6 -
 7
7 -
8
-
9
-
10
-
11
-
12
-
13
-
14
-
15
-
16
-
17
-
18
-
19
-
20
-
21
-
22
-
23
-
24
-
25
-
26
-
27
-
28
-
29
-
30
-
31
-
32
-
33
-
34
 |
 |

E
nglish
E
nglish
1
Table of Contents
Table of Contents
.......................................................................................
1
Usage Notice
..............................................................................................
2
Precautions
.........................................................................................................
2
Introduction
...............................................................................................
4
Product Features
.................................................................................................
4
Package Overview
...............................................................................................
5
Product Overview
................................................................................................
6
Main Unit
.........................................................................................................................
6
Control Panel
..................................................................................................................
7
Connection Ports
............................................................................................................
8
Wireless Remote Controller
............................................................................................
9
Installation
................................................................................................
10
Connecting the Projector
...................................................................................
10
Powering On/Off the Projector
.............................................................................
11
Powering On the Projector
............................................................................................
11
Powering Off the projector
............................................................................................
12
Warning Indicator
.........................................................................................................
12
Adjusting the Projected Image
...........................................................................
13
Adjusting the Projector Image Height
...........................................................................
13
Adjusting the Projector Zoom / Focus
..........................................................................
14
User Controls
..........................................................................................
15
Control Panel & Remote Control
........................................................................
15
On-Screen Display Menus
................................................................................
18
How to operate
..............................................................................................................
18
Menu Tree
.....................................................................................................................
19
Language
......................................................................................................................
20
Image-I
.........................................................................................................................
21
Image-II
........................................................................................................................
23
Image-III
.......................................................................................................................
24
Management
.................................................................................................................
26
PIP
...............................................................................................................................
28
Appendices
...............................................................................................
29
Troubleshooting
.................................................................................................
29
Replacing the lamp
............................................................................................
33
Ceiling Mount Installation
...................................................................................
34