Optoma TS350 User Manual
Optoma TS350 Manual
 |
View all Optoma TS350 manuals
Add to My Manuals
Save this manual to your list of manuals |
Optoma TS350 manual content summary:
- Optoma TS350 | User Manual - Page 1
the Projector Zoom / Focus 14 Adjusting Projected Image Size 14 User Controls 15 Control Panel & Remote Control 15 On-Screen Display Menus 18 How to operate ...18 Menu Tree...19 Language ...20 Image-I ...21 Image-II (Computer Mode 23 Image-II (Video Mode 25 Audio ...27 Management ...28 Lamp - Optoma TS350 | User Manual - Page 2
, and follow all changing instructions. Warning- This product will detect the life of the lamp itself. Please be sure to change the lamp when it shows warning messages. Warning- Reset the "Lamp Reset" function from the On Screen Display "Lamp Setting" menu after replacing the lamp module (refer to - Optoma TS350 | User Manual - Page 3
Usage Notice Do: Turn off the product before cleaning. Use a soft cloth moistened with mild detergent to clean the display housing. Disconnect the power plug from AC outlet if the product is not being used for a long period of time. Don't: Block the slots and - Optoma TS350 | User Manual - Page 4
Features This product is an SVGA single chip 0.55" DLPTM projector. Outstanding features include: True SVGA, 800 x 600 image and Auto saving the adjustments Full function remote control User friendly multilingual on screen display menu Advanced digital keystone correction and high quality - Optoma TS350 | User Manual - Page 5
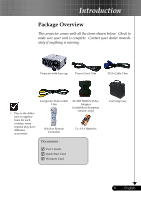
dealer immediately if anything is missing. Projector with lens cap Power Cord 1.8m VGA Cable 1.8m Due to the difference in applications for each country, some regions may have different accessories. Composite Video Cable 1.8m Wireless Remote Controller SCART RGB/S-Video Adaptor (available in - Optoma TS350 | User Manual - Page 6
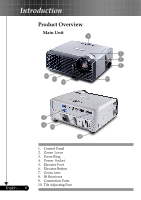
Introduction Product Overview Main Unit 1 8 7 6 2 3 4 5 English ... 6 9 10 8 10 1. Control Panel 2. Zoom Lever 3. Focus Ring 4. Power Socket 5. Elevator Foot 6. Elevator Button 7. Zoom Lens 8. IR Receivers 9. Connection Ports 10. Tilt Adjusting Feet - Optoma TS350 | User Manual - Page 7
Introduction Control Panel 1 2 3 10 4 98 7 46 5 1. Power Indicator LED 2. Temp Indicator LED 3. Lamp Indicator LED 4. Keystone Correction 5. Power/Standby 6. Re-Sync 7. Source 8. Four Directional Select Keys 9. Menu (On/Off) 10. Enter 7 ... English - Optoma TS350 | User Manual - Page 8
Introduction Connection Ports 7 654 3 21 8 9 1. IR Receiver 2. RS232 Connector 3. Monitor Loop-through Output Connector 4. Composite Video Input Connector 5. S-Video Input Connector 6. Audio Input Connector 7. PC Analog signal/SCART RGB/HDTV/Component Video Input Connector 8. PC Analog - Optoma TS350 | User Manual - Page 9
Introduction Wireless Remote Control 1 2 1. Power 2. IR LED 3. Hide 8 3 4. Freeze 9 4 5. D-Zoom 10 5 6. Display Mode 7. Menu 11 6 8. Keystone Correction 9. Re-Sync 12 7 10. Volume + 13 11. Volume - 12. Reset 14 13. Enter 14. Four Directional Select Keys 15 15. - Optoma TS350 | User Manual - Page 10
Video Cable 5 S-Video Cable (Optional Accessory) 6 D-15 to RCA Adapter for YPbPr (Optional Accessory) English ... 10 To ensure the projector works well with your computer, please set the display mode of your graphic card less than or equal to 1280 x 1024 resolution. Make sure the timing of the - Optoma TS350 | User Manual - Page 11
menu after the startup screen display. 4. Turn on your source (computer, notebook, video player,etc.). The projector will detect your source automatically. If you connect multiple sources at the same time, use the "Source" button on the control panel or remote control to switch. Turn on the - Optoma TS350 | User Manual - Page 12
60 seconds, it indicates the projector has been overheated. The projector will automatically shut itself down. Under normal conditions, the projector can be switched on again after it has cooled down. If the problem persists, you should contact your local dealer or our service center. See page 34~35 - Optoma TS350 | User Manual - Page 13
Installation Adjusting the Projected Image Adjusting the Projector Image Height The projector is equipped with an display angle. To lower the image: 1. Press the elevator button. 2. Lower the image, then release the button to lock the elevator foot into position. 3. Use to fine-tune the display - Optoma TS350 | User Manual - Page 14
. To focus the image, rotate the focus ring until the image is clear. The projector will focus at distances from 4.9 to 39.4 feet (1.5 to 12.0 meters) with mechanical travel. Zoom Lever Focus Ring Adjusting Projection Image Size 38.1" (96.8cm) 34.7" (88.1cm) Diagonal 76.2" (193.6cm) 127.1" (322 - Optoma TS350 | User Manual - Page 15
Panel Remote Control Using the Control Panel Power/Standby Refer to the "Power On/Off the Projector" section on pages 11-12. Source Press "Source" to choose RGB, Component-p, Component-i, S-Video, Composite Video and HDTV sources. Menu Press "Menu" to launch the on screen display (OSD - Optoma TS350 | User Manual - Page 16
the Remote Control Power Refer to the "Power On/Off the Projector" section on pages 11-12. Re-Sync Automatically synchronizes the projector to Confirm your selection of items. Menu Press "Menu" to launch the on screen display menu. To exit OSD, press "Menu" again. VGA1 Press "VGA1" to - Optoma TS350 | User Manual - Page 17
User Controls Composite Press "composite" to choose Composite video source. 17 ... English - Optoma TS350 | User Manual - Page 18
you to make image adjustments and change a variety of settings. The projector will automatically detect the source. How to operate 1. To open the OSD menu, press "Menu " on the Remote Control or Control Panel. 2. When OSD is displayed, use keys to select any item in the main menu. While making - Optoma TS350 | User Manual - Page 19
Menu Tree User Controls 19 ... English - Optoma TS350 | User Manual - Page 20
User Controls Language Language Choose the multilingual OSD menu . Use the your preferred language. Press "Enter" to finalize the selection. or key to select English ... 20 - Optoma TS350 | User Manual - Page 21
Controls Image-I Display Mode the image. Contrast The contrast controls the degree of difference between the lightest and darkest parts of the picture. Adjusting the projector. (±15 degrees) Color Press "Enter" to adjust the red, green and blue colors. White Peaking Use the white peaking control - Optoma TS350 | User Manual - Page 22
User Controls maximum peaking. If you prefer a stronger image, adjust towards the maximum setting. For a smooth and more natural image, adjust towards the minimum setting. Color Temp. - Optoma TS350 | User Manual - Page 23
Controls Image-II (Computer Mode) Frequency "Frequency"changes the display data frequency to match the frequency of your computer's graphic card. If you experience a vertical flickering bar, use this function to make an adjustment. Tracking "Tracking" synchronizes the signal timing of the display - Optoma TS350 | User Manual - Page 24
User Controls Original Pixel Window 16:9 Image Position Adjust the image position to up or down, when you select the aspect ratio to 16:9. Press the to - Optoma TS350 | User Manual - Page 25
User Controls Image-II (Video Mode) "Saturation", "Tint" and "Sharpness" function is not supported under DVI-D mode. choose your desired aspect ratio. 4:3 : The input source will be scaled to fit the projection screen. 16:9 : The input source will be scaled to fit the width of the screen - Optoma TS350 | User Manual - Page 26
User Controls Original Pixel Window 16:9 Image Position Adjust the image position to up or down, when you select the aspect ratio to 16:9. Press the to - Optoma TS350 | User Manual - Page 27
User Controls Audio Volume Press the Press the Mute to decrease the volume. to increase the volume. Choose the left icon to turn mute on. Choose the right icon to turn mute off. 27 ... English - Optoma TS350 | User Manual - Page 28
User Controls English ... 28 Management Menu Location Choose the menu location on the display screen. Projection Front-Desktop The factory default setting. Rear-Desktop When you select this function, the projector reverses the image so you can project behind a translucent screen. - Optoma TS350 | User Manual - Page 29
Controls Security Settings A. Press "Enter" to set password. (First time) 1. Password is allowed of 4~8 bits, Default value is "0000". 2. Display verification while user switch on projector. Off: When user switch on projector without password. Timer: Displays the usable hours when switch on - Optoma TS350 | User Manual - Page 30
"Menu", and then press the key.) Zoom Press the Press the Reset to reduce the size of an image. to magnify an image on the projection screen. Choose "Yes" to return the display parameters on all menus to the factory default settings. English ... 30 - Optoma TS350 | User Manual - Page 31
User Controls Lamp Setting Lamp Hours Display the cumulative lamp operating time. Lamp Reset Reset the lamp life hour after replacing a new lamp. Lamp Reminding Choose this function to show or to hide the warning message when the changing lamp message is displayed. The message will show up 30 hours - Optoma TS350 | User Manual - Page 32
refer to the "Replacing the lamp" section. Make sure you have removed the lens cap and the projector is switched on. Ensure that the "Hide" feature is not turned on. Problem: Partial, scrolling or incorrectly displayed image Press "Re-Sync" on the remote control or control panel. If you are - Optoma TS350 | User Manual - Page 33
If you experience difficulty changing resolutions or your monitor freezes, restart all equipment including the projector. Problem: The screen of the Notebook or PowerBook computer is not displaying a presentation If you are using a Notebook PC: Some Notebook PCs may deactivate their own screens - Optoma TS350 | User Manual - Page 34
light => No light => English ... 34 Make sure the projection screen is between the required distance 4.9 to 39.4 feet (1.5 to 12.0 meters) from the projector. See page 14. Problem: The image is stretched when displaying 16:9 DVD The projector automatically detects 16:9 DVD and adjusts the aspect - Optoma TS350 | User Manual - Page 35
Appendices Problem: Message Reminders Fan failed: Over temperature: Replacing the lamp: Password error : Time out: 35 ... English - Optoma TS350 | User Manual - Page 36
of personal injury, do not drop the lamp module or touch the lamp bulb. The bulb may shatter and cause injury if it is dropped. English ... 36 Lamp Replacing Procedure: 1. Switch off the power to the projector by pressing the Power/ Standby button. 2. Allow the projector to cool down at least 30 - Optoma TS350 | User Manual - Page 37
Appendices Remark : "*"com- pressed computer image. Compatibility Modes Mode VESA VGA VESA VGA VESA VGA VESA VGA VESA VGA VESA VGA VESA VGA VESA VGA VESA VGA VESA SVGA VESA SVGA VESA SVGA VESA SVGA VESA SVGA * VESA XGA * VESA XGA * VESA XGA * VESA XGA * VESA SXGA * VESA SXGA * VESA SXGA * VESA - Optoma TS350 | User Manual - Page 38
for installation. 2. If you wish to use a third party ceiling mount kit, please ensure the screws used to attached a mount to the projector met the following specifications: Please note that damage resulting from incorrect installation will invalidate the warranty. Screw type: M2.6 Maximum
-
 1
1 -
 2
2 -
 3
3 -
 4
4 -
 5
5 -
 6
6 -
 7
7 -
8
-
9
-
10
-
11
-
12
-
13
-
14
-
15
-
16
-
17
-
18
-
19
-
20
-
21
-
22
-
23
-
24
-
25
-
26
-
27
-
28
-
29
-
30
-
31
-
32
-
33
-
34
-
35
-
36
-
37
-
38
 |
 |

1
... English
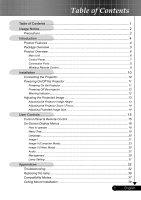
Table of Contents
Table of Contents
.........................................................................................
1
Usage Notice
................................................................................................
2
Precautions
..........................................................................................................
2
Introduction
..................................................................................................
4
Product Features
..................................................................................................
4
Package Overview
...............................................................................................
5
Product Overview
.................................................................................................
6
Main Unit
........................................................................................................................
6
Control Panel
.................................................................................................................
7
Connection Ports
...........................................................................................................
8
Wireless Remote Control
...............................................................................................
9
Installation
..................................................................................................
10
Connecting the Projector
....................................................................................
10
Powering On/Off the Projector
...........................................................................
11
Powering On the Projector
...........................................................................................
11
Powering Off the projector
...........................................................................................
12
Warning Indicator
.........................................................................................................
12
Adjusting the Projected Image
...........................................................................
13
Adjusting the Projector Image Height
..........................................................................
13
Adjusting the Projector Zoom / Focus
..........................................................................
14
Adjusting Projected Image Size
...................................................................................
14
User Controls
.............................................................................................
15
Control Panel & Remote Control
........................................................................
15
On-Screen Display Menus
.................................................................................
18
How to operate
............................................................................................................
18
Menu Tree
....................................................................................................................
19
Language
.....................................................................................................................
20
Image-I
........................................................................................................................
21
Image-II (Computer Mode)
...........................................................................................
23
Image-II (Video Mode)
.................................................................................................
25
Audio
............................................................................................................................
27
Management
................................................................................................................
28
Lamp Setting
...............................................................................................................
31
Appendices
................................................................................................
32
Troubleshooting
..................................................................................................
32
Replacing the lamp
.............................................................................................
36
Compatibility Modes
...........................................................................................
37
Ceiling Mount Installation
...................................................................................
38