Oregon Scientific PE200 User Manual
Oregon Scientific PE200 Manual
 |
View all Oregon Scientific PE200 manuals
Add to My Manuals
Save this manual to your list of manuals |
Oregon Scientific PE200 manual content summary:
- Oregon Scientific PE200 | User Manual - Page 1
, please visit: https://us.oregonscientific.com/service/support.asp For international inquiries, please visit: https://us.oregonscientific. com/about/international.asp EU-DECLARATION OF CONFORMITY Hereby, Oregon Scientific, declares that this Slimfit 3D pedometer (Model: SP200) is in compliance with
-
 1
1
 |
 |

Slimfit 3D Pedometer
MODEL: SP200
USER MANUAL
EN
INTRODUCTION
Thank you for selecting the Oregon Scientific
TM
Slimfit 3D
Pedometer (SP200). The PE200 is a 3D sensor type pedometer
that can detect steps in any dimension it is carried. It is equipped
with clock, 7-day memory, step, speed, distance, fat burn and
calorie counter functions.
IMPORTANT
Do not immerse the pedometer in water.
CONTROL BUTTONS
1.
MODE
: Toggle between main modes; increase values
2.
SET
: Toggle between sub modes; confirm and move to next
setting option
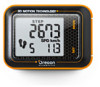
LCD
1
2
11
12
10
9
8
7
3
4
5
6
1. Pedometer Mode
2.
Indicates total data within a week
3.
Displays Time number of step or step walked
4. Battery Display
5.
Indicates step counter is On
6.
Indicates on which day (1-7) before is displayed data recorded
7.
Displays indicates current speed or calorie. reading or distance
walked. (Time / Max Average speed / exerise Time)
8.
Unit (grams / calorie)
9.
Indicates alarm is On
10. Distance Unit (Miles / Kilometres) per hour
11. Indicates calorie mode
12. Indicates speed
GETTING STARTED
ACTIVATE PEDOMETER (FIRST-TIME USE ONLY)
•
Carrying the pedometer
The SP200 can be carried on the waist, around the neck or in
pockets and handbags by using detachable clip provided.
Hook
"pull" to slide off the
pedometer.
NOTE
For most accurate
measurement, please clip the
pedometer onto the belt, or insert
into a tight secure pocket.
•
Set time and user data
To effectively use the pedometer for calculating fat burn and calorie
burned (based on step count and user body weight) and speed
and distance walked (based on step count and user’s height
or calibration), you are advised to set the time and your user
data in the Setting Mode. Refer to Setting Mode in this manual.
IMPORTANT
Remember to set the time and your user data
after every battery replacement.
BATTERY REPLACEMENT
The pedometer uses a CR1620 3V battery, which has already
been installed.
Indicates battery power is low.
To replace battery:
CR1620 3V
1. Use a small Phillips screwdriver to remove battery
compartment lid. Once opened, please keep the screws in
a safe place to avoid losing them.
2.
Remove the old battery and insert the new one, matching
the polarities.
3.
Replace the lid by screwing it back into place using a Phillips
screwdriver.
NOTE
When the battery compartment is opened or battery is
replaced, all data in the pedometer will be reset.
OPERATION MODES
The SP200 has 4 modes of operation. Press
MODE
to navigate
between these modes when banner is displayed.
CLOCK MODE
In the Clock Mode, you can:
•
view the time and calendar
Press
SET
to toggle between displays:
REMARK
Press
MODE
to move to Pedometer mode.
PEDOMETER MODE
In the Pedometer Mode, you can:
•
view the current step count and clock
•
Exercise timer
•
Distance walked
•
Current Speed
Press
SET
to toggle between displays:
--------------
-----------------
------
------
------
-------------------
REMARK
Press
MODE
to move to Daily Record mode.
NOTE
The Distance and Exercise timer will be reset automatically
to zero at midnight.
DAILY RECORD MODE
In the Daily Record Mode, you can view:
•
Calories burned
•
Fat burned
•
Current Step count
•
Average Speed
•
Maximum Speed
MODE
SET
battery
Press
SET
to toggle between displays:
------
------
------
------
------
------
REMARK
Press
MODE
to move to Memory mode.
MEMORY MODE
In the Memory Mode, you can view the records of your steps,
distance, fat burned, calorie burned and timer for the past 7 days
and week total accumulated data.
1. Press
MODE
to enter the Memory Mode.
2. Press
SET
to select which day to view, week total data and
odometer.
In the day’s record, the pedometer will automatically toggle
between daily step counts, exercise timer, distance calorie and
fat burned.
NOTE
Unit automatically toggles between screen displays.
REMARK
Press
MODE
to return to Clock mode.
TIP
Odometer Save
•
You can input the distance walked after changing battery or
performing total reset.
•
Please write down the accumulated distance walked before
changing battery or performing total reset function.
To reset odometer save:
1. Press and hold
SET
to input the values.
2. Press
MODE
to increase values.
3. Press
SET
to confirm and move to next digit.
NOTE
Odometer will be reset to zero after TOTAL RESET or
when the battery is replaced.
RESET THE PEDOMETER
After the INITIAL SETTING of the unit, there are 2 resetting
procedure for user to reset the data.
•
Total reset the pedometer
1. Press
MODE
to enter the Clock Mode.
2. Press and hold both
MODE
and
SET
to total reset the
pedometer.
•
Reset the daily record data
1. Press
MODE
to enter the Pedometer Mode.
2. Press
SET
to toggle to the Exercise Timer record.
3.
Press and hold both
MODE
and
SET
to reset the daily record.
SETTING MODE
INITIAL SETTING
Setting Units
1. Press
MODE
to select measurement unit.
2. Press
SET
to confirm and move to the next setting option.
The setting sequence is: distance, time, calendar, weight, Height
and calibration.
NOTE
Once measurement unit has been set in the initial setting,
all other units will automatically follow the same format.
Item
Measurement Setting option
Distance
Km
Mi
Weight
Kg
Lbs
Height
Cm
in
NORMAL SETTING
You can set below data after initial setting:
•
Clock and calendar
•
Weight
•
Height
•
Calibration
Clock and Calendar setting
1. Press
MODE
to enter the Clock Mode.
2. Press and hold
SET
to set values
3. Press
MODE
to increase values
4. Press
SET
to confirm and move to the next setting option.
The setting sequence is: 12 / 24 time format, time (hour, minute
and second), calendar (year, month and date).
Weight, Height and calibration setting
1. Press
MODE
to enter the Pedometer Mode.
2. Press and hold
SET
to set values.
3. Press
MODE
to increase values
4. Press
SET
to confirm and move to the next setting option.
The setting sequence is: weight, Height and Calibration (Run
/ Walk).
Calibration in RUN or WALK setting
1. Press
MODE
to enter the Pedometer Mode.
2. Press and Hold
SET
to set values.
3. Press
MODE
to select YES or NO for Calibration.
To select NO for calibration:
It will be returned to Pedometer Mode.
NOTE
The pedometer will be calibrated automatically based on
user’s height if user select NO for calibration.
To select YES for calibration:
1. Press
MODE
to select YES, the pedometer
2. Press
MODE
to select RUN or WALK
3. Press
SET
to confirm and moving to the next setting option.
4. Press
MODE
to increase values for distance setting.
5. Press
SET
to confirm and press once more to start calibration
or press
MODE
to move back to the Calibration setting mode.
6.
After RUN or WALK for calibration, press
SET
to finish.
7. Press
SET
or
MODE
to proceed step (2) to (6) again.
8.
Completed the calibration process.
SPECIFICATIONS
Real time clock
12 / 24 format with hour/
minute
Step measurement range
0 - 99,999 steps
Distance measurement range
0 – 99.99 km or mile
Odoemter
9999km or mile
Calorie measurement range
0 – 99,999 Kcal
Fat measurement range
0 –15,000 g
Body height range
150cm – 249cm or 40” – 99”
Body weight range
50kg – 219kg or 66lbs –
479lbs
Exercise timer range
23 hrs 59 mins
Stopwatch measurement
capacity
9 hrs 59 mins 59.99 sec
Power
1x CR1620 3V battery
Operating temperature
-10
0
C to 40
0
C
Storage temperature
-20
0
C to 60
0
C
PRECAUTIONS
To ensure you use your product correctly and safely, read these
warnings and the entire user manual before using the product:
•
Use a soft, slightly moistened cloth. Do not use abrasive of
corrosive cleaning agents, as these may cause damage. Use
lukewarm water and mild soap to clean the device thoroughly
after each training session. Never use the product in hot water
or store it when wet.
•
Do not subject the product to excessive force, shock dust
temperature changes, or humidity. Never expose the product
to direct sunlight for extended periods. Such treatment may
result in malfunction.
•
Do not tamer with internal components. Doing so will terminate
the product warranty and may cause damage. The main unit
contains no user-serviceable parts.
•
Do not scratch hard objects against the LCD display as this
may cause damage.
•
Take precautions when handling all battery types.
•
Remove the batteries whenever you are planning to store
the product for a long period of time.
•
When replacing batteries, use new batteries as specified in
this user manual.
•
The product is a precision instrument. Never attempt to take
this device apart. Contact the retailer or our customer service
department if the product requires servicing.
•
Do not touch the exposed electronic circuitry, as there is a
danger of electric shock.
•
Check all major functions if the device has not been used
for a long time. Maintain regular internal testing and cleaning
of your device. Have your device serviced by an approved
service centre annually.
•
When disposing of this product, ensure it is collected
separately for special treatment and not as normal household
waste.
•
Due to printing limitations, the displays shown in this manual
may differ from the actual display.
•
The contents of this manual may not be reproduced without
the permission of the manufacturer.
NOTE
The technical specifications for this product and the
contents of the user manual are subject to change without notice.
ABOUT OREGON SCIENTIFIC
Visit our website (www.oregonscientific.com) to learn more about
Oregon Scientific products.
If you’re in the US and would like to contact our Customer Care
department directly, please visit:
https://us.oregonscientific.com/service/support.asp
For international inquiries, please visit: https://us.oregonscientific.
com/about/international.asp
EU-DECLARATION OF CONFORMITY
Hereby, Oregon Scientific, declares that this Slimfit 3D pedometer
(Model: SP200) is in compliance with EMC directive 2004 / 108 /
EC. A copy of the signed and dated Declaration of Conformity is
available on request via our Oregon Scientific Customer Service.
Wearing Clip
Clock
Clock
Date
SET
MODE
MODE
MODE
current
step
count
clock
Current
Speed
current
step
count
Exercise
timer
Distance
walked
MODE
Memory
Pedometer
Daily Record
Calories
SET
SET
SET
Calories / Fat burned
Record Mode
Step / Daily average speed
Step / Daily Max speed
Fat burned
Current Step count
Current Step count
Daily Average Speed
Daily Maximum Speed
SET
SET
SET
SET
SET
(loop)
SET
SET
1 days before data
7 days before data
Week Total data
Odometer
Daily Step/Daily Timer
Daily Step/Daily Distance
Daily Calorie/Fat burnt
SET
SET
SET
SET