Oregon Scientific WMR100N User Manual
Oregon Scientific WMR100N Manual
 |
View all Oregon Scientific WMR100N manuals
Add to My Manuals
Save this manual to your list of manuals |
Oregon Scientific WMR100N manual content summary:
- Oregon Scientific WMR100N | User Manual - Page 1
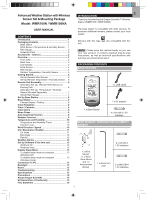
EN Advanced Weather Station with Wireless Sensor Set & Mounting Package Model: WMR100N / WMR100NA INTRODUCTION Thank you for selecting the Oregon Scientific™ Weather Station (WMR100N / WMR100NA). USER MANUAL CONTENTS Introduction 1 Packaging Contents 1 Base station 1 Wind Sensor / Temperature & - Oregon Scientific WMR100N | User Manual - Page 2
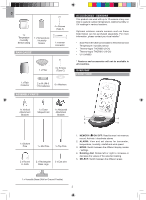
AA UM-3 1.5V batteries 6 x Washers ASSEMBLY PARTS ACCESSORIES - SENSORS This product can work with in various locations. Optional wireless remote sensors such as set alarms for barometer, temperature, humidity, rainfall and wind speed 3. MODE: Switch between the different display modes / settings - Oregon Scientific WMR100N | User Manual - Page 3
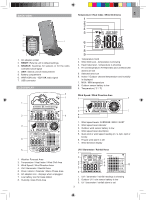
display 5 1. Weather Forecast Area 2. Temperature / Heat Index / Wind Chill Area 3. Wind Speed / Wind Direction Area 4. UVI / Barometer / Rainfall Area 5. Clock / Alarm / Calendar / Moon Phase Area 6. AC adapter icon - displays when unplugged 7. Low battery icon for base station 8. Humidity - Oregon Scientific WMR100N | User Manual - Page 4
6 1. Clock radio reception 2. Alarm 1 and 2 are displayed and set 3. Timestamp is displayed 4. Offset time zone 5. Moon phase 6. Time / date level - Temperature is showing 2. HI / LO humidity and Dew Point alarms are set 3. Comfort levels 4. Humidity trend 5. MAX / MIN humidity 6. Humidity reading - Oregon Scientific WMR100N | User Manual - Page 5
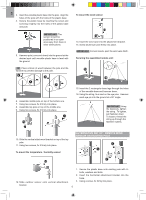
SET UP REMOTE WIND SENSOR The wind sensor takes wind speed and direction readings. The sensor is battery operated. It is capable of transmitting data to the base station wirelessly Insert batteries matching the polarities (+ / -) and replace the anemometer. Press RESET after each 1 battery change - Oregon Scientific WMR100N | User Manual - Page 6
bracket on top of the top pole. 11. Using two screws, fix it firmly into place. To mount the temperature / humidity sensor: 12 ALTERNATIVE SET UP: REMOTE WIND SENSOR ON EXISTING POLE 3 1 2 12. Slide outdoor sensor onto vertical attachment bracket. 1. Secure the plastic base onto existing pole with - Oregon Scientific WMR100N | User Manual - Page 7
the base of the funnel to check the horizontal level. 1 3 2 4 SET UP RAIN GAUGE The rain gauge collects rain and takes readings of rainfall rate and time. The sensor can remotely transmit data to the base station. The base station and rain gauge should be positioned within an effective range: - Oregon Scientific WMR100N | User Manual - Page 8
units for display. TIP To exit from the setting mode, push any button. Alternatively, the base station will automatically exit after 30 seconds. CLOCK RECEPTION This product is designed to synchronize its calendar clock automatically once it is brought within range of a radio signal: WMR100N: • EU - Oregon Scientific WMR100N | User Manual - Page 9
top part of the screen shows the current weather and the weather forecast for the next 12-24 hours within a 30-50 km (19-31 mile) radius. Weather Forecast Area ICON MEANING ICON DESCRIPTION Alarm 1 or 2 is displayed Alarm 1 or 2 is activated Sunny No icons No alarm is set To set an alarm - Oregon Scientific WMR100N | User Manual - Page 10
EN TEMPERATURE AND HUMIDITY The weather station displays indoor and outdoor readings for: 1. Current, minimum and maximum temperatures and relative humidity. 2. Comfort level indicator and trend line. 3. Heat index, wind chill and dew point level. The weather station can connect up to 10 remote - Oregon Scientific WMR100N | User Manual - Page 11
high gust wind alarm setting. 2. Rotate the dial left or right to set the desired values. 3. Press ALARM to confirm the settings. To activate / ICON UVI / BAROMETER / RAINFALL The weather station works with one UV sensor and one rain gauge. The station is capable of storing and displaying - Oregon Scientific WMR100N | User Manual - Page 12
XP To install software: 1. Run CD software provided. 2. Setup wizard dialogue box will appear and guide you through the installation process. 3. After successful installation, double click on desktop shortcut. 4. Click DISPLAY in Oregon Weather Station dialogue box. WINDOWS VISTA To Disable User - Oregon Scientific WMR100N | User Manual - Page 13
The USB is only used for uploading weather data. It cannot be used for charging battery power. BACKLIGHT Press any button or rotate the dial to activate the backlight. RESET Press RESET to return to the default settings. TROUBLESHOOTING PROBLEM Barometer Calendar SYMPTOM Strange readings Strange - Oregon Scientific WMR100N | User Manual - Page 14
% Memory Current, Min and Max Alarm Hi / Lo RADIO-CONTROLLED / ATOMIC CLOCK Synchronization Auto or disabled Clock display HH:MM:SS Hour format 12hr AM/PM or24hr Calendar DD/MM or MM/DD Weekday in 5 (E, G, mix new and old batteries. • Images shown in this manual may differ from the 14 - Oregon Scientific WMR100N | User Manual - Page 15
fic. com/service/support.asp For international inquiries, please visit: www2. oregonscientific.com/about/international.asp EU DECLARATION OF CONFORMITY Hereby, Oregon Scientific, declares that this Advanced Weather Station with Wireless Sensor Set & Mounting Package (models: WMR100N / WMR100NA) is
-
 1
1 -
 2
2 -
 3
3 -
 4
4 -
 5
5 -
 6
6 -
 7
7 -
8
-
9
-
10
-
11
-
12
-
13
-
14
-
15
 |
 |

1
EN
Advanced Weather Station with Wireless
Sensor Set & Mounting Package
Model: WMR100N / WMR100NA
USER MANUAL
CONTENTS
Introduction
...............................................................
1
Packaging Contents
.................................................
1
Base station
...........................................................
1
Wind Sensor / Temperature & Humidity Sensor
.....
1
Rain Gauge
............................................................
2
Assembly Parts
......................................................
2
Accessories - Sensors
.............................................
2
Overview
....................................................................
2
Front View
..............................................................
2
Back View
..............................................................
3
LCD Display
...........................................................
3
Wind Sensor
...........................................................
4
Rain Gauge
............................................................
4
Outdoor Temperature / Humidity Sensor
................
5
Getting Started
..........................................................
5
Set Up Remote Wind Sensor
.................................
5
Set Up Remote Temperature / Humidity Sensor
....
5
Remote Unit Assembly
.............................................
5
Alternative Set Up:
Remote Wind Sensor on
Existing Pole
..........................................................
6
Alternative Set Up:
Temperature / Humidity
Sensor Mounted Separately
...................................
7
Set Up Rain Gauge
................................................
7
Set Up Base Station
.................................................
8
Base Station
..............................................................
8
Change Display / Setting
........................................
8
Clock Reception
.......................................................
8
Clock / Calendar
.......................................................
9
Clock Alarm
...............................................................
9
Moon Phase
..............................................................
9
Auto Scanning Function
..........................................
9
Weather Forecast
.....................................................
9
Temperature and Humidity
....................................
10
Temperature and Humidity Trend
.........................
10
Comfort Level
.......................................................
10
Wind Direction / Speed
..........................................
10
UVI / Barometer / Rainfall
.......................................
11
UV Index
..............................................................
11
Barometer
............................................................
12
Rainfall
.................................................................
12
Weather Alarms
......................................................
12
Set Up Software (First time use)
...........................
12
Windows XP
.........................................................
12
Windows Vista
......................................................
12
Disable Sleep Mode
................................................
13
To disable sleep mode on computer
....................
13
(Windows XP)
To disable sleep mode on computer
....................
13
(Windows Vista)
Connection To PC
...................................................
13
Backlight
.................................................................
13
Reset
........................................................................
13
Troubleshooting
.....................................................
13
Specifications
.........................................................
13
Precautions
.............................................................
14
About Oregon Scientific
........................................
15
EU Declaration of Conformity
...............................
15
FCC Statement
........................................................
15
INTRODUCTION
Thank you for selecting the Oregon Scientific™ Weather
Station (WMR100N / WMR100NA).
The base station is compatible with other sensors. To
purchase additional sensors, please contact your local
retailer.
Sensors with this logo
are compatible with this
unit.
NOTE
Please keep this manual handy as you use
your new product. It contains practical step-by-step
instructions, as well as technical specifications and
warnings you should know about.
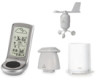
PACKAGING CONTENTS
BASE STATION
1 x Base Station
1 x USB cable
1 x 6V adapter
4 x AA UM-3 1.5V
batteries
WIND SENSOR / TEMPERATURE & HUMIDITY
SENSOR
1 x Wind
Sensor
(1 x Wind
Vane Above
and 1 x
Anemometer
Below)
1 x Aluminium
pole
2 x AA UM-3
1.5V batteries
2 x AAA UM-4
1.5V batteries