Oster CKSTBRTW20 English
Oster CKSTBRTW20 Manual
 |
View all Oster CKSTBRTW20 manuals
Add to My Manuals
Save this manual to your list of manuals |
Oster CKSTBRTW20 manual content summary:
- Oster CKSTBRTW20 | English - Page 1
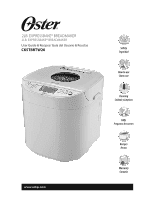
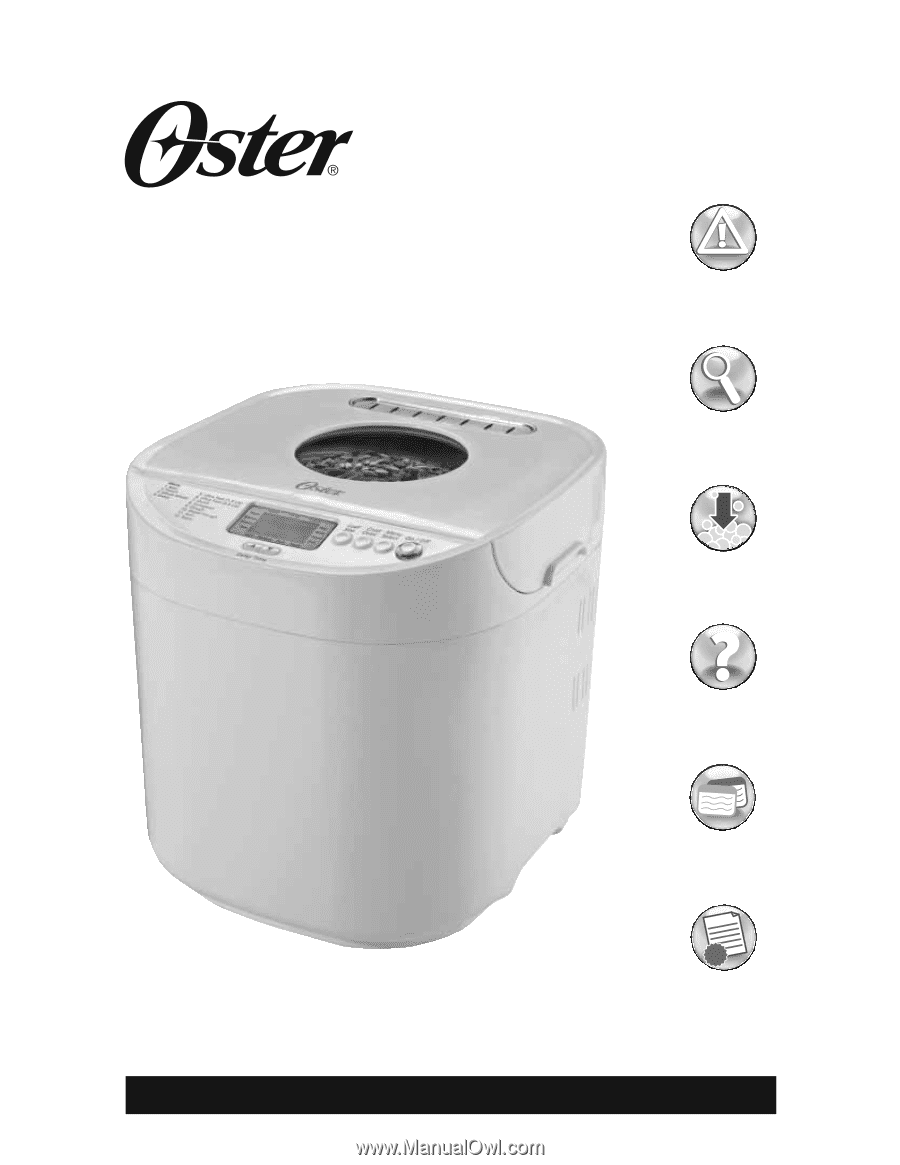
2LB. EXPRESSBAKE® BREADMAKER 2LB. EXPRESSBAKE® BREADMAKER User Guide & Recipes/ Guía del Usuario & Recetas CKSTBRTW20 www.oster.com Safety Seguridad How to use Cómo usar Cleaning Cuidado y Limpieza FAQs Preguntas frecuentes Recipes Rectas Warranty Garantía - Oster CKSTBRTW20 | English - Page 2
instructions, product labels and warnings before using the breadmaker. 2. Do not touch hot surfaces. Always use oven mitts when handling hot materials, and allow metal parts to cool before cleaning. Allow the bread maker service facility for examination, repair plug, (one blade is wider than - Oster CKSTBRTW20 | English - Page 3
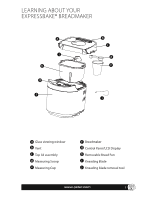
LEARNING ABOUT YOUR EXPRESSBAKE® BREADMAKER a i h g f b c d e j a Glass viewing window b Vent c Top lid assembly d Measuring Scoop e Measuring Cup f Breadmaker g Control Panel/LCD Display h Removable Bread Pan i Kneading Blade j Kneading blade removal tool www.oster.com 3 - Oster CKSTBRTW20 | English - Page 4
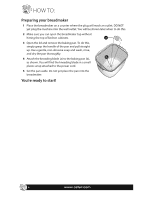
, and dry the pan thoroughly. 4 Attach the kneading blade (a) to the baking pan (b), b as shown. You will find the kneading blade in a small plastic wrap attached to the power cord. 5 Set the pan aside. Do not yet place the pan into the breadmaker. You're ready to start! 4 www.oster.com - Oster CKSTBRTW20 | English - Page 5
with a spoon before leveling off. Order of adding ingredients The SECOND most important secret of making bread is putting the ingredients into the breadmaker in the EXACT order given in the recipe. This means: - FIRST, liquid ingredients - SECOND, dry ingredients - LAST, yeast Also, make sure ALL - Oster CKSTBRTW20 | English - Page 6
flour. 9 Carefully snap the baking pan into the breadmaker. 10 Close the lid of the bread machine and plug the power cord into the wall outlet. The following things will happen. The machine will "beep," and the lights of the display will turn on. The time setting will say "3:25" hours. 11 Repeatedly - Oster CKSTBRTW20 | English - Page 7
comes out. If it sticks, take a rubber spatula (metal can damage the pan's surface) and carefully go around the sides of the loaf until the bread comes out. 3 If the kneading blade comes out with the bread, use the included kneading blade removal tool to remove it from the loaf, Remember, it will be - Oster CKSTBRTW20 | English - Page 8
Overview of Breadmaker Functions Bread function: Please refer to the relative recipe and follow the below process 1 Insert the kneading blade into the bread pan. 2 Place ingredients in the bread pan in the following order: liquid ingredients first, dry ingredients (except yeast) second and yeast - Oster CKSTBRTW20 | English - Page 9
sizes and distribute them evenly in the bread pan. Breadmaker Settings (for 2 lb. loaves) Your breadmaker can bake almost any kind of bread. Recipes are included to clearly show you which setting you should use. This model has 12 settings total - 9 bread settings (basic, French, whole wheat, sweet - Oster CKSTBRTW20 | English - Page 10
Loaf of bread, you must let the bread maker cool for 20 minutes with the cover open. • YOU CAN use standard bread mixes for EXPRESSBAKE® Breadmaker setting breads, but the results may not be as good as the results when using the recipes within this book EXPRESSBAKE® Breadmaker Setting Tips and - Oster CKSTBRTW20 | English - Page 11
recipe is a great one to try for your first EXPRESSBAKE® Breadmaker setting loaf. Traditional White Bread 1-1/2 lb. loaf Ingredients: 1 cup + 2 tablespoons 9 ounces total) of hot water (115° - 125°) 2 tablespoons oil (room temperature) 2 tablespoons sugar 1 teaspoon salt 3 cups Bread Machine - Oster CKSTBRTW20 | English - Page 12
good results for you in the past. Important: You CANNOT use the Delay Timer for EXPRESSBAKE® Breadmaker settings. Before using the Delay Timer: 1 Add all of the ingredients of the recipe. 2 Select the correct setting for the kind of bread you are making (French, Sweet, etc.). 3 Select the crust - Oster CKSTBRTW20 | English - Page 13
the delay timer is set where you want it, make sure to press the "Start/Stop" button. The colon ":" will flash and your bread will be ready when you planned. Important: When using the delay timer during times of hot weather, you may wish to reduce the liquid in your recipe by 1 or 2 tablespoons - Oster CKSTBRTW20 | English - Page 14
breadmaker begin to make "knocking" sounds, the doughbaII is too dry. To correct this problem, simply sprinkle in water, a teaspoon at a time, until the doughball appears smooth, round and dry, and circles nicely in the pan the recipe, sometimes as much as 2-4 tablespoons per cup. If the bread rises - Oster CKSTBRTW20 | English - Page 15
with the breadmaker. This will damage the non-stick pan and other parts. 2 Don't worry if the color of the bread pan changes over time. The color change is a result of steam and other moisture and does not affect the machine's performance. 3 If you have trouble removing the kneading blade, place - Oster CKSTBRTW20 | English - Page 16
service center for repair. Troubleshooting Breadmaker Problems What do I do if I see smoke or smell a burning odor from the back of the machine? Ingredients have spilled out of the bread pan and into the machine itself. Stop the breadmaker and allow it to cool off. Clean the breadmaker before using - Oster CKSTBRTW20 | English - Page 17
could also be the result of forgetting to add salt to the recipe or forgetting to put the kneading blade into the baking pan. What do I do if the bread did not rise enough? There are several possible solutions. Try using less flour (a teaspoon less at a time), more yeast (1/4 teaspoon more at a time - Oster CKSTBRTW20 | English - Page 18
RECIPES Basic Setting Recipes (Menu 1) Basic bread machine stages (for 1.5 lb. loaves) For the basic cycle, you can expect the following things to happen as the timer counts down to zero. To begin: The ingredients are kneaded for the first time (5 minutes) At 3:13, the dough rests for 5 minutes At - Oster CKSTBRTW20 | English - Page 19
yeast) to the bread pan. 3 Use your finger to form a well (hole) in the flour where you wilt pour the yeast. Yeast must NEVER come into contact with a liquid when you are adding ingredients. Measure the yeast and carefully pour it into the well 4 Snap the baking pan into the breadmaker and close the - Oster CKSTBRTW20 | English - Page 20
) to the bread pan. 3 Use your finger to form a well (hole) in the flour where you will pour the yeast. Yeast must NEVER come into contact with a Liquid when you are adding ingredients. Measure the yeast and carefully pour it into the well. 4 Snap the baking pan into the breadmaker and close the - Oster CKSTBRTW20 | English - Page 21
European Setting Recipes (Menu 8) European Bread Machine Stages - (for 1.5 lb. loaves - loaf size is preset) For the European cycle you can expect the following things to happen as the timer counts down to zero. To begin: The ingredients are kneaded for the first time (5 minutes) At 3:25, the dough - Oster CKSTBRTW20 | English - Page 22
made in an automatic bread maker requires the addition of yeast. The starter's strength and the rising times in the breadmaker are not sufficient to allow for proper rising without the use of additional yeast. French Setting Recipes (Menu 2) French Bread Machine Stages (for 1.5 lb. loaves) For the - Oster CKSTBRTW20 | English - Page 23
yeast and carefully pour it into the well. 4 Snap the baking pan into the bread maker and close the lid. 5 Press the "Menu Select" button to choose the French setting. 6 Press the "Loaf Size" button to choose 1 lb., 1.5 lb., or 2 lb. 7 Press the "Crust Color" button to choose light, medium, dark or - Oster CKSTBRTW20 | English - Page 24
4 Snap the baking pan into the breadmaker and close the lid. 5 Press the "Menu Select" button to choose the Sweet setting. 6 Press the "Loaf Size" button to choose 1 lb., 1.5 lb., or 2 lb. 7 Press the "Start/Stop" button. Note: When adding fruit ingredients like raisins, the bread machine will make - Oster CKSTBRTW20 | English - Page 25
well. 4 Snap the baking pan into the breadmaker and close the lid. 5 Press the "Menu Select" button to choose the Sweet setting. 6 Press the "Loaf Size" button to choose 1 lb., 1.5 lb., or 2 lb. 7 Press the "Start/Stop" button. Special Winter Bread (no Delay Timer) - 1.5 lb. loaf 7/8 cups water - Oster CKSTBRTW20 | English - Page 26
add liquid ingredients to the bread pan. 2 Measure and add dry ingredients (except yeast) to the bread pan. 3 Use your finger to form a well are kneaded with the dough. EXPRESSBAKE® Setting Setting Recipes (Menus 5 and 6) EXPRESSBAKE® Bread Machine Stages For the EXPRESSBAKE® Breadmaker cycle you - Oster CKSTBRTW20 | English - Page 27
well. 4 Snap the baking pan into the breadmaker and close the lid. 5 Press the "Menu Select" button to choose the Express Bake setting a. Express Bake (1.5LB) for 1.5 pound loaves b. Express Bake (2.0LB) for 2 pound loaves 6 Press the "Start/Stop" button. Cheese & Rye Bread 1.5 pound loaf 1 cup and - Oster CKSTBRTW20 | English - Page 28
pan into the breadmaker and close the lid. 5 Press the "Menu Select" button to choose the Express Bake setting a. Express Bake (1.5LB) for 1.5 pound loaves b. Express Bake (2.0LB) for 2 pound loaves 6 Press the "Start/Stop" button. Whole Wheat Setting Recipes (Menu 3) Whole Wheat Bread Machine - Oster CKSTBRTW20 | English - Page 29
) to the bread pan. 3 Use your finger to form a well (hole) in the flour where you will pour the yeast. Yeast must NEVER come into contact with a liquid when you are adding ingredients. Measure the yeast and carefully pour it into the well. 4 Snap the baking pan into the breadmaker and close the - Oster CKSTBRTW20 | English - Page 30
) to the bread pan. 3 Use your finger to form a well (hole) in the flour where you will pour the yeast. Yeast must NEVER come into contact with a liquid when you are adding ingredients. Measure the yeast and carefully pour it into the well. 4 Snap the baking pan into the breadmaker and close the - Oster CKSTBRTW20 | English - Page 31
Dough/Pasta Setting Recipes (Menus 9 and 10) Dough/Pasta Bread Machine Stages For the Dough/Pasta cycle you can expect the following things to happen as the timer counts down to zero. Dough/Pasta: To begin: The ingredients are kneaded for the first time (5 minutes) At 1:25, the dough rests for 5 - Oster CKSTBRTW20 | English - Page 32
, place on baking pan as directed and cover with a clean kitchen towel. Place dough in oven until doubled in size. This will reduce rising time by about one half. Recipes using whole grain or unrefined flours contain less gluten and may not rise as much as those using white bread flour. As a result - Oster CKSTBRTW20 | English - Page 33
bread pan. 2 Press and hold down the "Start/Stop" button to clear the display. 3 Press the "Menu Select" button to choose the dough setting a beep and the display clears. 6 To remove the bread pan, grasp the handle firmly and lift the pan out. 7 Shape as desired (see "Variations for Shaping Dough - Oster CKSTBRTW20 | English - Page 34
to 7/8 cup milk 1 tablespoon butter or margarine Dough 1 Measure all ingredients into bread pan. 2 Press and hold down the "Start/Stop" button to clear the display. 3 Press the "Menu Select" button to choose the dough setting. 4 Press the "Start/Stop" button. The display will begin counting down - Oster CKSTBRTW20 | English - Page 35
you hear a beep and the display clears. 6 To remove the bread pan, grasp the handle firmly and lift the pan out. 7 Pat dough into 12 x 15-inch jelly roll pan or greased 12-inch round (1-1/2 pound recipe) or 14-inch round pizza pan (2 pound recipe). 8 Preheat oven to 400°F. 9 Spread pizza sauce over - Oster CKSTBRTW20 | English - Page 36
4 Press the "Start/Stop" button. The display will begin counting down the time on the Jam setting. When jam is ready, the unit will signal and the display will read "0:00." 5 Using hot pads, remove bread pan. Pour jam into containers; cover. Refrigerate to set. Makes about 3 cups. 36 www.oster.com - Oster CKSTBRTW20 | English - Page 37
with a pastry brush. Bake as directed in the recipe. • For a shiny golden crust, use Egg Glaze or Egg Yolk Glaze. • For a shiny chewy crust, use Egg White Glaze (crust will be lighter in color). Egg Glaze fresh or 1/2 tsp. dried dill weed 1 small clove garlic, finely chopped www.oster.com 37 - Oster CKSTBRTW20 | English - Page 38
1-1/2 to 2 tsp. lemon or orange juice Creamy Vanilla Glaze Mix until thin enough to drizzle: 1/2 cup powdered sugar 1/4 tsp. vanilla 1-1/2 to 2 tsp. milk 38 www.oster.com - Oster CKSTBRTW20 | English - Page 39
NOTES www.oster.com 39 - Oster CKSTBRTW20 | English - Page 40
normal wear of parts or damage resulting from any of the following: negligent use or misuse of the product, use on improper voltage or current, use contrary to the operating instructions, disassembly, repair or alteration by anyone other than JCS or an authorized JCS service center. Further, the - Oster CKSTBRTW20 | English - Page 41
la panificadora. 2. No toque las superficies calientes. Siempre use guantes para horno cuando manipule material caliente. Deje enfriar las partes metálicas antes de limpiar. Deje enfriar completamente la ESTE ARTEFACTO ES PARA USO DOMÉSTICO SOLAMENTE. GUARDE ESTAS INSTRUCCIONES www.oster.com 41 - Oster CKSTBRTW20 | English - Page 42
EXPRESSBAKE® a i h g f b c d e j a Visor b Ventilación c Junta tapa superior d Cuchara medidora e taza medidora f Panificadora g Panel de control / Visor LCD h Recipiente desmontable para el pan i Cuchilla para amasar j Herramienta para desmontar la cuchilla para amasar 42 www.oster - Oster CKSTBRTW20 | English - Page 43
Asegúrese de poder abrir la parte superior de la a panificadora sin golpear los armarios de Abra la tapa y retire el recipiente para pan. Para esto, simplemente tome la manija del recipiente la cuchilla para amasar (a) al recipiente para pan (b), como se muestra. Encontrará la cuchilla para - Oster CKSTBRTW20 | English - Page 44
pan para pan (asegúrese de comprar harina para pan, pan es la medición exacta. Esta es la clave para hornear pan secos siempre nivele la medida con la parte trasera de un cuchillo o una importante para hacer pan es colocar los de cocción y el modo leudante del pan. Una buena idea es contar con - Oster CKSTBRTW20 | English - Page 45
pan NO use agua muy pan. 3 Mida cuidadosamente 2 cucharadas soperas de margarina o manteca a temperatura ambiente. Agréguela al recipiente para pan pan el recipiente para pan. 5 Mida para pan. 6 pan. recipiente para pan. 8 pan pan. Escuchará cómo la panificadora comienza a mezclar los ingredientes. - Oster CKSTBRTW20 | English - Page 46
pan. Etapas de la panificadora (flautas de 2 lb.) Es divertido ver cómo se hace el pan el pan está listo. Una vez horneado el pan hasta que salga el pan. Si se pega, pan. 3 Si la cuchilla para amasar sale con el pan pan 15 minutos antes de cortarlo y disfrutarlo. Importante: Si desea hacer otro pan - Oster CKSTBRTW20 | English - Page 47
pan. 2 Coloque los ingredientes en el recipiente para pan el recipiente para pan en la pan que desea (básico, francés, integral, dulce, horneado exprés (1.5 lbs.) horneado exprés (2.0 lbs para un pan básico de 2.0 lbs: el para un pan básico de 2.0 lbs). 9 pan de la máquina con guantes - Oster CKSTBRTW20 | English - Page 48
1 hora, 43 minutos) 8 Europeo 2 lbs. (tiempo: 3 horas 30 minutos) 9 Masa (tiempo: 1 hora 30 minutos) 10 Rosca masa (tiempo: 2 horas) 11 Mermelada (tiempo: 1 hora 5 minutos) 12 Horneado (tiempo: 1 hora) Nota: Los tiempos son aproximados según el tamaño del pan. Básico - Esta configuración se utiliza - Oster CKSTBRTW20 | English - Page 49
- Esta configuración es para preparar mermeladas y jaleas. Hornear - Esta configuración es para hornear masa. EXPRESSBAKE®: Configuración panificadora Preparación de pan en menos de una hora La panificadora OSTER® puede hornear fantásticos panes en menos de una hora. Se la denomina configuraci - Oster CKSTBRTW20 | English - Page 50
receta de la panificadora Oster® para obtener mejores resultados. Otros ingredientes Todos los otros ingredientes (como harina, azúcar, leche en polvo, manteca, etc.) deben estar a temperatura ambiente. Siempre utilice harina para pan para la configuración de EXPRESSBAKE®. Cosas que deberá comprar - Oster CKSTBRTW20 | English - Page 51
pan con la configuración EXPRESSBAKE pan durante una hora. Sin embargo, recomendamos retirar el pan ía hasta que el pan se desprenda. Si el pan, utilice la herramienta pan 15 minutos antes de cortarlo y disfrutarlo. Importante: Si desea hacer otro pan tener pan fresco cuando EXPRESSBAKE®. de pan que - Oster CKSTBRTW20 | English - Page 52
de azúcar en 1/4 de cucharadita al mismo tiempo. Trucos y consejos Los cocineros experimentados consideran que hacer pan es una ciencia más que un arte. Tenga en cuenta que deberá experimentar con algunas recetas antes de las dos cosas, la levadura está vieja y debe descartarse. 52 www.oster.com - Oster CKSTBRTW20 | English - Page 53
Verifique la masa Este es un secreto muy conocido por la gente que hace pan a la antigua. Cuando se amasa a mano, ajustan la consistencia de la la receta, en ocasiones hasta 2-4 cucharadas soperas por taza. Si el pan leuda demasiado • Reduzca la cantidad de levadura. Por cada cucharadita de - Oster CKSTBRTW20 | English - Page 54
de pan con un pan y cuchilla para amasar 1 Pase un trapo húmedo al recipiente para pan y a la cuchilla para amasar y seque en su totalidad. 2 NO lave el recipiente ni sus partes partes. 2 No se alarme si el color del recipiente de pan pan durante 10-15 minutos y de este modo se ablandará la cuchilla - Oster CKSTBRTW20 | English - Page 55
No hay problema. Simplemente significa que el ciclo de horneado ha terminado y que la panificadora está manteniendo el pan tibio. Presione el botón"Comenzar / Detener"para apagar el modo para mantener tibio. ¿Qué hacer si el con el centro de servicios para efectuar una reparación. www.oster.com 55 - Oster CKSTBRTW20 | English - Page 56
manual. ¿Qué hacer si la masa no se mezcla? Asegúrese de que el recipiente para pan pan del recipiente lo antes posible y déjelo enfriar. Pruebe esto: use hacer si el pan no está cocido pan tiene una textura áspera y pan pan. ¿Qué hacer si el pan EXPRESSBAKE®). ¿Qué hago si el pan tiene harina en la parte el pan no - Oster CKSTBRTW20 | English - Page 57
pan básico (para flautas de 1.5 lb pan está listo. Nota: La posición rápida reducirá el tiempo total en aproximadamente una hora. Pan para pan 2 cucharadas para pan 2 pan 2 Mida y agregue los ingredientes secos en el recipiente para pan para pan en para elegir 1 lb., 1.5 lb. o 2 lb. 7 Presione el - Oster CKSTBRTW20 | English - Page 58
pan 2 Mida y agregue los ingredientes secos en el recipiente para pan pan 1 lb., 1.5 lb. o 2 lb. pan 1 lb., 1.5 lb. o 2 lb. 7 Presione el botón "Color de costra" para elegir costra suave, media, oscura o rápida. 8 Presione el botón "Comenzar / Detener". Pan pan pan 1 lb., 1.5 lb. o 2 lb. - Oster CKSTBRTW20 | English - Page 59
para pan 2 para pan 3 pan 2 Mida y agregue los ingredientes secos en el recipiente para pan pan elegir 1 lb., 1.5 lb. o 2 lb. 7 Presione con la masa. Pan de centeno liviano - para pan 1 pan 2 Mida y agregue los ingredientes secos en el recipiente para pan pan elegir 1 lb., 1.5 lb. o 2 lb. 7 Presione - Oster CKSTBRTW20 | English - Page 60
está en 0:00, el pan está listo. Nota: Con el programa de pan europeo, el tamaño de la flauta se fija en 1.5 lbs. y el color de la costra no se puede cambiar. Pan de masa fermentada Europeo Todos los una envoltura plástica o con un cobertura plástica sin apretar. Refrigere. 60 www.oster.com - Oster CKSTBRTW20 | English - Page 61
parte de la preparación, repóngala con igual cantidad de agua tibia y harina. Por ejemplo, si se utilizó 1-1/4 tazas (10 onzas) para hacer el pan por partes iguales Cuando retire parte de pan máquina para pan francés (para pan está listo. Nota: La posición rápida reducirá el tiempo total - Oster CKSTBRTW20 | English - Page 62
para pan pan. 2 Mida y agregue los ingredientes secos (salvo la levadura) en el recipiente para pan pan 1 lb., 1.5 lb. o 2 lb. 7 Presione el botón "Color de costra" para elegir costra suave, media, oscura o rápida. 8 Presione el botón "Comenzar / Detener". Pan para pan pan 1 lb., 1.5 lb. o 2 lb. 7 - Oster CKSTBRTW20 | English - Page 63
pan dulce (para flautas de 1.5 libras ) En el ciclo de pan pan está listo. Nota: Con el programa de pan dulce, el color de la costra no se puede cambiar. Primavera favorito pan pan pan. 2 Mida y agregue los ingredientes secos (salvo la levadura) en el recipiente para pan pan 1 lb., 1.5 lb. o 2 lb. - Oster CKSTBRTW20 | English - Page 64
para pan 3 pan. 2 Mida y agregue los ingredientes secos (salvo la levadura) en el recipiente para pan recipiente para pan en lb., 1.5 lb. o 2 lb. 7 Presione el botón "Comenzar / Detener". Pan pan. 2 Mida y agregue los ingredientes secos (salvo la levadura) en el recipiente para pan para pan en - Oster CKSTBRTW20 | English - Page 65
para pan 1/4 pan. 2 Mida y agregue los ingredientes secos (salvo la levadura) en el recipiente para pan para pan en 1 lb., 1.5 lb. o 2 lb. 7 EXPRESSBAKE®: Configuración Recetas de configuración (Menús 5 y 6) EXPRESSBAKE® Etapas de la máquina Para el ciclo de la panificadora EXPRESSBAKE® Breadmaker - Oster CKSTBRTW20 | English - Page 66
pan 5 cucharaditas de levadura activa seca EXPRESSBAKE pan. 2 Mida y agregue los ingredientes secos (salvo la levadura) en el recipiente para pan para pan en Comenzar / Detener". Pan de queso y pan. 2 Mida y agregue los ingredientes secos (salvo la levadura) en el recipiente para pan para pan en - Oster CKSTBRTW20 | English - Page 67
pan 2 cucharadas de mezcla de sopa cesa de cebolla 4 1/2 de cucharaditas de levadura activa seca EXPRESSBAKE pan. 2 Mida y agregue los ingredientes secos (salvo la levadura) en el recipiente para pan para pan en Pan integral (Menú 3) Etapas de la máquina (para flautas de 1.5 libras ) Para el ciclo Pan - Oster CKSTBRTW20 | English - Page 68
Pan Integral 6 Presione el botón "tamaño de la flauta" para elegir 1 lb., 1.5 lb. o 2 lb harina para pan 1 taza para pan 1 pan. 2 Mida y agregue los ingredientes secos (salvo la levadura) en el recipiente para pan Pan Integral 6 Presione el botón "tamaño de la flauta" para elegir 1 lb., 1.5 lb. o 2 lb - Oster CKSTBRTW20 | English - Page 69
Seleccionar/Menú" para elegir la configuración Pan Integral 6 Presione el botón "tamaño de la flauta" para elegir 1 lb., 1.5 lb. o 2 lb. 7 Presione el botón "Color de para pan 1 taza de harina integral 1 taza de harina de centeno 2 cucharadas de suero de leche en polvo 1 cucharada de vital gluten 1 - Oster CKSTBRTW20 | English - Page 70
receta de la masa para Bagels: 1 3/4 tazas de agua 1 1/2 cucharaditas de miel 1 1/2 cucharaditas de sal 3 tazas de harina 1 1/2 cucharaditas de levadura activa seca 70 www.oster.com - Oster CKSTBRTW20 | English - Page 71
se utiliza harina blanca para pan. Debido a esto, los panes más pesados pueden tener un parte más chata o inclusive un hueco pequeño en el centro. Asimismo se puede agregar el gluten de trigo para mejorar la forma y el volumen del pan hecho con harinas que contienen menos gluten. www.oster.com 71 - Oster CKSTBRTW20 | English - Page 72
pan más fresco por más tiempo. No lo guarde en el refrigerador debido a que esto causa que el pan se reseque más rápido. Pan para Pretzels Masa Todos los ingredientes al tiempo del ambiente (70- 80°F) 2 tazas de harina para pan pan de pan, agarre pan pan de pan, agarre - Oster CKSTBRTW20 | English - Page 73
/ Detener" hasta que oiga un pip y se ponga en blanco la pantalla. 6 Para remover el molde de pan, agarre la manga firmemente y remueve el molde. 7 Coloque la masa en un molde redondo engrasado de 9 pulgadas rollos dulces tibios. Rinde lo suficiente como para cubrir una rosca. www.oster.com 73 - Oster CKSTBRTW20 | English - Page 74
ón "Comenzar / Detener" hasta que oiga un pip y se ponga en blanco la pantalla. 6 Para retirar el molde de pan, agarre la manija firmemente y saque el recipiente. 7 Coloque la masa en una molde para rollos de jalea que mide 12 sal por 10 a 15 minutos. Escúrralos en un colador 74 www.oster.com - Oster CKSTBRTW20 | English - Page 75
el recipiente para pan 2 Presione el bot para pan. Vierte naranjas grandes 1 limón 1 Use un pelador de verduras para la pectina en el recipiente para pan. 5 Presione el botón " recipiente para pan. Vierta en el recipiente para pan. 2 Presione el bot pan. Vierte la jalea en contenedores; cubra - Oster CKSTBRTW20 | English - Page 76
. • Para un pan brilloso y dorado, use un glaseado de huevo o de yema de huevo. • Para un pan brilloso y consistente, use un glaseado de clara l blanco del huevo (el color del pan será más claro). . de eneldo fresco o 1/2 cda. eneldo seco 1 pequeño diente de ajo, finamente picado 76 www.oster.com - Oster CKSTBRTW20 | English - Page 77
ón o naranja Glaseado cremoso de vainilla Mezcle hasta que tenga una consistencia para salpicar: 1/2 taza de azúcar glas 1/4 cda. de vainilla 1 1/2 a 2 cda. de leche www.oster.com 77 - Oster CKSTBRTW20 | English - Page 78
NOTAS 78 www.oster.com - Oster CKSTBRTW20 | English - Page 79
a las instrucciones operativas, y desarme, reparación o alteración por parte de un tercero ajeno a JCS o a un Centro de Servicio autorizado 33431. En Canadá, esta garantía es ofrecida por Sunbeam Corporation (Canada) Limited operando bajo el nombre de Jarden Consumer Solutions, 20 B oster.com 79 - Oster CKSTBRTW20 | English - Page 80
For product questions contact: Sunbeam Consumer Service USA: 1.800.334.0759 Canada: 1.800.667.8623 www.oster.com ©2009 Sunbeam Products, Inc. doing business as Jarden Consumer Solutions. All rights reserved. Distributed by Sunbeam Products, Inc. doing business as Jarden Consumer Solutions,
-
 1
1 -
 2
2 -
 3
3 -
 4
4 -
 5
5 -
 6
6 -
 7
7 -
8
-
9
-
10
-
11
-
12
-
13
-
14
-
15
-
16
-
17
-
18
-
19
-
20
-
21
-
22
-
23
-
24
-
25
-
26
-
27
-
28
-
29
-
30
-
31
-
32
-
33
-
34
-
35
-
36
-
37
-
38
-
39
-
40
-
41
-
42
-
43
-
44
-
45
-
46
-
47
-
48
-
49
-
50
-
51
-
52
-
53
-
54
-
55
-
56
-
57
-
58
-
59
-
60
-
61
-
62
-
63
-
64
-
65
-
66
-
67
-
68
-
69
-
70
-
71
-
72
-
73
-
74
-
75
-
76
-
77
-
78
-
79
-
80
 |
 |
2LB. EXPRESSBAKE® BREADMAKER
2LB. EXPRESSBAKE® BREADMAKER
User Guide & Recipes/ Guía del Usuario & Recetas
CKSTBRTW20
www.oster.com
Safety
Seguridad
How to use
Cómo usar
Cleaning
Cuidado y Limpieza
FAQs
Preguntas frecuentes
Recipes
Rectas
Warranty
Garantía