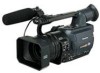
Panasonic AG HVX200 Memory Card Camcorder
Panasonic AG HVX200 - Camcorder Manual
 |
View all Panasonic AG HVX200 manuals
Add to My Manuals
Save this manual to your list of manuals |
Panasonic AG HVX200 manual content summary:
- Panasonic AG HVX200 | Memory Card Camcorder - Page 1
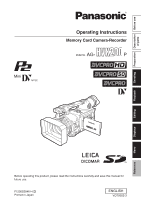
Description Before use of parts Operating Instructions Memory Card Camera-Recorder AG- Model No. P Shooting Playback Editing Displays Menu Reference Before operating this product, please read the instructions carefully and save this manual for future use. F1205S3046-H D Printed - Panasonic AG HVX200 | Memory Card Camcorder - Page 2
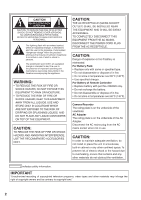
the user to the presence of important operating and maintenance (servicing) instructions HAZARD AND ANNOYING INTERFERENCE, USE THE RECOMMENDED ACCESSORIES ONLY. CAUTION: THE AC • Do not store in temperatures over 60°C (140°F). Camera-Recorder The rating plate is on the underside of the viewfinder - Panasonic AG HVX200 | Memory Card Camcorder - Page 3
AG-HVX200P Trade Name: PANASONIC Responsible Party: Panasonic Corporation of North America One Panasonic Way, Secaucus, NJ 07094 Support contact: Panasonic follow the attached installation instructions and do not make emission limit compliance, the user must use only shielded interface cables - Panasonic AG HVX200 | Memory Card Camcorder - Page 4
camera-recorder. See the folder named \LDOC. (The description is the original (written in English).) To download the relevant source code, visit https://eww.pavc.panasonic of Leica Microsystems IRGmbH. • DICOMAR is a trademark of Leica Camera AG. • SD logo is a trademark. All other explanations, - Panasonic AG HVX200 | Memory Card Camcorder - Page 5
on or pinched particularly at plugs, convenience receptacles, and the point where they exit from the apparatus. 11) Only use attachments/accessories specified by the manufacturer. 12) Use only with the cart, stand, tripod, bracket, or table specified by the manufacturer, or sold with the apparatus - Panasonic AG HVX200 | Memory Card Camcorder - Page 6
Contents Before use Software information for this product .......... 4 IMPORTANT SAFETY INSTRUCTIONS ......... 5 Outline of operations 8 Read this first 10 Accessories 11 About this manual 11 Description of parts Description of parts 12 Right side and rear side 12 Left side 13 Terminals and - Panasonic AG HVX200 | Memory Card Camcorder - Page 7
AV IN/OUT SETUP screen 111 DISPLAY SETUP screen 112 CARD FUNCTIONS screen 114 OTHER FUNCTIONS screen 114 OPTION MENU 118 Reference Before calling for service 119 Operating precautions 123 Updating the driver in the camera 125 Condensation 125 System resetting 126 Cleaning 126 Video Heads - Panasonic AG HVX200 | Memory Card Camcorder - Page 8
allows you sophisticated movie-making on this handy camera, including HD (High Definition) recording and smooth editing/dubbing. Flow of shooting, playing and saving The setting values such as the user file are saved to and read from the SD memory card. 1 P2 mode shooting and playback (Pages 25 and - Panasonic AG HVX200 | Memory Card Camcorder - Page 9
Saving and editing on external devices Before use P2 card 4 PC mode (Page 82) The data (file) is transferred for IEEE1394 (Windows/Macintosh) Video equipment /Television Computer Memory card recorder The contents can be transferred as a data stream (digital dubbing). ∗Serial Bus Protocol-2 9 - Panasonic AG HVX200 | Memory Card Camcorder - Page 10
your recordings. • Please understand that Panasonic makes no guarantees for your recordings in cases where images and/ or sound were not recorded as you intended due to problems with the camera-recorder or cassette. Respect copyrights • Copyright laws forbid the use of video and audio material you - Panasonic AG HVX200 | Memory Card Camcorder - Page 11
menu screens, etc.) in these operating instructions differ slightly from the actual camera-recorder. References • References are shown as (Page 10). Icons Explanations specific to the media used are identified by the icons below. P2 : Explanations for P2 card usage only. TAPE : Explanations for tape - Panasonic AG HVX200 | Memory Card Camcorder - Page 12
(Pages 29 and 30) 15 White balance sensor (Page 40) 16 INPUT 1/2 (audio input) switch (Page 52) 17 Lens hood screw (Page 18) 18 P2 card access lamp (x 2) (Page 26) 19 Viewfinder (Page 21) 20 P2 card slot (x 2) (Page 25) 21 SCENE FILE dial (Page 54) 22 Mode button (Page 25 and 29) 23 Mode - Panasonic AG HVX200 | Memory Card Camcorder - Page 13
Description of parts Left side 1 23 4 18 AWB ZOOM SERVO MANUAL 8 10 12 14 16 5 6 7 9 11 13 15 17 ) 13 WHITE BAL switch (Page 40) 14 DISP/MODE CHK button (Page 44) 15 USER button (Page 45) 16 AUTO/MANUAL switch (Pages 25 and 29) 17 LCD monitor (Page 22) 18 Diopter adjustment dial (Page - Panasonic AG HVX200 | Memory Card Camcorder - Page 14
shoe (Page 76) 3 USB terminal (Mini-B) (Pages 77 and 82) 4 Headphone jack (3.5 mm stereo mini jack) (Page 76) 5 1394 terminal (Page 77) 6 SD memory card slot (Pages 32 and 56) 7 CAM REMOTE jack∗ FOCUS/IRIS (3.5 mm mini jack) You can connect a remote control unit to control the FOCUS and IRIS - Panasonic AG HVX200 | Memory Card Camcorder - Page 15
VCR mode 7 PLAY button ( ) (Page 62) 8 /REW button ( ) (Page 62) 9 PAUSE button ( ) (Page 62) Like the operation buttons of the camera, MENU operations are performed using SET button. 10 STILL ADV button ( , ) (Page 73) 11 INDEX buttons ( , ) (Page 75) 12 STOP button ( ) (Page 62) 13 FF - Panasonic AG HVX200 | Memory Card Camcorder - Page 16
above are approximate for when scenes are shot in the DVCPRO HD mode on a P2 card while using the viewfinder. • The times apply when the ambient operating battery becomes hot while it is being used or charged. The camera-recorder itself also becomes hot during use. • The recordable time reduces if - Panasonic AG HVX200 | Memory Card Camcorder - Page 17
. 2 Remove the battery while pressing the battery release button. • Support the battery with your hand to ensure that it will not fall power outlet. • You cannot charge the battery when supplying power to the camera-recorder from the AC adapter. DC cord's battery connector CAUTION: • This used. 17 - Panasonic AG HVX200 | Memory Card Camcorder - Page 18
the shoulder strap and use it as a precaution against dropping the camera. 20 mm or more 20 mm or more Detaching and attaching the lens hood Detaching the lens hood • Loosen the screw and turn the lens hood counterclockwise to detach it. Attaching the lens hood • Turn the lens hood clockwise and - Panasonic AG HVX200 | Memory Card Camcorder - Page 19
's remote control sensor, the battery has run out. • Keep the battery out of the reach of children. Remote control setup When using two camera-recorders simultaneously, set this camera-recorder and the remote control to either [VCR1] or [VCR2] so the remote control does not operate the wrong - Panasonic AG HVX200 | Memory Card Camcorder - Page 20
OTHER FUNCTIONS screen. (Page 115) When the camera-recorder is in any of the following states, tape is reached (4 blinks/ sec.) • When trouble occurs regarding tape running systems (4 blinks/sec.) • the P2 card or tape or the battery power is low (1 blink/ sec.) • When removing the P2 card during - Panasonic AG HVX200 | Memory Card Camcorder - Page 21
This camera has two viewfinders; one is a miniature LCD in the viewfinder and the other is a retractable 3.5-inch LCD. Use the viewfinder eye cup after attaching it may cause the eye cup holder to come off. If the eyecup holder does come off, see "Cleaning the Viewfinder" (page 126) for details on - Panasonic AG HVX200 | Memory Card Camcorder - Page 22
the LCD monitor where it is easiest to see. • The monitor can be rotated 180° toward the lens and 90° toward you. • Do not apply unnecessary force to the open LCD. This can damage the camera. Press EVF DTL again to return to the original display. "EVF DTL OFF" appears on the - Panasonic AG HVX200 | Memory Card Camcorder - Page 23
. SET Operation button MENU • For menu operation (Page 96) • You can also use the menu buttons on the remote control. (Page 15) 3 Viewfinder adjustments Set YES SETUP screen to ON. • The viewfinder display can be in color or black and white. (See the setup menus, DISPLAY SETUP screen, EVF COLOR.) - Panasonic AG HVX200 | Memory Card Camcorder - Page 24
. 9 Press MENU three times to exit the menus. • The clock can vary in accuracy so check that the time is correct before shooting. • When using the camera overseas, do not set the CLOCK option to the current time, but instead enter the time difference from Greenwich mean time according to TIME ZONE - Panasonic AG HVX200 | Memory Card Camcorder - Page 25
POWER switch to start shooting. • Press again to return to the camera to the shooting standby mode. • Use the handle START/STOP button to make it easier to shoot from low angles. 2 LCD side AUTO MANUAL Handle START/STOP button P2 TAPE Do not operate the MEDIA switch when the power is switched - Panasonic AG HVX200 | Memory Card Camcorder - Page 26
mode. The HD recording(720P/60P) settings are already made in the default mode. (To view the current settings, see page 44.) P2 card access lamp Protecting against a possible erasure Switch the write-protect switch of the P2 card to [PROTECT]. P2 card access lamps CAMERA mode (MCR) Lights - Panasonic AG HVX200 | Memory Card Camcorder - Page 27
formats are not included in the DVCPRO HD recording format. • When using any other types of cards, the driver installed in the camera-recorder may need to be updated. (Page 125) • For the latest information not available in the Operating Instructions, visit the P2 Support Desk at the following Web - Panasonic AG HVX200 | Memory Card Camcorder - Page 28
Check the clips and repair them. (For details on repairing clips, see page 69.) • During playback, a P2 card inserted into the empty slot will not be recognized and the P2 card access lamp will not light. When playback is completed, the P2 card recognition will begin. • You can use ACCESS LED on the - Panasonic AG HVX200 | Memory Card Camcorder - Page 29
POWER switch to start shooting. • Press again to return to the camera to the shooting standby mode. • Use the handle START/STOP button to make it easier to shoot from low angles. 2 LCD side AUTO MANUAL Handle START/STOP button 1 P2 TAPE 4 5 PUSH PUSH Do not operate the MEDIA switch when the - Panasonic AG HVX200 | Memory Card Camcorder - Page 30
you shot play, and then the camera returns to the shooting pause mode. • The REC CHECK function cannot be used unless the recording is at least holder will not open if the camera is not supplied with power (AC adapter or battery). • A tape cannot be ejected in P2 mode or during recording in TAPE - Panasonic AG HVX200 | Memory Card Camcorder - Page 31
an LP mode. • During slow motion or still-picture playback • When using the camera's search functions Audio dubbing cannot be performed in the LP mode as the Tapes cannot be loaded or unloaded when the MEDIA switch is set to P2. • Do not try to insert or eject the tape by just holding the - Panasonic AG HVX200 | Memory Card Camcorder - Page 32
) can be used for the AG-HVX200: 8 MB 16 MB 32 MB 64 MB 128 MB 256 MB 512 MB 1 GB 2 GB For the latest information not available in the Operating Instructions, visit the P2 Support Desk at the following Web sites. https://eww.pavc.panasonic.co.jp/pro-av/ • SD memory cards must not be used or stored - Panasonic AG HVX200 | Memory Card Camcorder - Page 33
Zoom button Zoom ring Set the ZOOM switch to MANU so that you can use the zoom ring. • You cannot use the zoom ring if the ZOOM switch is set to SERVO. Trying to use it could damage the camera. Zoom ring On the remote control Press ZOOM/VOL to zoom with the motor - Panasonic AG HVX200 | Memory Card Camcorder - Page 34
or 60P mode (standard recording). As with Panasonic's Varicam model (AJ-HDC27 series), this unit also provides a recording format that allows frame rate conversion using nonlinear editing. (Either the 30P or 24P mode must be set for this.) 24PN mode: The camera-recorder shoots in the 24 fps native - Panasonic AG HVX200 | Memory Card Camcorder - Page 35
that supports 24P over 60P) format. 1 Using the REC FORMAT (P2) function (page 106) on the RECORDING SETUP screen, select 720P/60P, 720P/30P or 720P/24P as the recording format. 2 Select the appropriate scene file using the SCENE FILE dial. If necessary, before doing this, perform the camera - Panasonic AG HVX200 | Memory Card Camcorder - Page 36
P2 Using variable frame rates (VFR) Standard speed shooting for movie production When making movies to show on a screen, a frame rate of 24 fps (frames per second), which is the same as for films, is the norm (1x speed). If you use you have shot scenes using the 24P recording format for specifying - Panasonic AG HVX200 | Memory Card Camcorder - Page 37
50 (OFF) or 1/60 for best results. • There may be a slight delay to the start of recording when you use the 24P or 24P advanced modes because 5 frames are recorded at a time. When using a tape, the shortest possible recording time is three seconds. 60 i AoAeBoBeBoCeCoDeDoDeEoEeFoFe Fo Ge GoHe Ho He - Panasonic AG HVX200 | Memory Card Camcorder - Page 38
switch PUSH AUTO button AUTO/MANUAL switch Switching to manual mode If the camera is in auto mode, use the AUTO/ MANUAL switch to switch to manual mode ( on the viewfinder and LCD goes out). Manual focusing 1 Use the AUTO/MANUAL switch to switch to manual mode. 2 Use the FOCUS switch to choose - Panasonic AG HVX200 | Memory Card Camcorder - Page 39
IRIS dial Iris adjustments 1 If the camera is in auto mode, use the AUTO/ MANUAL switch to switch to manual mode. (Page 38) 2 Press the IRIS button to switch how to adjust the aperture of lens. AUTO IRIS: Adjust the iris automatically. MANUAL IRIS: Adjust the iris manually. 3 Turn the IRIS dial to - Panasonic AG HVX200 | Memory Card Camcorder - Page 40
AWB Ach ACTIVE Message after adjustment AWB Ach OK WHITE BAL switch AWB button White balance adjustments 1 If the camera is in auto mode, use the AUTO/ MANUAL switch to switch to manual mode. (Page 38) 2 Set the shutter speed. (Page 50) 3 Place a white pattern in a location with the same lighting - Panasonic AG HVX200 | Memory Card Camcorder - Page 41
tones of the entire screen will also be downgraded. It is not normally necessary to adjust the black balance. Adjust it when: • You use the camera for the first time. • You use the camera after not using it for a long time. • The ambient temperature changes greatly. • You switch to the normal (OFF - Panasonic AG HVX200 | Memory Card Camcorder - Page 42
Shooting techniques for different targets Low-angle shooting Use the START/STOP button on the handle to make it easier to shoot from low angles. START/STOP button Self-portrait shooting Images in the - Panasonic AG HVX200 | Memory Card Camcorder - Page 43
Zebra pattern Press the ZEBRA button in the camera mode to show the zebra pattern or marker Reflecting parts You can remove most overexposed parts by adjusting the iris and shutter speed in the manual mode to remove the areas with zebra patterns. The display changes as follows each time you press - Panasonic AG HVX200 | Memory Card Camcorder - Page 44
you record. Select the aspect ratio in the setup menus, CAMERA SETUP screen, ASPECT CONV. (Page 102) • For menu a list of functions allocated to the USER buttons, will be displayed. When you release LETTER BOX: Recorded in the 16:9 aspect ratio. Black bands are recorded at the top and bottom of - Panasonic AG HVX200 | Memory Card Camcorder - Page 45
camera shake when shooting by hand. Press the OIS button to turn the function on and off. appears on the screen when this function is on. Turn the function off when using fade out to black. Audio also Using the USER buttons You can allocate one of twelve features to each of the three USER buttons. Use - Panasonic AG HVX200 | Memory Card Camcorder - Page 46
check the menu item settings before you operate the camera-recorder. • If you use another AG-HVX200 as the external unit for backup recording, select " are recorded even when you perform a rec check if a P2 card is being used: When a tape is used, no images are output during rec check. • You cannot - Panasonic AG HVX200 | Memory Card Camcorder - Page 47
P2 card, making the settings in the RECORDING SETUP screen (page 106) enables special recording functions such as Pre-recording, Interval Recording, One Shot Recording, and Loop Recording. This can be used the MCR mode to CAMERA mode, immediately after turning on the camera-recorder's power or - Panasonic AG HVX200 | Memory Card Camcorder - Page 48
, when you press the USER button to which the SHOT When you press the USER button to which the need the latest updated version of P2 Viewer to edit the text memos USER button under USER (page 104) on the SW MODE screen, you can switch the slot with the card on which data is to be written using - Panasonic AG HVX200 | Memory Card Camcorder - Page 49
or recording, the index signals are recorded if a tape is being used. When the same USER button is pressed in shooting or recording pause mode, recording standby point you are looking for. The camera returns to shooting standby mode. • The scenes may not connect smoothly for certain recording - Panasonic AG HVX200 | Memory Card Camcorder - Page 50
it is recommended that the unit be secured to a tripod, etc. for use. 1 Press the SHUTTER button. Each time you press the SHUTTER button, Standard (OFF) SYNCRO SCAN 1/100 1/120 1/60 1/2000 All other formats (30P, 24P, 24PA) Standard (OFF) SYNCRO SCAN 1/30(1/24) 1/60 1/50 1/1000 1/250 - Panasonic AG HVX200 | Memory Card Camcorder - Page 51
. Progressive mode OFF (60i) 30P 24P/24PA/24PN Shutter speed 50 Hz 60 Set the shutter speed of the synchro scan (used when shooting a television or computer monitor) in you can also shoot PAL system television screens. equivalent to the shutter speed of a film camera, and a wider angle results in a - Panasonic AG HVX200 | Memory Card Camcorder - Page 52
external microphones or audio equipment connected to camera. (See table below) CH1∗ CH2∗∗ P2 cards and the DVCPRO HD or DVCPRO50 format are used: The recording mode is fixed at 4-channel recording. When P2 cards and the DVCPRO25 or DV format are used: Either 2 or 4 channels can be selected using - Panasonic AG HVX200 | Memory Card Camcorder - Page 53
+48V. You can damage such equipment if you leave the setting at ON. 4 Use the CH1 SELECT switch to select the input signal to be recorded to audio channel to shooting. • For P2 mode recording, the recording level is set higher than for Panasonic's broadcast-use camera recorders (AJ series). 53 - Panasonic AG HVX200 | Memory Card Camcorder - Page 54
these settings, set the camerarecorder to recording standby state. When the camera-recorder is shipped from the factory, the following files are stored. remains unchanged even when the scene file is changed. It must be set using the REC FORMAT option on the RECORDING SETUP screen. (Page 106)) F6: - Panasonic AG HVX200 | Memory Card Camcorder - Page 55
6 The screen below is displayed, so set the file name of six letters using , , or button. Set the same as user information. (Page 60) • Characters that can be set Space, A to Z, 0 to 9 If the COUNTER RESET button is pressed when the filename has been set, the - Panasonic AG HVX200 | Memory Card Camcorder - Page 56
the P2 position. (Pages 25 and 32) If you have saved a scene file 1 Set the unit's POWER switch to ON. 2 Select SCENE FILE on the setting menu CARD FUNCTIONS screen, select YES, and press the (or ) button. For all other settings, select USER FILE. • For menu operations (Page 96) • You can also use - Panasonic AG HVX200 | Memory Card Camcorder - Page 57
card You will need the latest updated version of P2 Viewer. Download it from the URL address given below, and install it in the computer. https://eww.pavc.panasonic ID serves as the USER CLIP NAME. The USER CLIP NAME recording method which have been edited using a viewer other than the P2 Viewer. (In - Panasonic AG HVX200 | Memory Card Camcorder - Page 58
Using the Counter Counter display (P2 card / Tape) You can display a counter that indicates how much time has elapsed during shooting or playback. 1 Press the COUNTER button. Each time you press the button, the display changes as follows. (Page 90) 0 : 00. 00 Counter value In the P2 mode, the - Panasonic AG HVX200 | Memory Card Camcorder - Page 59
. (Page 17) • Leave the POWER switch at OFF. 2 Leave the camera-recorder like this for about 4 hours. • The internal battery charges during this FIRST REC TC, select PRESET. • For menu operation (Page 96) • You can also use the menu buttons on the remote control. (Page 15) If " " appears even after - Panasonic AG HVX200 | Memory Card Camcorder - Page 60
RESET TITLE ZOOM MULTI/ P-IN-P REC A.DUB /REW PLAY FF/ Camera or Remote control 6 Press the MENU button when you have finished setting 24P 5-frame increments 24 720P/24PN - Adjustable in 4-frame increments 720P/30PN - Adjustable in 2-frame increments Setting user information Setting user - Panasonic AG HVX200 | Memory Card Camcorder - Page 61
MULTI/ P-IN-P REC A.DUB /REW PLAY FF/ Camera or Remote control 4 Press the button to select YES, and press user information. MENU 7 Press the button to select YES, and press the button. 5 Set the user information. Press the and buttons to select the user information characters. • You can use - Panasonic AG HVX200 | Memory Card Camcorder - Page 62
, the mode changes as below. MCR CAMERA PC DUB P2 TAPE When you press the mode button while MCR is selected, the unit enters the PC (PC connection) mode. (Page 82) For details on playing back clips using thumbnails, see page 64. Operations using the OPERATION button Remote Control -V Play - Panasonic AG HVX200 | Memory Card Camcorder - Page 63
(Tape) TAPE 2 Lock release 3 CAMERA MCR VCR PC DUB 1 P2 TAPE 1 Before turning the POWER switch the mode changes as below. VCR CAMERA When you press the mode button while VCR is selected, the unit enters the DUB (dubbing) mode. (Page 86) Operations using the OPERATION button Playback ( ) - Panasonic AG HVX200 | Memory Card Camcorder - Page 64
operations using the thumbnail screen. • Play, repair and delete clips as well as add and delete shot marks. • Format P2 cards and SD memory cards. • REPAIR CLIP MARKED CLIPS EXIT TEXT MEMO CLIPS SLOT CLIPS SETUP EXIT PROPERTY META DATA CLIP PROPERTY LOAD CARD STATUS RECORD DEVICES USER - Panasonic AG HVX200 | Memory Card Camcorder - Page 65
menu to the format 6 below. (Page 106) • Clips on the playlist which have been edited and copied using the AJ-SPD850 memory card recorder or other such unit and which have more than one format (DV, DVCPRO or DVCPRO50) are shown in red, and these clips cannot be played back even when the REC - Panasonic AG HVX200 | Memory Card Camcorder - Page 66
P2 Adding shot marks to clips Adding shot marks ( M) will make it easier to find the clips you are looking for. 1 Press the and buttons to move the yellow frame to the clip to which you will add a shot mark. 2 Press the USER camera mode will be automatically activated, and shooting will start. 66 - Panasonic AG HVX200 | Memory Card Camcorder - Page 67
. (Page 64) 2 Select THUMBNAIL using the and button, and press the (or ) button. 3 Select the desired item using the and buttons, and press the menu, and select OPERATION-DELETE. SLOT CLIPS: The clips on the P2 card in the specified slot are displayed. SETUP: Various setup operations are performed - Panasonic AG HVX200 | Memory Card Camcorder - Page 68
) 4 Select the desired setting item using the and buttons, and press the button proxy indicator is to be displayed (ON/OFF). DATA DISPLAY: Select the time code (TC), user information (UB), shooting time (TIME), shooting date (DATE) or shooting date (DATE TIME) for release the menu mode. 68 P2 - Panasonic AG HVX200 | Memory Card Camcorder - Page 69
this happens, "!" can sometimes be released by downloading the latest version of the P2 viewer from the web site given below, installing it in your computer, and copying the clips again. https://eww.pavc.panasonic.co.jp/pro-av/ 3 Select the desired item using the and buttons, and press the button - Panasonic AG HVX200 | Memory Card Camcorder - Page 70
P2 card memory capacity. After selecting P2 CARD CAP, select REMAIN (remaining memory) or USED (memory used), and press the button. SYSTEM INFO: The version of the system in this camera P2 card is writeprotected) CLIP NAME: Clip name START TC: Time code value when recording started START UB: User - Panasonic AG HVX200 | Memory Card Camcorder - Page 71
of memory remaining on the P2 card is displayed using a percentage bar. The following displays may appear, depending on the card status. FORMAT ERROR: An unformatted P2 card has been inserted. NOT SUPPORTED: A card not supported by the unit has been inserted. NO CARD: A card has not been inserted - Panasonic AG HVX200 | Memory Card Camcorder - Page 72
. A menu now appears. (Page 64) 2 Select META DATA using the and button, and press the (or ) button. 3 Select the item using the and buttons, and press the button. USER CLIP NAME P2 LOAD: Select this to load the metadata recorded on the SD memory card into the unit. When the button is pressed with - Panasonic AG HVX200 | Memory Card Camcorder - Page 73
When a tape is used, the playback speed increases as follows each time you press the button; 1/5x (1/3x in LP mode), 1x, 2x, 5x, 10x, and 20x. • Press the "+" button to increase the speed and the "-" button to decrease the speed. Camera PAGE/ AUDIO MON/VAR Slow playback (P2 card / Tape) 1 During - Panasonic AG HVX200 | Memory Card Camcorder - Page 74
-V -V Useful playback functions (continued) Frame-by-frame playback (P2 card / Tape) 1 Press the button ADV INDEX STOP INDEX Camera or Remote control Press the button to return to normal playback. Clip skip (P2 card) 1 During playback, press the button to pause the camera. 2 Press the button - Panasonic AG HVX200 | Memory Card Camcorder - Page 75
-up. /REW PLAY FF/ STILL ADV PAUSE STILL ADV INDEX STOP INDEX Viewing images on a television (P2 card / Tape) You can view the images on a television if you connect the unit to a TV set using an AV cable (not included), S-video cable (not included) or component video cable (included). 1 Connect the - Panasonic AG HVX200 | Memory Card Camcorder - Page 76
when the headphones are connected. External microphone Stereo Microphone (optional) AG-MC100G INPUT1 or INPUT2 Microphone holder Microphone holder adapter 12 mm • When attaching an external microphone to the microphone shoe, use the supplied microphone holder and microphone holder adapter. • When - Panasonic AG HVX200 | Memory Card Camcorder - Page 77
are output simultaneously from the camera- recorder while data is being transferred from a computer to the camera-recorder. When connecting the volume among volumes of the X.X GB Panasonic disc, and click "Mount." • When the P2 card access lamp is off Eject the P2 card, and insert it again. If the - Panasonic AG HVX200 | Memory Card Camcorder - Page 78
power of the units. • Before proceeding to connect the unit which uses a 6-pin type 1394 connector, carefully check the shape of the locks. Ferrite core (provided) Digital video equipment (Dubbing) This camera Other Digital video equipment 1 1394 2 1394 cable (optional) manually. 78 - Panasonic AG HVX200 | Memory Card Camcorder - Page 79
connected concurrently, the COMPONENT OUT connectors take priority. Signals cannot be output through both sets of connectors at the same time. • When connecting the camera to another device using the component video cable, if the terminal on the device to which it is to be connected is a BNC type - Panasonic AG HVX200 | Memory Card Camcorder - Page 80
even after audio dubbing has been performed. 48K(16bit): The sound is recorded using the 16-bit/48kHz (high-quality stereo) system. When audio dubbing is . 3 Start shooting. 4 Press the mode button to switch to the VCR mode. CAMERA TAPE 6 Find the scene you want to add and set the unit to the still - Panasonic AG HVX200 | Memory Card Camcorder - Page 81
A. DUB INPUT item on the AV IN/OUT SETUP screen. (Page 111) Using the memory stop mode to edit dubbed sound (1) First reset the counter memory where the counter memory display was reset. Adjusting the audio input level Use the AUDIO control to adjust the recording level of audio signals input from - Panasonic AG HVX200 | Memory Card Camcorder - Page 82
must be met if the USB cable is to be used to make the connection. • Your computer must run Windows 2000 or Windows XP. • USB dedicated driver (provided on the CD-ROM supplied) must be installed in your computer. • Your computer must support USB2.0 (High Speed, Mass Storage Class). (USB 1.1 is not - Panasonic AG HVX200 | Memory Card Camcorder - Page 83
DISCONNECT is displayed, you cannot operate the camera.) 6 Proceed with nonlinear editing using your computer. An icon for the P2 card contents appears as a removable disk in My Computer of your computer. • For further details, refer to the instructions for your computer's editing software. • When - Panasonic AG HVX200 | Memory Card Camcorder - Page 84
connect the camera to two or more HDD (chain, hub, etc.), even if they are not turned ON. • Insert the P2 card into the unit, and set the MEDIA switch to the P2 position. (Page 25) 1 First turn on the power of the HDD (1394. a SBP2 supported) to be connected, and connect it using the IEEE1394 - Panasonic AG HVX200 | Memory Card Camcorder - Page 85
another PC, the subsequent operation in the camera and the data in the HDD cannot be guaranteed. • It is recommended that you first restore any defective clips contained in the P2 card before copying the data. • In order to avoid the occurrence of trouble in copying, formatting or other operations - Panasonic AG HVX200 | Memory Card Camcorder - Page 86
use the MENU button to open the menu. 2) Select DUBBING SETUP and then PULLDOWN SEL. Select 24P or 24PA. 24P: 2:3 pulldown 24PA: 2:3:3:2 pulldown 3) Use at the first valid clip (indicated by the black number) on the thumbnail display. The clips on the P2 card appear as thumbnails on the LCD screen. - Panasonic AG HVX200 | Memory Card Camcorder - Page 87
to pause playback. REC Camera COUNTER RESET TITLE ZOOM MULTI to 1080i/24P, 720P/24P or 720P USER button information will be displayed when the DISP/MODE CHK button is held down. Digital input/output (P2 card/Tape) You can perform dubbing with a high image quality by means of digital signals by using - Panasonic AG HVX200 | Memory Card Camcorder - Page 88
video deck. • Use the MEDIA switch to select the P2 card or tape ahead of time. (Pages 25 and 29) 1 Connect the video recording device to the unit. (Page 79) 2 Press the mode button to switch to the MCR/VCR mode. CAMERA screen. Time code and user information may not be correctly - Panasonic AG HVX200 | Memory Card Camcorder - Page 89
to switch to the MCR/VCR mode. CAMERA TAPE Analog/digital (AD) conversion (VCR mode only) You can use this unit to convert analog to digital audio level. • Analog signals cannot be input in the P2 mode. Analog signals This camera-recorder Digital signals Other digital video unit • Normally, set - Panasonic AG HVX200 | Memory Card Camcorder - Page 90
user information could not be read correctly from the P2 card or the tape, [UB∗] is displayed. FR: Frame rate information for recording FR 60I : Standard (60i interlace) mode (60 fields/sec.) FR 60P : 60P progressive mode (60 frames/ sec.) 90 FR 30P : 30P progressive mode (30 frames/ sec.) FR 24P - Panasonic AG HVX200 | Memory Card Camcorder - Page 91
other than recording or recording standby. 5 Recording format (P2 card) (Page 106)/ recording time (tape) display 6 1394TC auto black balance • Warning (Page 94) • The functions allocated to the USER buttons during playback when ON was selected under CAMERA DATA of the setting menu DISPLAY SETUP - Panasonic AG HVX200 | Memory Card Camcorder - Page 92
focus mode, AF appears. In the manual focus mode, MF appears. When the display is set to macro control, the black and white of AF or MF are CAMERA DATA option on the setting menu DISPLAY SETUP screen is set to ON, the value of the gain used during shooting is also displayed during playback using - Panasonic AG HVX200 | Memory Card Camcorder - Page 93
clips. CANNOT FORMAT Cannot format P2 cards or SD memory cards. CANNOT REPAIR Cannot repair clips. CARD FULL The P2 card does not have enough free space for recording. WRITE PROTECTED The P2 card or SD memory card is writeprotected. NO CARD A P2 card or SD memory card has not been inserted. NO - Panasonic AG HVX200 | Memory Card Camcorder - Page 94
(Trouble has occurred in the P2 card found in the slot indicated by the number.) • If the warning continues, turn off the power. • If the warning appears even when recording is carried out again, replace the card with another one. ERROR (other type of trouble) WARNING When trouble occurs with camera - Panasonic AG HVX200 | Memory Card Camcorder - Page 95
or by configuring OTHER DISPLAY of the DISPLAY SETUP screen of the setup menus. (Page 113) Displays 1 Time code display 3 AUTO/MANUAL switch operation display 5 Recording format/recording time display 7 Information display 8 Squeeze record display 9 Microphone level auto-control display 12 Date and - Panasonic AG HVX200 | Memory Card Camcorder - Page 96
or recording mode, press the MENU button. The following is displayed on the viewfinder and LCD screen. CAMERA mode (Example) 5 Press the button to make the setting. To change a number, use the and buttons to change the setting value. Example: MCR/VCR mode (Example) 2 Press , to highlight the - Panasonic AG HVX200 | Memory Card Camcorder - Page 97
button again to return to the normal screen. Initializing the menu settings The menu settings contain both the user file settings and the scene file settings. You can initialize them separately. To initialize the user file (i.e. all the settings other than the scene file settings) Select INITIAL in - Panasonic AG HVX200 | Memory Card Camcorder - Page 98
/TAPE BATT OTHER DISPLAY LCD BACKLIGHT LCD SET EVF SET SELF SHOOT EVF MODE DISPLAY ASPECT EVF COLOR SCENE FILE P2 USER FILE P2 SD CARD FORMAT P2 OPERATION TYPE FRAME RATE P2 SYNCRO SCAN DETAIL LEVEL V DETAIL LEVEL DETAIL CORING CHROMA LEVEL CHROMA PHASE COLOR TEMP MASTER PED A.IRIS LEVEL NEWS GAMMA - Panasonic AG HVX200 | Memory Card Camcorder - Page 99
(Pages 114 - 117) VIDEO OUT OSD DATE/TIME LEVEL METER CARD/TAPE BATT OTHER DISPLAY CAMERA DATA LCD BACKLIGHT LCD SET EVF SET EVF MODE DISPLAY ASPECT EVF COLOR REMOTE END SEARCH TAPE PC MODE P2 ACCESS LED P2 CLOCK SET TIME ZONE USER FILE HOUR METER TAPE OPTION MENU (Page 118) 1394 STATUS 1394 - Panasonic AG HVX200 | Memory Card Camcorder - Page 100
P2 TAPE CHROMA LEVEL P2 TAPE CHROMA PHASE P2 TAPE COLOR TEMP P2 TAPE MASTER PED P2 TAPE A. IRIS LEVEL P2 TAPE NEWS GAMMA P2 TAPE Display mode Description of settings (Camera) Switches the shutter and frame rate operation to the video type or film type. VIDEO CAM: SYNCRO SCAN is displayed using - Panasonic AG HVX200 | Memory Card Camcorder - Page 101
SCENE FILE screen (continued) Item GAMMA P2 TAPE KNEE P2 TAPE MATRIX P2 TAPE Display mode Description of settings (Camera) Selects the gamma curves other than the news gamma curve. HD NORM: This gamma setting is suitable for HD shooting. LOW: Makes a mellow image using the gamma curve which has - Panasonic AG HVX200 | Memory Card Camcorder - Page 102
cannot be selected when the 1080i or 720P recording format is used. (Page 44) NORMAL LETTER BOX SQUEEZE (Camera) Switch the setup level of video signals in 480i format using a P2 card. 0%: Setup is switched to 0% for both the camera output and the recording. 7.5%A: Setup is switched to 7.5% for the - Panasonic AG HVX200 | Memory Card Camcorder - Page 103
/M: Sets LOW (low speed)/OFF/MID (medium speed) to the 1/2/3 position. (Zoom is disabled when set to OFF.) (Camera) Sets the rotation direction and the aperture control of the IRIS dial. (In MANUAL IRIS mode) DOWN OPEN: The iris opens when the IRIS dial is turned downward. UP OPEN: The iris opens - Panasonic AG HVX200 | Memory Card Camcorder - Page 104
MANUAL mode or AUTO mode, set the AGC item on the AUTO SW screen of the setting menu to OFF to use this function. FOCUS RING: Selects the focus ring function (FOCUS or IRIS). The FOCUS RING is functional when the FOCUS switch is in AUTO mode. INDEX/MEMO: Text memo recording (P2 card - Panasonic AG HVX200 | Memory Card Camcorder - Page 105
can set the white balance value with the USER button. OFF: Does not perform the white balance function in auto mode. This performs the white balance function selected with the WHITE BAL switch. (Camera) ON: Performs auto focusing in auto mode. You cannot use the FOCUS switch and PUSH AUTO button - Panasonic AG HVX200 | Memory Card Camcorder - Page 106
MODE P2 REC FUNCTION P2 ONE-SHOT TIME P2 INTERVAL TIME P2 PREREC MODE P2 REC SPEED TAPE AUDIO REC TAPE MIC ALC P2 TAPE MIC GAIN 1 P2 TAPE MIC GAIN 2 P2 TAPE 25M REC CH SEL P2 Display mode Description of settings (Camera) Selects the recording format for P2 card. 1080i/60i, 1080i/30P, 1080i/24P - Panasonic AG HVX200 | Memory Card Camcorder - Page 107
to 24P, 24PA or 24PN. (Camera) Sets the mode in which you advance the time code. (MCR/ FREE RUN: VCR) The time code is advanced regardless of the operation mode. (DUB) Records in the dubbing mode in such a way that the time codes of the clips on the P2 card are carried over. User information - Panasonic AG HVX200 | Memory Card Camcorder - Page 108
. FRM. RATE: Records the frame rate information for frame conversion. UB PRESET P2 TAPE 1394 IN PRESET P2 TAPE ab cd a:Checking information for user information b:Frame sequence No. • 0 to 4 are displayed in the 24P/24P (ADV) mode. • F is displayed in the 60i/30P mode. c:Frame rates • Frame - Panasonic AG HVX200 | Memory Card Camcorder - Page 109
. CH1 signals = CH1 track CH2 signals = CH2 track (MCR/ VCR) Sets the audio signals to output from the AUDIO IN/OUT pin jack when the P2 card or the tape is played back. CH1 · CH2: CH1 output = CH1 signals, CH2 output = CH2 signals CH1: CH1 output = CH1 signals, CH2 output = CH1 signals - Panasonic AG HVX200 | Memory Card Camcorder - Page 110
Setup menu list (continued) PLAYBACK FUNCTIONS screen (continued) 32K(12bit) AUDIO item/AUDIO OUT item settings and audio track signals output from the AUDIO IN/OUT jack TAPE Audio recording mode 32K (12bit) 48K (16bit) 32K(12bit) AUDIO setting ST1 ST2 MIX - AUDIO OUT setting CH1 · CH2 CH1 CH2 - Panasonic AG HVX200 | Memory Card Camcorder - Page 111
AV IN/OUT SETUP screen Item CMPNT OUT SEL P2 HP MODE P2 TAPE A. DUB INPUT TAPE 1394 OUT TAPE Display mode Description of settings (Camera) Selects the type of component terminal. (MCR) 720P: Monitor which supports the D4 terminal 1080i: Monitor which supports the D3 terminal 480i: Monitor which - Panasonic AG HVX200 | Memory Card Camcorder - Page 112
P2 TAPE ZEBRA DETECT 2 P2 TAPE MARKER P2 TAPE SAFETY ZONE P2 TAPE VIDEO OUT OSD P2 TAPE DATE/TIME P2 TAPE LEVEL METER P2 TAPE Display mode Description of settings (Camera is set to ON when performing backup recording while a tape is used, the OSD will be output to the 1394 output at all times - Panasonic AG HVX200 | Memory Card Camcorder - Page 113
P2 TAPE EVF COLOR P2 TAPE Display mode Description of settings (Camera) Selects the unit of zoom and focus values. OFF, NUMBER, mm/feet, mm/m Use the mm/feet or mm/m display only as a general guideline since it is not entirely accurate. (Camera) Select ON to display the remaining card - Panasonic AG HVX200 | Memory Card Camcorder - Page 114
Setup menu list (continued) CARD FUNCTIONS screen Item SCENE FILE P2 USER FILE P2 SD CARD FORMAT P2 Display mode Description of settings (Camera) You can save four SCENE FILE settings to the SD memory card, and can also title the saved files. READ: Read WRITE: Write (Camera) You can save four - Panasonic AG HVX200 | Memory Card Camcorder - Page 115
MCR) same time.) USB DEVICE: Mode for sending files using the USB connector. 1394 DEVICE: Mode for sending files using the 1394 connector. 1394 HOST: Mode for copying files from the P2 card onto an external hard disk drive using the 1394 connector. (Camera) Sets lighting of the tally lamp. OFF: The - Panasonic AG HVX200 | Memory Card Camcorder - Page 116
Setup menu list (continued) OTHER FUNCTIONS screen (continued) Item TIME ZONE P2 TAPE Display mode Description of settings (Camera) Adds to or deducts from GMT the time value of -12:00 to +13:00 in 30-minute (MCR/ steps. (As an exception, you can - Panasonic AG HVX200 | Memory Card Camcorder - Page 117
without turning off the camera-recorder's power. • When connection is made with an external device using the IEEE1394 cable P2 card or tape has not been installed in the P2 mode or TAPE mode, respectively, even if ON has been selected as this item's setting. (Camera) LOAD: (MCR/ The previous user - Panasonic AG HVX200 | Memory Card Camcorder - Page 118
to check the connection status during nonlinear editing. Item 1394 STATUS P2 TAPE 1394 CONFIG P2 Display mode Description of settings (Camera) 1394 status display screen appears. (MCR/ • When a P2 card is used VCR) FORMAT: Format of the signals which are input or output. RATE: Transfer rate - Panasonic AG HVX200 | Memory Card Camcorder - Page 119
service life. The battery will become unchargeable. The battery has a certain service life which varies depending on how the battery is used condensation has dried out. Cannot focus automatically. • Make sure the camera is in manual mode. You can focus automatically when the auto focus mode is - Panasonic AG HVX200 | Memory Card Camcorder - Page 120
service (continued) Shooting (when using a P2 card) Cannot shoot even though the P2 card is inserted correctly. • The MEDIA switch may be in the TAPE position. P 25 If so, set it to the P2 position. • Make sure the P2 card closed. - You cannot operate the camera if the cassette holder is open - Panasonic AG HVX200 | Memory Card Camcorder - Page 121
P2 cards or tapes. Mosaic-like noise appears when I cue or review a tape. Images do not appear on the television even though I have connected the camera instructions carefully and select the correct video input connector for the camera not support hot swap playback. To replace one card with another - Panasonic AG HVX200 | Memory Card Camcorder - Page 122
. • There are some parts of the camera that make a rattling sound in - the VCR mode or when the POWER switch is OFF. This is normal. • This initialization operation is performed when the camera starts up. - It occurs due to the construction of the camera and is not indicative of any trouble. 122 - Panasonic AG HVX200 | Memory Card Camcorder - Page 123
can become slack or damaged if you leave it in the camera. Do not allow any sand or dust to get into the camera-recorder when using it at the beach and other similar places. • Sand and dust can damage the camera-recorder, P2 card and cassette. (Be especially careful when inserting or removing the - Panasonic AG HVX200 | Memory Card Camcorder - Page 124
brighten as the camera warms up. Do not point the lens or viewfinder at the sun. Doing so may damage the parts inside. Protective caps for the connectors Keep the protective caps fitted over any connectors that are not being used. What to remember when throwing memory cards away or transferring - Panasonic AG HVX200 | Memory Card Camcorder - Page 125
on drivers, visit the P2 Support Desk at the following Web sites. https://eww.pavc.panasonic.co.jp/pro-av/ To update a driver, select PROPERTY on the thumbnail menu and then SYSTEMINFO to check the camera-recorder's version, go to the site given above, and download the driver as necessary - Panasonic AG HVX200 | Memory Card Camcorder - Page 126
resetting Reset the system microcomputer if you can no longer operate the camera-recorder even though its power is on or a similar kind of a problem has occurred. Use a pointed object to press the RESET button on the camera-recorder. The menu setting entered and memory contents will not be cleared - Panasonic AG HVX200 | Memory Card Camcorder - Page 127
• Scratches on tapes • Overuse Using A Cleaning Tape (Page 133, OPTIONAL UNITS) (1) Insert the cleaning tape in the camera recorder and turn on the power a dirty video head with the cleaning tape, it needs cleaning and repair at the dealer. Please contact them. Regular Maintenance For the superior - Panasonic AG HVX200 | Memory Card Camcorder - Page 128
at least once a year, use up its charge in the camerarecorder, and then store it again. P2 cards • After ejecting a P2 card from the unit, be absolutely These particles could burrow into the cassettes, causing damage to the video camera's heads or other parts. Make sure that all of your tapes are - Panasonic AG HVX200 | Memory Card Camcorder - Page 129
native 720P/24PN - recording 480i/30P over 60i 480i/24P 480i/24PA over 60i over 60i Frame rate 12 18 20 22 26 32 36 48 1080i/60i - 720P/60P DVCPRO HD 720P/30PN 720P/12P - 48P over 60P 720P/12P - 48P native recording P2 Card Video format 720P/24PN DVCPRO50 720P/12P - 48P native - Panasonic AG HVX200 | Memory Card Camcorder - Page 130
or if the setting for recording clip metadata has been turned off USER CLIP NAME to be recorded Uploaded data + COUNT value* Same P2 card with a memory capacity of 8 GB or more is used in this unit and a one-time continuous recording exceeds the prescribed duration (approx. 5 minutes for DVCPRO HD - Panasonic AG HVX200 | Memory Card Camcorder - Page 131
mode: 1/15, 1/30 30P/30PN mode: 1/15 24P/24PN mode: 1/12 (720P mode only) Minimum subject luminance 3 lx (F1.6, gain +12 dB with a shutter speed of 1/24) Lens hood Large-sized lens hood with wide angle of view Filter diameter 82 mm [VIDEO P2] (DVCPRO HD 1080i 720P) Sampling frequency Y: 74.25 MHz - Panasonic AG HVX200 | Memory Card Camcorder - Page 132
DVCPRO HD format using one AJ-P2C008HG card with audio signals recorded on 4 channels. • This recording time represents one shot continuously recorded on a P2 card . (when AY-DVM63 is used) [VIDEO IN/OUT] Analog component output 720P, 1080i, 480i format monitors supported Y: 1.0 V [p-p], 75 - Panasonic AG HVX200 | Memory Card Camcorder - Page 133
Source: 100-240 V AC, 50/60 Hz 24 W Power Output: 7.9 V DC, 1.9 A (Video Camera) 8.4 V DC, 1.2 A (Charge) indicates safety information. Weight 160 g (0.35 lb) Dimensions (W UNITS] XLR microphone AG-MC100G Battery CGP-D28 (2800 mAh) CGA-D54 (5400 mAh: equivalent to accessory battery) Cleaning tape - Panasonic AG HVX200 | Memory Card Camcorder - Page 134
. Fax (800) 334-4880 Emergency after hour parts orders (800) 334-4881 TECHNICAL SUPPORT: Emergency 24 Hour Service (800) 222-0741 Panasonic Canada Inc. 5770 Ambler Drive, Mississauga, Ontario L4W 2T3 (905) 624-5010 Panasonic de Mexico S.A. de C.V. Av angel Urraza Num. 1209 Col. de Valle 03100 Mexico
-
 1
1 -
 2
2 -
 3
3 -
 4
4 -
 5
5 -
 6
6 -
 7
7 -
8
-
9
-
10
-
11
-
12
-
13
-
14
-
15
-
16
-
17
-
18
-
19
-
20
-
21
-
22
-
23
-
24
-
25
-
26
-
27
-
28
-
29
-
30
-
31
-
32
-
33
-
34
-
35
-
36
-
37
-
38
-
39
-
40
-
41
-
42
-
43
-
44
-
45
-
46
-
47
-
48
-
49
-
50
-
51
-
52
-
53
-
54
-
55
-
56
-
57
-
58
-
59
-
60
-
61
-
62
-
63
-
64
-
65
-
66
-
67
-
68
-
69
-
70
-
71
-
72
-
73
-
74
-
75
-
76
-
77
-
78
-
79
-
80
-
81
-
82
-
83
-
84
-
85
-
86
-
87
-
88
-
89
-
90
-
91
-
92
-
93
-
94
-
95
-
96
-
97
-
98
-
99
-
100
-
101
-
102
-
103
-
104
-
105
-
106
-
107
-
108
-
109
-
110
-
111
-
112
-
113
-
114
-
115
-
116
-
117
-
118
-
119
-
120
-
121
-
122
-
123
-
124
-
125
-
126
-
127
-
128
-
129
-
130
-
131
-
132
-
133
-
134
 |
 |
P
AG-
Reference
Menu
Displays
Editing
Playback
Shooting
Preparation
Description
of parts
Before use
Operating Instructions
Memory Card Camera-Recorder
Model No.
Before operating this product, please read the instructions carefully and save this manual for
future use.
F1205S3046-H
Printed in Japan
D
VQT0S52-3
ENGLISH