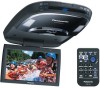
Panasonic CYVHD9401U 9" Overhead Monitor
Panasonic CYVHD9401U - Diagonal Flip-Down Monitor Console Manual
 |
UPC - 037988757169
View all Panasonic CYVHD9401U manuals
Add to My Manuals
Save this manual to your list of manuals |
Panasonic CYVHD9401U manual content summary:
- Panasonic CYVHD9401U | 9" Overhead Monitor - Page 1
con reproductor incorporado de DVD para instalación en el techo del auto CY-VHD9401U CY-VHD9401L Installation Instructions Instructions d'installation Instrucciones de instalación ≥ Please read these instructions carefully before using this product and keep this manual for future reference. ≥ Pri - Panasonic CYVHD9401U | 9" Overhead Monitor - Page 2
tank, etc.) could cause accidents. Follow the instructions and only use the accessories provided with the product and the specified parts. 2 CY-VHD9401U/L Warning Observe the following warnings when installing. (Continued) E N G L I S q Install the product after checking the position H of - Panasonic CYVHD9401U | 9" Overhead Monitor - Page 3
cautions when or any other parts. installing. Failure to heed this operating instructions Installation Guide replacing it. Wiring Diagram (Advanced System 34 Note: ≥ For replacing the bulb of the dome light, please refer to page 73 in the Operating Instructions. 4 CY-VHD9401U/L CY-VHD9401U - Panasonic CYVHD9401U | 9" Overhead Monitor - Page 4
des accidents. Suivez les instructions et utilisez exclusivement les accessoires fournis avec l'appareil et les pièces spécifiées. 6 CY-VHD9401U/L Mise en garde o Vérifiez d'abord la position des tuyaux, réservoirs et câbles électriques du véhicule avant d'installer Respectez les avertissements - Panasonic CYVHD9401U | 9" Overhead Monitor - Page 5
37 A N Ajustement latéral de l'angle de l'unité Ç A d'affichage 37 I S Guide d'installation 38 Vue d'ensemble 38 Matériel fourni 39 Outils requis 39 Identification de tous les fils 40 , veuillez vous reporter à la page 117 du Manuel d'instructions. 8 CY-VHD9401U/L CY-VHD9401U/L 9 - Panasonic CYVHD9401U | 9" Overhead Monitor - Page 6
manual No instale el producto alguna de sus partes se Si se Panasonic no es responsable de la merma en la seguridad ni de ningún accidente debido a la instalación de este producto. No garantizamos ninguna pieza del vehículo que resulte dañada durante la instalación. 10 CY-VHD9401U/L CY-VHD9401U - Panasonic CYVHD9401U | 9" Overhead Monitor - Page 7
de aparatos calentadores ni ponga objetos pesados encima de los mismos. q Instale el monitor en tal posición que no se golpee la cabeza de ≥ Solicite el recambio de la luz del techo por parte de un técnico cualificado. ≥ Al cambiar una manual de instrucciones. 12 CY-VHD9401U/L CY-VHD9401U/L 13 - Panasonic CYVHD9401U | 9" Overhead Monitor - Page 8
dimensions given below. Approximately 150 mm {515/16q}* Installation angle: Less than 20˚ Approximately 300 mm {1113/16q } Maximum Approximately 120˚ 300 mm {1113/16q } * Install by the non-slip part in the upper half of it and adjust its lateral angle. 14 CY-VHD9401U/L CY-VHD9401U/L 15 - Panasonic CYVHD9401U | 9" Overhead Monitor - Page 9
Card... Fill this out promptly. ≥ Panasonic Servicenter List for Service Directory... Keep for future reference in case the product needs servicing. ≥ Installation Hardware... Needed for installation. 16 CY-VHD9401U/L Supplied Hardware ª For Installation No. Item 1 Paper template Diagram - Panasonic CYVHD9401U | 9" Overhead Monitor - Page 10
new LCD monitor. Final Checks 1. Make sure that all wires are properly connected and insulated. 2. Turn on the ignition to check the unit for proper operation. If you have difficulties, consult your nearest authorized professional installer for assistance. 18 CY-VHD9401U/L CY-VHD9401U/L 19 - Panasonic CYVHD9401U | 9" Overhead Monitor - Page 11
crosspieces. Finally replace the headliner as it was and attach the main unit. Wiring Ceiling reinforcement crosspieces Slide plate (upper), slide plate (lower), base plate CY-VHD9401U/ CY-VHD9401L E N G L I Work Flow S H Note: There are five main steps to install the main unit - Panasonic CYVHD9401U | 9" Overhead Monitor - Page 12
nuts (7) in 8 positions. 5 Screw [No. 10-32 UNF, L=10 mm {3/8q}]a 8 22 CY-VHD9401U/L Line B Line A Edge of the lower slide plate B Use all 8 screws to attach the 3 the holes, check exactly where the unit and bracket are to be installed. Take care not to injure your fingers with the power drill - Panasonic CYVHD9401U | 9" Overhead Monitor - Page 13
service technician as needed. ≥ Both positive and negative switched light circuits are supported model to another so be absolutely sure to ask a dealer or service technician to wire and install the unit. Pullout openings Reference holes Headliner 24 CY-VHD9401U guide holes in the accessory paper - Panasonic CYVHD9401U | 9" Overhead Monitor - Page 14
between the base plate and the unit, attach and adjust the under cover (see next page). For details on installing the under cover, consult your dealer. 26 CY-VHD9401U/L E N G L I ª If some space is required between the base plate and the unit, attach the under cover S H and adjust as - Panasonic CYVHD9401U | 9" Overhead Monitor - Page 15
the cord clamps through the installation holes in the main unit's rear panel, and then use them to secure the wires. Finally, cut off the excess parts of the cord clamps. Caution: ≥ Wires are never to be hit by the screws or pinched between the plates. 28 CY-VHD9401U/L Push in any extra wire - Panasonic CYVHD9401U | 9" Overhead Monitor - Page 16
To the remote input terminal of the Panasonic DVD changer (CX-DH801U, option). (Black) VIDEO-OUT VTR input cord VTR1-IN Dome light lead (page 31) Video out cord Video (yellow) L (white) R (red) DOOR NEGA SWITCH (White) To the Door switch. (Negative Switched only) DOOR SWITCH CY-VHD9401U/CY - Panasonic CYVHD9401U | 9" Overhead Monitor - Page 17
RCA cord (option). ≥ Connect this unit's (CY-VHD9401U/ CY-VHD9401L) video control lead to the DVD changer's (CX-DH801U, option) video control lead. ≥ For wiring, carefully read the operating instructions for the devices connected. Remote control unit: ≥The remote control unit supplied with the CX - Panasonic CYVHD9401U | 9" Overhead Monitor - Page 18
read the operating instructions for the devices connected. CQ-VA707WEUC Control Unit (option) Front speaker cord (L) + FRONT L - + FRONT R Front speaker cord (R) Front speaker (option) Rear speaker cord (L) + REAR L - + REAR R Rear speaker cord (R) Rear speaker (option) CY-VHD9401U/L 35 - Panasonic CYVHD9401U | 9" Overhead Monitor - Page 19
installation Schéma d'installation sécuritaire ≥ Les dimensions maximales de cet appareil lorsqu'il est ouvert et lorsqu'il est fermé sont indiquées ci-dessous. F R A N Environ 150 mm {515/16 po}* Angle d'installation érieure pour ajuster l'angle latéral. 36 CY-VHD9401U/L CY-VHD9401U/L 37 - Panasonic CYVHD9401U | 9" Overhead Monitor - Page 20
Guide d'installation emplacement. Les instructions des pages qui service après-vente Panasonic ... À conserver pour consultation ultérieure si l'appareil a besoin d'une réparation. ≥ Matériel d'installation... Nécessaire pour l'installation. 38 CY-VHD9401U/L Matériel fourni ª Pour l'installation - Panasonic CYVHD9401U | 9" Overhead Monitor - Page 21
le véhicule est doté d'une radio ou du câblage pour radio : Détachez de la fiche les du service après-vente de câbler et installer l'appareil code de couleur des fils. Il est fortement recommandé de tester l'appareil avant de procéder à l'installation instructions. 40 CY-VHD9401U/L CY-VHD9401U/L 41 - Panasonic CYVHD9401U | 9" Overhead Monitor - Page 22
Plaque coulissante (supérieure), plaque coulissante (inférieure), plaque de base CY-VHD9401U/ CY-VHD9401L Flux de travaux Remarque : L'installation de l'appareil principal s'effectue en ≥ La figure ci-dessous illustre l'installation de manière simplifiée. Ne vous basez pas uniquement sur cette - Panasonic CYVHD9401U | 9" Overhead Monitor - Page 23
fournis, en 8 points. 5 Vis [No 10-32 UNF, L=10 mm {3/8 po}]a 8 44 CY-VHD9401U/L Ligne B Ligne A Bord de la plaque coulissante inférieure B Utilisez les 8 vis pour fi Avant de percer les trous, vérifiez la position exacte d'installation de l'appareil et du crochet. Prenez garde de vous blesser aux - Panasonic CYVHD9401U | 9" Overhead Monitor - Page 24
hicule à l'autre. Consultez votre concessionnaire ou un technicien du service après-vente. ≥ L'interrupteur de porte de cet appareil installation. 5 Tirez à l'avance les fils que vous avez fait passer par l'ouverture passe-fil de la plaque de base, pour faciliter leur raccordement. CY-VHD9401U - Panasonic CYVHD9401U | 9" Overhead Monitor - Page 25
base et l'appareil, fixez le sous-couvercle et ajustez-le (consultez la page suivante). Pour plus de détails sur l'installation du sous-couvercle, contactez votre détaillant. 48 CY-VHD9401U/L ª Si un dégagement est nécessaire entre la plaque de base et l'appareil, fixez le sous-couvercle et ajustez - Panasonic CYVHD9401U | 9" Overhead Monitor - Page 26
technicien du service après- installation dans le panneau arrière de l'appareil principal, puis utilisez-les pour immobiliser les câbles. Finalement, coupez la partie inutile des serre-cordons. Attention : ≥ Évitez qu'ils ne soient heurtés par les vis ou coincés entre les plaques. 50 CY-VHD9401U - Panasonic CYVHD9401U | 9" Overhead Monitor - Page 27
DVD Panasonic (CX-DH801U, en option) (Noir) REMOTE-OUT Cordon de sortie de télécommande Vers la borne d'entrée de télécommande du changeur de DVD Panasonic (À commutation positif uniquement) CY-VHD9401U/CY-VHD9401L (Noir) Vers I S du service après-vente de câbler et installer l'appareil. 18 - Panasonic CYVHD9401U | 9" Overhead Monitor - Page 28
-DH801U si ce raccordement a été établi.) Raccordements : ≥ Raccordez le cordon de sortie de télécommande du présent appareil (CY-VHD9401U/CY-VHD9401L) au connecteur REMOTE-IN du changeur de DVD (CX-DH801U, en option), au moyen d'un cordon RCA (en option). ≥ Raccordez le fil de commande vidéo de cet - Panasonic CYVHD9401U | 9" Overhead Monitor - Page 29
n'est pas soumis à une I S traction quand il est raccordé. ≥ Évitez de trop plier le câble. 21 DIGITAL OUT CY-VHD9401U/CY-VHD9401L 25 mm {1 po} ou davantage Vidéo (jaune) CY-AC300 Câble à fibres optiques Unité d'opération (en option) (CA-LRD60, en option) D (rouge) G (blanc) Cordon RCA (en - Panasonic CYVHD9401U | 9" Overhead Monitor - Page 30
300 mm {1113/16q} 120° aproximadamente Ñ O L 1 * Instale el producto de tal manera que se mantengan las distancias mostradas aun cuando izquierda y derecha. Sujete la unidad de pantalla por la parte antideslizante de la mitad superior, y ajuste el ángulo lateral. CY-VHD9401U/L CY-VHD9401U/L 59 - Panasonic CYVHD9401U | 9" Overhead Monitor - Page 31
del vehículo a los cables del conector de alimentación. ≥ Instale la unidad. ≥ Compruebe el funcionamiento de la unidad. Si encuentra Lista del directorio del centro de servicio de Panasonic... Guarde para futuras consultas en caso de que tuercas y tornillos. 60 CY-VHD9401U/L CY-VHD9401U/L 61 - Panasonic CYVHD9401U | 9" Overhead Monitor - Page 32
de la clavija de conexión de radio cortada. Toque los cables uno por técnico de reparaciones que le cablee e instale la unidad. Conexión de todos los manual de instrucciones y las instrucciones de instalación de cualquier equipo que vaya a conectar a esta unidad. 62 CY-VHD9401U/L CY-VHD9401U - Panasonic CYVHD9401U | 9" Overhead Monitor - Page 33
gafas de seguridad o protectores oculares para protegerse los ojos de las partículas de metal que salgan E despedidas durante el taladrado. Si techo Placa deslizante (superior), placa deslizante (inferior), placa base CY-VHD9401U/ CY-VHD9401L Flujo operativo Nota: ≥ La figura de abajo muestra - Panasonic CYVHD9401U | 9" Overhead Monitor - Page 34
de las partículas de metal que salgan despedidas durante el taladrado. Si se hace caso omiso de esta precaución, se pueden producir accidentes y/o lesiones. 6 Fije firmemente las placas de ensamblaje en los travesaños de refuerzo del techo por medio de los tornillos y las tuercas. CY-VHD9401U/L 67 - Panasonic CYVHD9401U | 9" Overhead Monitor - Page 35
a un distribuidor o técnico de reparaciones que le cablee e instale la unidad. Parte superior de la placa base Precaución: ≥ Pase los cables que pillar los cables con la parte superior de la placa base. Orificios de salida Orificios de referencia Cabecera 68 CY-VHD9401U/L 2 Vuelva a colocar en - Panasonic CYVHD9401U | 9" Overhead Monitor - Page 36
a su distribuidor. 70 CY-VHD9401U/L ª Si hace falta algo de espacio entre la placa base y la unidad, instale la cubierta inferior y aj tornillos (para resina) (C) para montar la cubierta inferior accesoria (@) sobre la parte inferior de la unidad principal. Nota: ≥ Dependiendo del tipo de vehículo - Panasonic CYVHD9401U | 9" Overhead Monitor - Page 37
en el lado del asiento trasero (en 1 posición) 72 CY-VHD9401U/L 1 Conecte los cables (página 74 a 79) que técnico de reparaciones que le cablee e instale la unidad. 2 Empalme los cables por medio cable adicional. 3 Inserte el saliente de la parte inferior de la unidad principal en los orificios - Panasonic CYVHD9401U | 9" Overhead Monitor - Page 38
control de vídeo Al cable de control de vídeo del cambiador DVD de Panasonic (CX-DH801U, opcional). (Negro) REMOTE NEGA SWITCH (Blanco) DOOR SWITCH CY-VHD9401U/CY-VHD9401L DOOR POSI SWITCH (Blanco) . Consulte a su distribuidor o técnico de instale la unidad. reparaciones. E S P Tipo - Panasonic CYVHD9401U | 9" Overhead Monitor - Page 39
REMOTE-IN del cambiador DVD (CX-DH801U, opcional) utilizando un cable RCA (opcional). ≥ Conecte el conductor de control de vídeo de esta unidad (CY-VHD9401U/CY-VHD9401L) al conductor de control de vídeo del cambiador DVD (CX-DH801U, opcional). ≥ Para efectuar el cableado, lea con cuidado el manual - Panasonic CYVHD9401U | 9" Overhead Monitor - Page 40
DIGITAL OUT CY-VHD9401U/CY-VHD9401L 25 mm {1q} o más E Vídeo S P (amarillo) A VTR1-IN Ñ O Cable de fibra óptica L 21 CY-AC300 Unidad de cableado, lea con cuidado el manual de instrucciones de los dispositivos conectados. CQ-VA707WEUC Unidad de control (opcional) Cable del altavoz - Panasonic CYVHD9401U | 9" Overhead Monitor - Page 41
CY-VHD9401U/CY-VHD9401L Panasonic Consumer Electronics Company, Division of Panasonic Corporation of North America One Panasonic Way, Secaucus, New Jersey 07094 http://www.panasonic.com Panasonic Sales Company, Division of Panasonic Puerto Rico, Inc. ("PSC") Ave. 65 de Infanteria, Km. 9.5 San
-
 1
1 -
 2
2 -
 3
3 -
 4
4 -
 5
5 -
 6
6 -
 7
7 -
8
-
9
-
10
-
11
-
12
-
13
-
14
-
15
-
16
-
17
-
18
-
19
-
20
-
21
-
22
-
23
-
24
-
25
-
26
-
27
-
28
-
29
-
30
-
31
-
32
-
33
-
34
-
35
-
36
-
37
-
38
-
39
-
40
-
41
 |
 |

Installation Instructions
Instructions d’installation
Instrucciones de instalación
Overhead 9
q
Widescreen Color LCD Monitor with Built-in DVD Player
Moniteur plafond couleur à ÉCL de 9 po (grand-écran) avec lecteur DVD intégré
Monitor de pantalla ancha LCD de 9
q
a color con reproductor incorporado de DVD
para instalación en el techo del auto
CY-VHD9401U
CY-VHD9401L
≥
Please read these instructions carefully before using this product and keep this manual for future reference.
≥
Prière de lire ces instructions attentivement avant d’utiliser Ie produit et garder ce manuel pour l’utilisation ultérieure.
≥
Lea con atención estas instrucciones antes de utilizar el producto y guarde este manual para poderlo consultar en el futuro.