Panasonic DMPBDT220 DMPBDT220 User Guide - Page 17
Erase or Format SD Card and press [OK]., Select SD Card Management in the Home - video formats
 |
View all Panasonic DMPBDT220 manuals
Add to My Manuals
Save this manual to your list of manuals |
Page 17 highlights
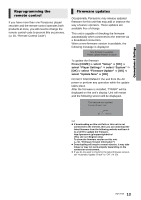
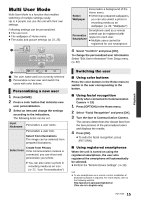
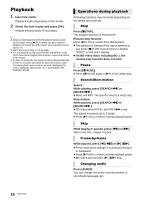
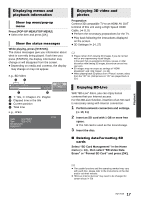
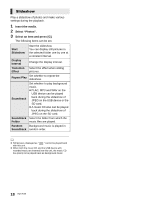
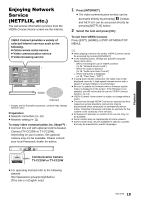
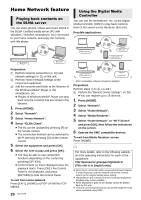
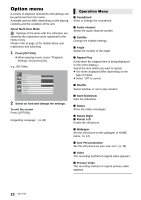
Displaying menus and playback information Show top menu/pop-up menu Press [POP-UP MENU/TOP MENU]. ≥ Select the item and press [OK]. Show the status messages While playing, press [STATUS]. The status messages give you information about what is currently being played. Each time you press [STATUS], the display information may change or will disappear from the screen. ≥ Depending on media and contents, the display may change or may not appear. e.g., BD-Video A B T1 C1 0:05.14 0:20.52 BD-Video Play C D A T: Title, C: Chapter, PL: Playlist B Elapsed time in the title C Current position D Total time e.g., JPEG Date 11/12/2007 Size 500 x 375 Manufacturer Equipment 1 / 26 Enjoying 3D video and photos Preparation Connect 3D compatible TV to an HDMI AV OUT terminal of this unit using a High Speed HDMI Cable. (> 8, 9) ≥ Perform the necessary preparations for the TV. ≥ Play back following the instructions displayed on the screen. ≥ 3D Settings (> 24, 27) ≥ Please refrain from viewing 3D images if you do not feel well or are experiencing visual fatigue. In the event that you experience dizziness, nausea, or other discomfort while viewing 3D images, discontinue use and rest your eyes. ≥ 3D images may not output as settings of "HDMI Resolution" and "24p Output". (> 25) ≥ When playing back 3D photos from "Photos" screen, select from the "3D" list. (Still pictures in "2D" are played back in 2D.) Enjoying BD-Live With "BD-Live" discs, you can enjoy bonus contents that use Internet access. For this BD-Live function, insertion of an SD card is necessary along with Internet connection. 1 Perform network connection and settings. (> 10, 11) 2 Insert an SD card with 1 GB or more free space. ≥ The SD card is used as the local storage. 3 Insert the disc. ∫ Deleting data/Formatting SD cards Select "SD Card Management" in the Home menu (> 14) , then select "BD-Video Data Erase" or "Format SD Card" and press [OK]. Playback ≥ The usable functions and the operating method may vary with each disc, please refer to the instructions on the disc and/or visit their website. ≥ "BD-Live Internet Access" may need to be changed for certain discs (> 29). 17 VQT3V20
-
 1
1 -
2
-
3
-
4
-
5
-
6
-
7
-
8
-
9
-
10
-
11
-
 12
12 -
 13
13 -
 14
14 -
 15
15 -
 16
16 -
 17
17 -
 18
18 -
 19
19 -
 20
20 -
 21
21 -
 22
22 -
23
-
24
-
25
-
26
-
27
-
28
-
29
-
30
-
31
-
32
-
33
-
34
-
35
-
36
-
37
-
38
-
39
-
40
-
41
-
42
-
43
-
44
 |
 |