Panasonic DMREZ485V Dvd Recorder - English/spanish - Page 6

Control Reference Guide, The Unit's Display, Main Unit - remote control

Page 6 highlights

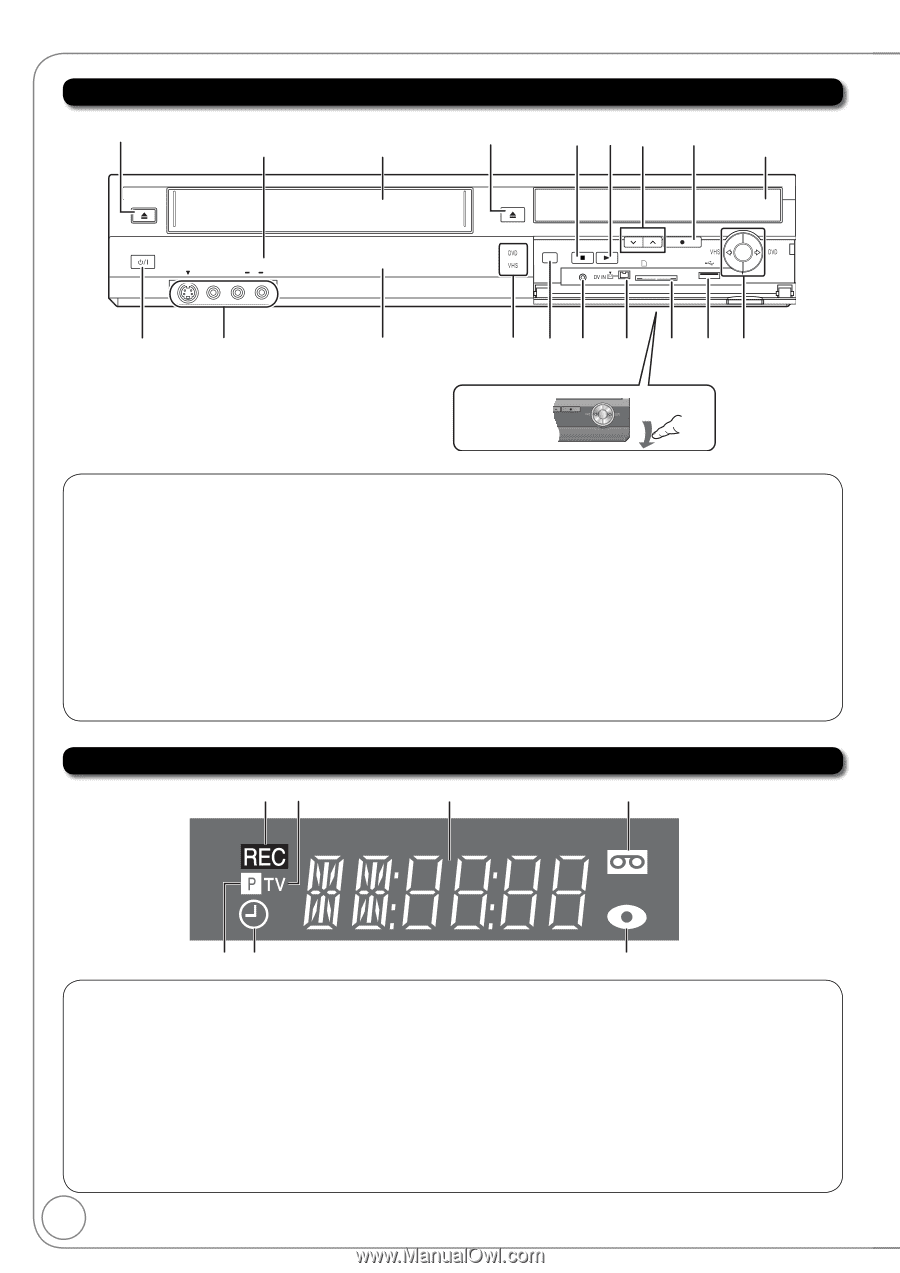
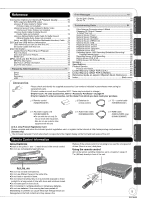
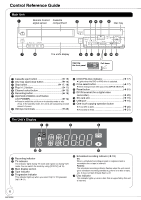
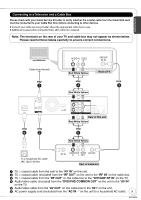
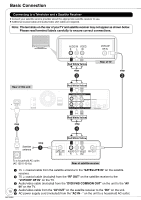
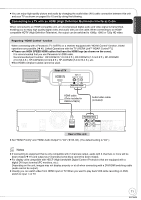
Control Reference Guide Main Unit Remote Control Cassette signal sensor compartment EJECT POWER IN 2 S VIDEO VIDEO L /MONO AUDIO R OPEN/CLOSE DRIVE SELECT RESET Disc tray CH REC SD CARD COPYING The unit's display Opening CH REC the front panel COPYING Pull down.  Cassette eject button 15)  Disc tray open/close button 15)  Stop button 17, 18)  Play/1.3 button 17)  Channel select button 13)  Recording button 18)  DVD/VHS POWER on/off button (/I POWER 12)  Press to switch the unit from on to standby mode or vice versa. In the standby mode, the unit is still consuming a small amount of power.  IN2 input terminals 28)  DVD/VHS drive indicator 17)  Lights when the DVD or VHS drive is selected.  Drive select button 17)  Drive changes each time you press [DRIVE SELECT].  Reset button 81)  DV IN terminal (for a digital video camcorder 29)  SD card slot 15)  USB port 15)  One touch copying operation button  From VHS to DVD 20)  From DVD to VHS 21) The Unit's Display  Recording indicator  TV indicator The indicator lights during TV mode and it goes out during VCR mode. You can switch the mode by using [VCR/TV] ( 16).  Main display section  Tape indicator  Progressive indicator This indicator lights up when you select "24p" in "Progressive/ 24p" ( 51).  Scheduled recording indicator ( 19) On: When a scheduled recording program is registered and a recordable disc or tape is inserted. Flashes: The scheduled recording indicator flashes when the unit cannot go to scheduled recording standby (e.g. there is no disc or tape, etc). It does not flash if Quick Start is off.  Disc indicator This indicator lights up when a disc that is supported by this unit is inserted. 6 RQT9056

  • 1
  • 2
  • 3
  • 4
  • 5
  • 6
  • 7
  • 8
  • 9
  • 10
  • 11
  • 12
  • 13
  • 14
  • 15
  • 16
  • 17
  • 18
  • 19
  • 20
  • 21
  • 22
  • 23
  • 24
  • 25
  • 26
  • 27
  • 28
  • 29
  • 30
  • 31
  • 32
  • 33
  • 34
  • 35
  • 36
  • 37
  • 38
  • 39
  • 40
  • 41
  • 42
  • 43
  • 44
  • 45
  • 46
  • 47
  • 48
  • 49
  • 50
  • 51
  • 52
  • 53
  • 54
  • 55
  • 56
  • 57
  • 58
  • 59
  • 60
  • 61
  • 62
  • 63
  • 64
  • 65
  • 66
  • 67
  • 68
  • 69
  • 70
  • 71
  • 72
  • 73
  • 74
  • 75
  • 76
  • 77
  • 78
  • 79
  • 80
  • 81
  • 82
  • 83
  • 84
  • 85
  • 86
  • 87
  • 88
  • 89
  • 90
  • 91
  • 92
  • 93
  • 94
  • 95
  • 96
  • 97
  • 98
  • 99
  • 100

6
RQT9056
Control Reference Guide
±
²
³
´
µ
·
Cassette eject button
.....................................
(
¼
15)
Disc tray open/close button
............................
(
¼
15)
Stop button
...............................................
(
¼
17, 18)
Play/
1.3 button
............................................
(
¼
17)
Channel select button
....................................
(
¼
13)
Recording button
............................................
(
¼
18)
DVD/VHS PO
W
ER on/off button
(
/I PO
W
ER)
................................................
(
¼
12)
Press to switch the unit from on to standby mode or
v
ice
v
ersa. In the standby mode, the unit is still consuming a small
amount of power.
IN2 input terminals
........................................
(
¼
28)
DVD/VHS dri
v
e indicator
................................
(
¼
17)
Lights when the DVD or VHS dri
v
e is selected.
Dri
v
e select button
.........................................
(
¼
17)
Dri
v
e changes each time you press [DRIVE SELECT].
Reset button
...................................................
(
¼
81)
DV IN terminal (for a digital
v
ideo
camcorder)
.....................................................
(
¼
29)
SD card slot
....................................................
(
¼
15)
USB port
........................................................
(
¼
15)
One touch copying operation button
From VHS to DVD
......................................................
(
¼
20)
From DVD to VHS
......................................................
(
¼
21)
Recording indicator
TV indicator
The indicator lights during TV mode and it goes out during VCR
mode. You can switch the mode by using [VCR/TV] (
¼
16).
Main display section
Tape indicator
Progressi
v
e indicator
This indicator lights up when you select “24p” in “Progressi
v
e/
24p” (
¼
51).
Scheduled recording indicator (
¼
19)
On:
W
hen a scheduled recording program is registered and a
recordable disc or tape is inserted.
Flashes:
The scheduled recording indicator flashes when the unit cannot
go to scheduled recording standby (e.g. there is no disc or tape,
etc). It does not flash if Quick Start is off.
Disc indicator
This indicator lights up when a disc that is supported by this unit
is inserted.
The Unit’s Display
Main Unit
S VIDEO
IN 2
VIDEO
/MONO
AUDIO
R
L
S VIDEO
IN 2
VIDEO
/MONO
AUDIO
R
L
OPEN/CLOSE
EJECT
PO
W
ER
REC
SD CARD
CH
CH
DRIVE SELECT
RESET
¸
¹
±
²³
µ
·
´
º
»
¼
½
¾
¿
COPYING
COPYING
COPYING
COPYING
REC
Cassette
compartment
The unit’s display
Remote Control
signal sensor
Disc tray
Opening
the front panel
Pull down.