Panasonic HL-BD82S Installation Instructions
Panasonic HL-BD82S Manual
 |
View all Panasonic HL-BD82S manuals
Add to My Manuals
Save this manual to your list of manuals |
Panasonic HL-BD82S manual content summary:
- Panasonic HL-BD82S | Installation Instructions - Page 1
ENCASTRABLE HORNO ELECTRICO DE PARED Model/Modèle/Modélo No. HL-BD82S Please read these Installation Instructions. And read in particular "WARNING and CAUTION" before construction by all means. Lire ces instructions d'installation. Lire en particulier la section des "AVERTISSEMENTS et PRÉCAUTIONS - Panasonic HL-BD82S | Installation Instructions - Page 2
- Panasonic HL-BD82S | Installation Instructions - Page 3
reference. WARNING A fire or explosion may result causing property damage, If the information in this manual is not followed exactly, personal injury or death. INTRODUCTION Please read these instructions COMPLETELY AND CAREFULLY. They will save you time and effort and help to ensure optimum oven - Panasonic HL-BD82S | Installation Instructions - Page 4
location SINGLE OVEN HL-BD82S Electrical Ratings and support surface must be a minimum 3/4" (2cm) thick plywood platform. For single ovens, it must support in the maintenance section of the Operating Instructions. 4. Be very careful when moving OFF at the service panel. Lock service panel to prevent - Panasonic HL-BD82S | Installation Instructions - Page 5
WALL OR UNDER COUNTER INSTALLATION, SINGLE OVEN ENGLISH Electrical supply junction box Attach the electrical supply junction box to the top right corner Attach the electrical supply junction box to the top right corner Electrical supply junction box Secure oven to cabinet using the screws - Panasonic HL-BD82S | Installation Instructions - Page 6
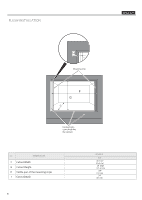
FLUSH INSTALLATION ENGLISH Mounting strip Finished sides the cabinet) Ltr. DIMENSION F Cutout Width G Cutout Height H Visible part of the mounting strips I Cutout Depth 6 SINGLE 30" 30 1/16" (76,4 cm) 28 1/32" (71 ,2 cm) 3/4" (1,9 cm) 24" (61 cm) - Panasonic HL-BD82S | Installation Instructions - Page 7
the appliance is properly grounded. Failure to follow these instructions could result in serious injury or death. CAUTION Do not repair or replace any part of the appliance unless specifically recommended in the manual. All other servicing should be done by a qualified technician. This may reduce - Panasonic HL-BD82S | Installation Instructions - Page 8
quali ed technician or an authorized repair service. This appliance is manufactured with a conduit connector. Figures A and B and the instructions provided below present the most common way of to the "Using the Oven Controls" section of the USER MANUAL. 7. If the oven is working properly, turn o the - Panasonic HL-BD82S | Installation Instructions - Page 9
, cela peut provoquer un incendie ou une explosion pouvant entraîner des dégâts, des blessures ou la mort. INTRODUCTION Veuillez lire ces instructions COMPLÈTEMENT ET SOIGNEUSEMENT. Cela vous fera gagner du temps et épargner des efforts et vous aidera à assurer les meilleures performances du - Panasonic HL-BD82S | Installation Instructions - Page 10
libre nécessaire et instructions de montage pour Préparation de l'emplacement FOUR SIMPLE HL-BD82S Caractéristiques électriques et puissance raccord . 2. La surface du support du four doit être une plate-forme de contreplaqué au panneau de service. Fermez le tableau de service pour éviter que - Panasonic HL-BD82S | Installation Instructions - Page 11
INSTALLATION DES PAROIS D'UN FOUR SIMPLE FRANÇAIS Boîte de raccordement de l'alimentation électrique Fixer la boîte de raccordement de l'alimentation électrique au coin supérieur droit. Fixer la boîte de raccordement de l'alimentation électrique au coin supérieur droit. Boîte de raccordement de - Panasonic HL-BD82S | Installation Instructions - Page 12
INSTALLATION EN ALIGNEMENT FRANÇAIS Baguettes de montage (même finition que l'arrière) Lettre DIMENSION F Dé coupe largeur G Dé coupe hauteur H Partie visible des bandes de support I Découpe profondeur 12 SIMPLE 30 po 30 1/16 po (76,4 cm) 28 1/32 po (71,2 cm) 3/4 po (1,9 cm) 24 po (61 cm) - Panasonic HL-BD82S | Installation Instructions - Page 13
ez avec un électricien quali é si vous avez un doute si votre appareil est correctement raccordé à la masse. Si vous ne suivez pas bien ces instructions, cela peut entraîner des blessures graves ou la mort. ATTENTION Ne réparez ou ne remplacez pas des pièces de l'appareil si ce n'est - Panasonic HL-BD82S | Installation Instructions - Page 14
technicien quali é. Demandez à votre revendeur un technicien quali é ou un service de réparation agréé. Cet appareil est fabriqué avec un conducteur de terre connecteur de conduit listé par U.L. Les gures A et B et les instructions fournies présentant la manière la plus commune de brancher un four. - Panasonic HL-BD82S | Installation Instructions - Page 15
en ambos lados de la línea. Si se tiene que usar un circuito 120V/ 208V, vea la conexión al circuito de 120V/208V de este manual. Se recomienda un cortacircuitos o un fusible de retraso dimensionados para no exceder la potencia nominal de circuito del aparato como se espec en la placa - Panasonic HL-BD82S | Installation Instructions - Page 16
siguiente sección titulada: Preparación del lugar HORNO INDIVIDUAL HL-BD82S Intensidad de la Corriente Eléctrica y Máxima Potencia instalarlo más fácilmente. Vea QUITAR LA PUERTA en la sección de mantenimiento del Manual de Uso y Mantenimiento. 4. Tenga mucho cuidado cuando mueva o instale el horno - Panasonic HL-BD82S | Installation Instructions - Page 17
INSTALACIÓN EMPOTRADA, HORNO INDIVIDUAL ESPAÑOL Caja de empalme de alimentación eléctrica Fijar la caja de empalme de la alimentación eléctrica en la esquina superior derecha. Fijar la caja de empalme de la alimentación eléctrica en la esquina superior derecha. Caja de empalme de alimentación elé - Panasonic HL-BD82S | Installation Instructions - Page 18
INSTALACIÓN PLANA ESPAÑOL Mounting strip Finished sides the cabinet) Letra. DIM ENSIONES F Anc ho hueco G Alto hueco H Parte visible de la tiras de montaje I Profundidad de recorte 18 INDIVIDUAL 30" 30 1/16" (76 4 cm) 28 1/32" (71 ,2 cm) 3/4" (1,9 cm) 24" (61 cm) - Panasonic HL-BD82S | Installation Instructions - Page 19
puede provocar heridas graves o la muerte. PRECAUCIÓN No repare o remplace ninguna parte del aparato si no está especí camente recomendado en el manual. Todas las demás operaciones de mantenimiento tiene que realizarlas un técnico cuali cado. Para reducir el riesgo de heridas personales o daños al - Panasonic HL-BD82S | Installation Instructions - Page 20
para parar la cocción. 6. Para controlar las demás funciones del horno tome como referencia la sección "Uso de los controles del horno" To del MANUAL DE USO Y MANTENIMIENTO. 7. Si el horno trabaja de manera apropiada, apague la corriente del horno. 8. Coloque la tapa sobre la caja de empalme y aseg - Panasonic HL-BD82S | Installation Instructions - Page 21
Notes 21 - Panasonic HL-BD82S | Installation Instructions - Page 22
Notes 22 - Panasonic HL-BD82S | Installation Instructions - Page 23
- Panasonic HL-BD82S | Installation Instructions - Page 24
Panasonic Canada Inc. 5770 Ambler Drive, Mississauga, Ontario, L4W 2T3 www.panasonic.ca © Panasonic Corporation 2012 09PN5980 - 10-12 Printed in Italy Imprimé en Italie Estampado en Italia
-
 1
1 -
 2
2 -
 3
3 -
 4
4 -
 5
5 -
 6
6 -
 7
7 -
8
-
9
-
10
-
11
-
12
-
13
-
14
-
15
-
16
-
17
-
18
-
19
-
20
-
21
-
22
-
23
-
24
 |
 |

Installation Instructions
Instructions d’installation
Instrucciones de Installación
ELECTRIC BUILT-IN OVEN
FOUR ENCASTRABLE
HORNO ELECTRICO DE PARED
Model/Modèle/Modélo
No. HL-BD82S
Please read these Installation Instructions. And read in particular “WARNING and
CAUTION” before construction by all means.
Lire ces instructions d’installation. Lire en particulier la section des “AVERTISSEMENTS
et PRÉCAUTIONS” avant toute opération de montage.
Leer estas instrucciones de instalación. En particular, leer el apartado “ADVERTENCIA Y
PRECAUCIONES” antes de realizar cualquier operación de montaje.
Proper installation is the responsibility of the installer. Any malfunction or accident resulting
from the failure to follow Installation Instructions is not covered under guarantee.
L’installateur est responsable de la bonne installation de l’équipement. La garantie ne
couvre pas les défaillances de fonctionnement et les accidents dérivés du non-respect
des instructions d’installation.
La idoneidad de la instalación es responsabilidad del instalador. La garantía no cubrirá
posibles fallos de funcionamiento o accidentes derivados del no respeto de las instrucciones
de instalación.