Panasonic KXTG4021 KXTG4011 User Guide - Page 35
Useful Information, Wall mounting, Base unit
 |
View all Panasonic KXTG4021 manuals
Add to My Manuals
Save this manual to your list of manuals |
Page 35 highlights
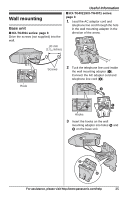
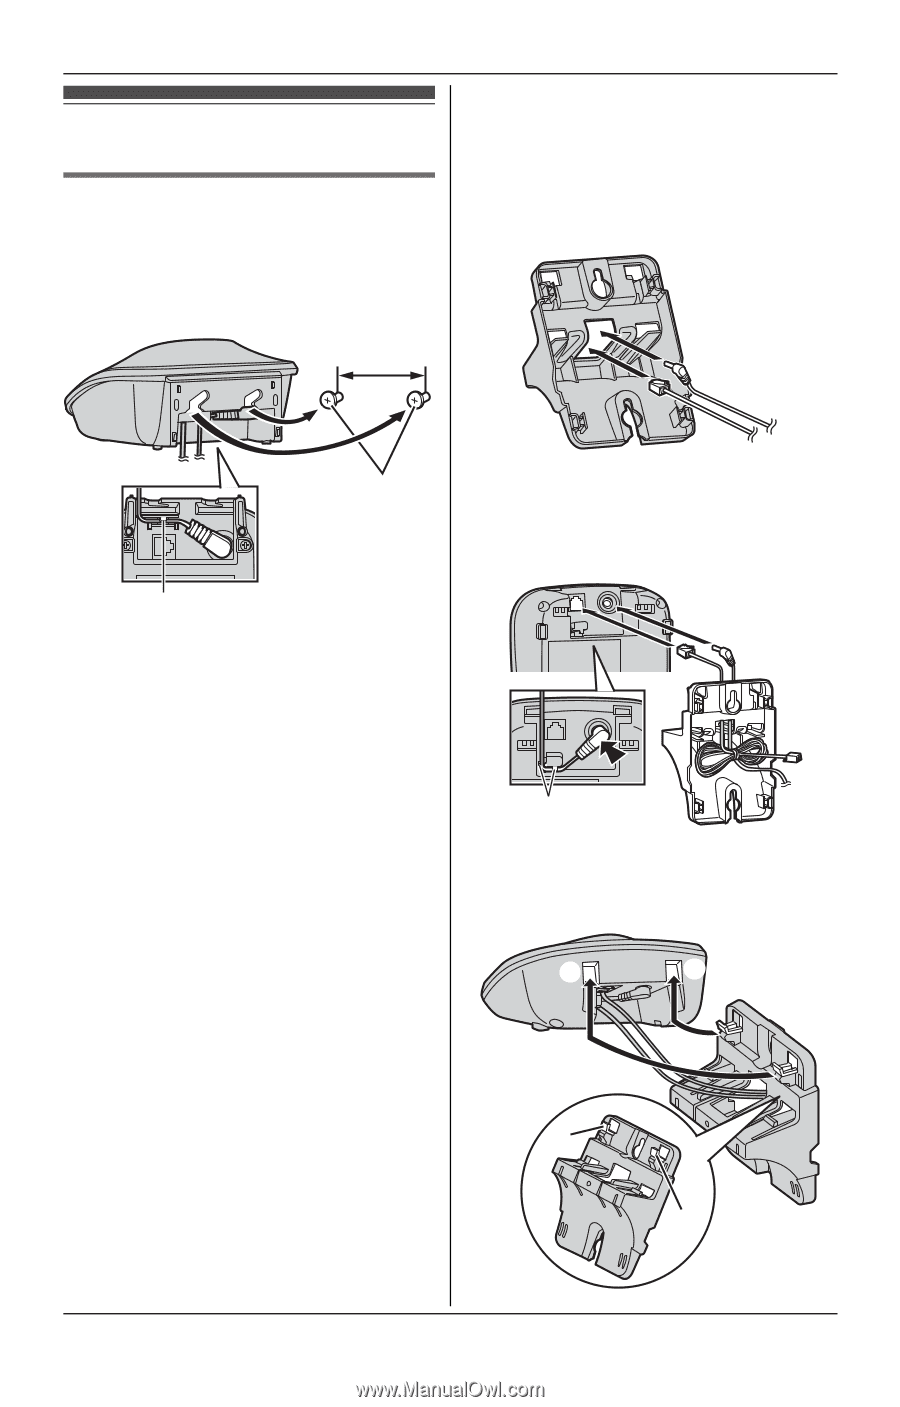
Wall mounting Base unit ■ KX-TG4011 series: page 3 Drive the screws (not supplied) into the wall. 30 mm (13/16 inches) Useful Information ■ KX-TG4021/KX-TG4071 series: page 3 1 Lead the AC adaptor cord and telephone line cord through the hole in the wall mounting adaptor in the direction of the arrow. Hook Screws 2 Tuck the telephone line cord inside the wall mounting adaptor (A). Connect the AC adaptor cord and telephone line cord (B). B A Hooks 3 Insert the hooks on the wall mounting adaptor into holes 1 and 2 on the base unit. 1 2 2 1 For assistance, please visit http://www.panasonic.com/help 35
-
 1
1 -
2
-
3
-
4
-
5
-
6
-
7
-
8
-
9
-
10
-
11
-
12
-
13
-
14
-
15
-
16
-
17
-
18
-
19
-
20
-
21
-
22
-
23
-
24
-
25
-
26
-
27
-
28
-
29
-
 30
30 -
 31
31 -
 32
32 -
 33
33 -
 34
34 -
 35
35 -
 36
36 -
 37
37 -
 38
38 -
 39
39 -
 40
40 -
41
-
42
-
43
-
44
-
45
-
46
-
47
-
48
-
49
-
50
-
51
-
52
 |
 |
Useful Information
35
For assistance, please visit http://www.panasonic.com/help
Wall mounting
Base unit
■
KX-TG4011 series: page 3
Drive the screws (not supplied) into the
wall.
■
KX-TG4021/KX-TG4071 series:
page 3
1
Lead the AC adaptor cord and
telephone line cord through the hole
in the wall mounting adaptor in the
direction of the arrow.
2
Tuck the telephone line cord inside
the wall mounting adaptor (
A
).
Connect the AC adaptor cord and
telephone line cord (
B
).
3
Insert the hooks on the wall
mounting adaptor into holes
1
and
2
on the base unit.
Hook
Screws
30 mm
(1
3
/
16
inches)
A
B
Hooks
2
1
1
2