Panasonic KXTS880 KXTS880 User Guide - Page 6
Controls, Preparation
 |
View all Panasonic KXTS880 manuals
Add to My Manuals
Save this manual to your list of manuals |
Page 6 highlights
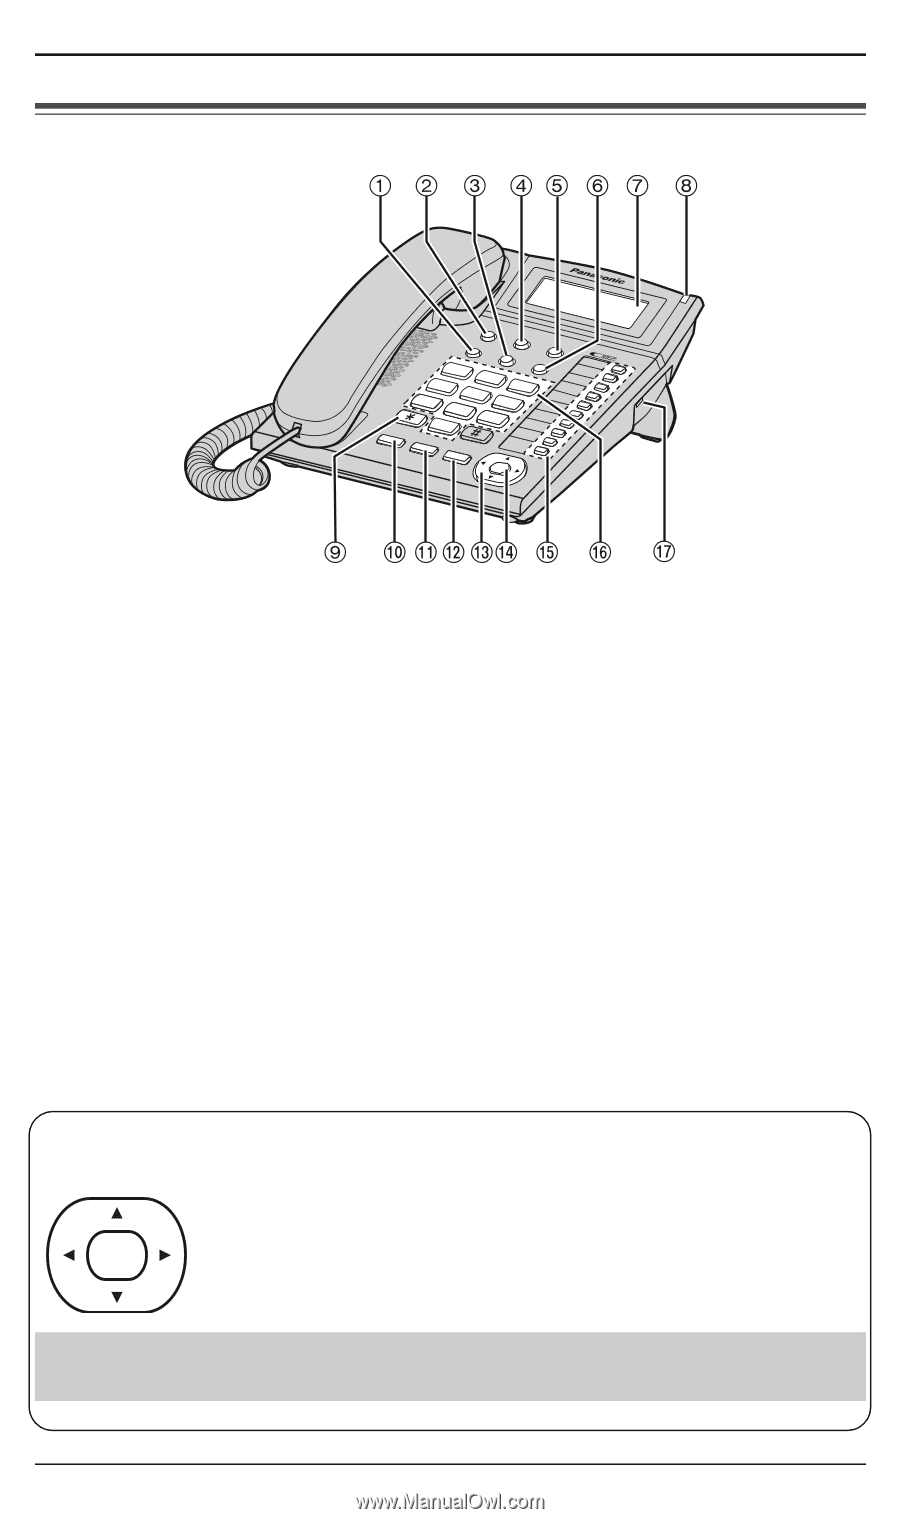
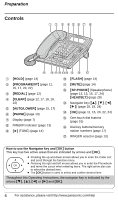
Preparation Controls TONE FLASH HPORLODGRAM/ERXEIDT IACLLEARPAAUUSTEO/LOWER 1 ABC 2 GHI DEF 4 5 3 PQRS JKL MNO 7 6 TUV 0 8 9 OPER WXYZ MUTE SP-PHONE HEADSET VOL. OK EDkIT 1 {HOLD} (page 14) 2 {PROGRAM/EXIT} (page 11, 15, 17, 20, 22) 3 {REDIAL} (page 12) 4 {CLEAR} (page 12, 17, 18, 19, 22) 5 {AUTO/LOWER} (page 15, 17) 6 {PAUSE} (page 13) 7 Display (page 7) 8 RINGER indicator (page 13) 9 {£} (TONE) (page 14) : {FLASH} (page 14) ; {MUTE} (page 14) < {SP-PHONE} (Speakerphone) (page 12, 13, 15, 17, 24) {HEADSET} (page 28) = Navigator key ({3}, {4}, {2}, {1}) (page 18, 19, 24) > {OK} (page 11, 15, 20, 22, 24) ? One-touch dial buttons (page 15) @ Dial key buttons/memory station numbers (page 17) A RINGER selector (page 13) How to use the Navigator key and {OK} button This key has five active areas that are indicated by arrows and {OK}. ≥ Pressing the up and down arrows allows you to enter the Caller List and scroll through the function menu. ≥ Pressing the right and left arrows allows you to enter the Phonebook OK and move the cursor when entering items. The right arrow also use to select the desired item. ≥ The {OK} button is used to select and confirm desired item. Throughout this Operating Instructions, the navigator key is indicated by the arrows {4}, {3}, {2} or {1} and {OK}. 6 For assistance, please visit http://www.panasonic.com/help
-
 1
1 -
 2
2 -
 3
3 -
 4
4 -
 5
5 -
 6
6 -
 7
7 -
 8
8 -
 9
9 -
 10
10 -
 11
11 -
 12
12 -
13
-
14
-
15
-
16
-
17
-
18
-
19
-
20
-
21
-
22
-
23
-
24
-
25
-
26
-
27
-
28
-
29
-
30
-
31
-
32
-
33
-
34
-
35
-
36
-
37
-
38
-
39
-
40
-
41
-
42
-
43
-
44
-
45
-
46
-
47
-
48
-
49
 |
 |