Panasonic PVGS2 PVGS2 User Guide
Panasonic PVGS2 - DIGITAL VIDEO CAMCORDER Manual
 |
View all Panasonic PVGS2 manuals
Add to My Manuals
Save this manual to your list of manuals |
Panasonic PVGS2 manual content summary:
- Panasonic PVGS2 | PVGS2 User Guide - Page 1
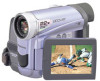
Digital Video Camcorder Operating Instructions Model No. PV-GS2 Before attempting to connect, operate or adjust this product, please read these instructions thoroughly. Spanish Quick Use Guide is included. Guía para rápida consulta en español está incluida. For assistance, please call : 1-800-211- - Panasonic PVGS2 | PVGS2 User Guide - Page 2
for choosing Panasonic! You have on the underside of your Camcorder. Be sure to retain this manual as your convenient Camcorder information source. Date of Purchase Therefore, it should be read carefully in order to avoid any problems. The above markings are located on the appliance bottom cover. - Panasonic PVGS2 | PVGS2 User Guide - Page 3
Panasonic Model No. : PV-GS2 Responsibility Party : Matsushita Electric Corporation of America Address : One Panasonic instructions and use only shielded interface cables when connecting to computer INSERT. CAUTION: DANGER OF EXPLOSION IF BATTERY IS INCORRECTLY REPLACED. REPLACE ONLY WITH THE - Panasonic PVGS2 | PVGS2 User Guide - Page 4
units intended to be operated from battery power, or other sources, refer to the operating instructions. 11. Grounding or Polarization - information with respect to proper grounding of the mast and supporting structure, grounding of the lead-in wire to an : http://www.panasonic.com/contactinfo - Panasonic PVGS2 | PVGS2 User Guide - Page 5
the operating instructions. Adjust only those controls that are covered by the operating instructions, as an serviceable parts inside. Unplug your Camcorder from the power supply before cleaning. CAUTION • DO NOT AIM YOUR CAMCORDER AT THE SUN OR OTHER BRIGHT OBJECTS • DO NOT LEAVE THE CAMCORDER - Panasonic PVGS2 | PVGS2 User Guide - Page 6
. Article 1 License Licensee is granted the right to use the software, including the information recorded or described on the CD-ROM, instruction manuals, and any other media provided to Licensee (collectively "Software"), but all applicable rights to patents, copyrights, trademarks and trade - Panasonic PVGS2 | PVGS2 User Guide - Page 7
software or driver (Uninstall 52 Notes 52 Others Indications 54 Initializing the Modes 55 Warning/Alarm Indications 55 Notes and Hints 56 Cautions for Use 60 Before Requesting Service (Problems and Solutions 63 Using the RESET button 65 Explanation of Terms 65 Specifications 67 Camcorder - Panasonic PVGS2 | PVGS2 User Guide - Page 8
Guide 1 Attach the Battery to the AC Adaptor and charge it. Inserting a Card 1 Place your Thumb on the [OPEN▼] 1 Knob and pull the LCD Monitor 2 out in the direction of the arrow. 2 • Before use, fully charge the Battery. • Since the Battery Battery to the Camcorder. panasonic.com/contactinfo - Panasonic PVGS2 | PVGS2 User Guide - Page 9
Before Use 2 Set the Mode Dial to Tape Recording Mode. 2 Set the Mode Dial to Tape Playback Mode. 3 Press the Recording Start/Stop Button. • Recording starts. 3 Press the [ ] Button to rewind the tape. 4 Press the Recording Start/Stop Button again to pause the recording. Recording a Still - Panasonic PVGS2 | PVGS2 User Guide - Page 10
Camcorder. 1) PV-DAC11 Battery Pack (p. 13) 3) Mini DV Tape (60 min.) (p. 15) 4) AV Cable (pp. 40, 42) 5) Shoulder Strap (p. 15) Controls and Components Camcorder ] (pp. 25-26) 16 Rewind/Review Button [ ] (p. 33) 17 Mode Selector Switch [AUTO/MANUAL/FOCUS] (pp. 22, 27-30) panasonic.com/contactinfo - Panasonic PVGS2 | PVGS2 User Guide - Page 11
, 22) 41 42 29 30 25 Cassette Holder 26 Cassette Compartment Cover (p. 15) 27 USB Jack [ ] (pp. 45-46, 48, 51) 28 DV Input/Output Terminal (pp Belt (p. 14) 43 Battery Holder 44 Battery Eject Switch [BATTERY RELEASE] (p. 14) 45 Tripod Receptacle • Used for mounting the Camcorder on an optional tripod - Panasonic PVGS2 | PVGS2 User Guide - Page 12
the corresponding buttons on the Camcorder. 61 67 62 68 Picture Button [MULTI/P-IN-P] (p. 31) 64 Rewind/Review Button [ ] (p. 33) 65 Pause Button [ battery. WARNING ●Replace Battery with Panasonic or Lixing type CR2025 only. Use of another battery may present a risk of fire or explosion. ●Battery - Panasonic PVGS2 | PVGS2 User Guide - Page 13
that [POWER] Lamp is not lit. (p. 16) Using the Battery Before use, fully charge the Battery. • We recommend using a Panasonic Battery. • We cannot guarantee the quality of this Camcorder when batteries from other companies are used. 1 Attach the Battery to the AC Adaptor and charge it. 2 1 [VCR1 - Panasonic PVGS2 | PVGS2 User Guide - Page 14
Before Use 2 Attach the charged Battery to the Camcorder. The Grip Belt To Use as a Grip Belt Adjust the length of the Grip Belt to the size of your hand. for protection. 2 2 1 14 For assistance, please call : 1-800-211-PANA(7262) or, contact us via the web at: http://www.panasonic.com/contactinfo - Panasonic PVGS2 | PVGS2 User Guide - Page 15
Card can be used to record still pictures. • Use a genuine SD Memory Card or MultiMediaCard manufactured by Panasonic only. Before inserting or removing a Card, be sure to turn off the Camcorder. • Otherwise, the Camcorder may not function properly or it may cause the loss of recorded data in a Card - Panasonic PVGS2 | PVGS2 User Guide - Page 16
still picture on a card. : PC Mode Use this mode when you want to connect the Camcorder to your Personal Computer. Using the Viewfinder/LCD Monitor Using the Viewfinder Before using the Viewfinder, adjust the : 1-800-211-PANA(7262) or, contact us via the web at: http://www.panasonic.com/contactinfo - Panasonic PVGS2 | PVGS2 User Guide - Page 17
. About the Menu Mode Setting The setting selected on the Menu will be retained even when the Camcorder is turned off. However, if the Battery or AC Adaptor is disconnected before turning off the Camcorder, the selected setup may not be retained. • Menu operation flow is shown in this text by >>. 17 - Panasonic PVGS2 | PVGS2 User Guide - Page 18
. (The above procedure will not be repeated in the following instructions.) List of Menus The figures of the Menus are for [D.ZOOM] Digital Zoom (p. 25) [SELF TIMER] Self-timer Recording (p. 24) [USB FUNCTION] USB Functions Mode (pp. 48, 51) • If you press the [ ] Button, www.panasonic.com/contactinfo - Panasonic PVGS2 | PVGS2 User Guide - Page 19
to the Camcorder and the [OFF/ON] Switch is turned to [ON] without inserting a Cassette or a Card, the Camcorder is automatically set Audio Selector (pp. 41-42) [AUDIO OUT] Audio Output Mode (p. 59) [USB FUNCTION] USB Functions Mode (pp. 48, 51) 2) [DIGITAL] Playback Digital Setup Sub-Menu [EFFECT - Panasonic PVGS2 | PVGS2 User Guide - Page 20
, 60) [REMOTE] Remote Control Mode (p. 13) Setting Date and Time Since the internal clock of the Camcorder has a slight imprecision make sure to check the time before recording. 1) [DELETE] Deleting a File Sub-Menu -211-PANA(7262) or, contact us via the web at: http://www.panasonic.com/contactinfo - Panasonic PVGS2 | PVGS2 User Guide - Page 21
the other 2 tracks can be used for Audio Dubbing. 1 Connect the AC Adaptor to the Camcorder with the power turned off and then connect to the AC jack. • After charging for 4 hours, the built-in lithium battery can power the clock for approximately 3 months. LP Mode A desired recording speed can be - Panasonic PVGS2 | PVGS2 User Guide - Page 22
MANUAL/FOCUS] Switch 17 set to [AUTO], the Camcorder automatically adjusts the focus and white balance. In some cases, they cannot be adjusted automatically and need to be adjusted manually Camcorder is connected to a personal computer with a USB the Camcorder the Camcorder switches to - Panasonic PVGS2 | PVGS2 User Guide - Page 23
Photoshot Function is not activated. Recording a Still Picture on a Card (Photoshot) Still pictures can be recorded on the Memory Card from the Camcorder. Selecting the quality of Photoshot images 1 Set [CARD RECORDING MENU] >> [CARD] >> [PICT QUALITY] >> a desired image quality. 18 12 13 14 15 - Panasonic PVGS2 | PVGS2 User Guide - Page 24
Monitor and rotating it forward (to the lens side), you can let the subject in front of the Camcorder monitor the shot while recording is in progress. Self-timer Recording When you set the self-timer, the : 1-800-211-PANA(7262) or, contact us via the web at: http://www.panasonic.com/contactinfo - Panasonic PVGS2 | PVGS2 User Guide - Page 25
Recording Mode To Take Close-up Shots of Small Subjects (Macro Close-up Function) When the zoom magnification is 1X, the Camcorder can focus on a subject that is as close as approximately 0.8 inches (20 mm) from the Lens. Small subjects like insects can be recorded with this - Panasonic PVGS2 | PVGS2 User Guide - Page 26
-Skin Mode Press the [SOFT SKIN] Button. 26 For assistance, please call : 1-800-211-PANA(7262) or, contact us via the web at: http://www.panasonic.com/contactinfo - Panasonic PVGS2 | PVGS2 User Guide - Page 27
CUT] >> [ON]. Recording in Special Situations (Program AE) You can select optimal automatic exposure under specific recording situations. 1 Set the [AUTO/MANUAL/FOCUS] Switch 17 to [MANUAL]. 18 12 13 14 15 16 • The [WIND CUT] Indication appears. To Cancel the Wind Noise Reduction Function Set [TAPE - Panasonic PVGS2 | PVGS2 User Guide - Page 28
be able to bring out natural colors. In this case, the white balance can be adjusted manually. When the Camcorder is turned on with the Lens Cap on, the Automatic White Balance Adjustment may not function properly 800-211-PANA(7262) or, contact us via the web at: http://www.panasonic.com/contactinfo - Panasonic PVGS2 | PVGS2 User Guide - Page 29
Balance. 1) The effective range of Automatic White Balance Adjustment on this Camcorder 2) Blue sky 3) Cloudy sky (rain) 4) TV screen 5) when the screen is too bright or too dark. 1 Set the [AUTO/MANUAL/FOCUS] Switch 17 to [MANUAL]. 17 • The [MNL] Indication appears. 2 Press the [ENTER] Button - Panasonic PVGS2 | PVGS2 User Guide - Page 30
where auto focus may not function well. 1 Set the [AUTO/MANUAL/FOCUS] Switch 17 to [MANUAL]. Digital Effect Functions This Camcorder is equipped with Digital Effect Functions that add special effects to the scene -PANA(7262) or, contact us via the web at: http://www.panasonic.com/contactinfo - Panasonic PVGS2 | PVGS2 User Guide - Page 31
Delete Multi-Pictures One by One (When pictures were captured in [MANUAL]) When the [MULTI] Button is pressed for 1 second or longer EFFECT1] >> [MULTI]. 18 12 13 14 15 16 18 12 13 14 15 16 2 Aim the Camcorder at the scene you want to capture and press the [P-IN-P] Button 19 to insert a small still - Panasonic PVGS2 | PVGS2 User Guide - Page 32
notes concerning this item, see page 58. 32 For assistance, please call : 1-800-211-PANA(7262) or, contact us via the web at: http://www.panasonic.com/contactinfo - Panasonic PVGS2 | PVGS2 User Guide - Page 33
Control in Playback Zoom Mode. (pp. 35-36) • For other notes concerning this item, see page 59. Finding a Scene You Want to Play Back Cue/Review Playback 16 13 If the [ ] Button 13 or [ ] Button 16 is pressed during Playback, it turns to Cue Playback A or - Panasonic PVGS2 | PVGS2 User Guide - Page 34
Review Camcorder is left in the Slow Motion Playback Mode for more than 10 minutes, the Camcorder Camcorder or Review Playback, Please refer to page 69. This Camcorder can play back at a slow speed of the Camcorder in the Camcorder is left in the Still Playback Mode for more than 5 minutes, the Camcorder - Panasonic PVGS2 | PVGS2 User Guide - Page 35
after the date has changed since the last recording. (While the index signal is being recorded, the [INDEX] Indication flashes for a few seconds.) • If the Camcorder is switched from the Tape Playback Mode to Tape Recording Mode or if the date and time is set before the start of recording, the - Panasonic PVGS2 | PVGS2 User Guide - Page 36
the Slide Show : Pause the Slide Show 36 For assistance, please call : 1-800-211-PANA(7262) or, contact us via the web at: http://www.panasonic.com/contactinfo - Panasonic PVGS2 | PVGS2 User Guide - Page 37
Playback Mode 1 2 3 1 Folder File Number 2 Picture Size (p. 55) 3 File Number To Select a Desired File and Playing Back 1 Set the Mode Dial 36 to Picture Playback Mode. Slide Show The recorded still pictures in the Card can be played back like a Slide Show. 1 Set the Mode Dial 36 to Picture - Panasonic PVGS2 | PVGS2 User Guide - Page 38
1 Tape Playback Mode: Search for the image you want to use for creating a title and set the Camcorder to the Still Playback Mode. 12 Adding a Title A title can be added to the picture. It is , please call : 1-800-211-PANA(7262) or, contact us via the web at: http://www.panasonic.com/contactinfo - Panasonic PVGS2 | PVGS2 User Guide - Page 39
Memory Card has a write protection switch. (p. 60) • For other notes concerning this item, see page 60. Deleting the Files Recorded on a Card Using the Camcorder, you can delete the files recorded on a Card. After the file is deleted, it cannot be restored. To Select and Delete Files or Titles 1 Set - Panasonic PVGS2 | PVGS2 User Guide - Page 40
[YES] and formatting will be carried out. • It may not be able to use the Card formatted by this Camcorder on another unit. In this case, format the Card on the unit which will use the Card. Make sure that : 1-800-211-PANA(7262) or, contact us via the web at: http://www.panasonic.com/contactinfo - Panasonic PVGS2 | PVGS2 User Guide - Page 41
Card from scenes that have already been recorded on a cassette. 1 Set the Mode Dial 36 to Tape Playback Mode. 36 2 Start playback and set the Camcorder to Still Playback Mode at the scene you wish to record, and press the [PHOTO SHOT] Button 33 . 33 Recording Pictures from a Card onto a Tape - Panasonic PVGS2 | PVGS2 User Guide - Page 42
Camcorder Camcorder with other digital video equipment (such as another Camcorder of the same format/model) that has a DV input/output Terminal, and using a 4-pin to 4-pin DV Interface Cable PV Camcorder instructions of your VCR. Camcorder ] Button 10 on the Camcorder. 7 10 • Recording starts - Panasonic PVGS2 | PVGS2 User Guide - Page 43
using the DV Interface. Our DVC being OHCI compliant should have no problem working with any OHCI compliant Firewire Card/video - Editing software package. • Personal Computer must be equipped with an DV Terminal. • During Camcorder playback, do not disconnect the DV Interface Cable or turn the - Panasonic PVGS2 | PVGS2 User Guide - Page 44
the CD-ROM (Optional Software). 4 Follow the instructions on the computer screen until the installation is USB Jack Installing USB Driver (Optional Software) Please install USB Driver first before connecting the Camcorder to your personal computer with the USB Cable. 1 Turn on the personal computer - Panasonic PVGS2 | PVGS2 User Guide - Page 45
restart your computer. • Reboot the computer to finish installing USB driver. • Installation continues after the computer reboots if you selected additional software. • A message indicating a conflict between versions may be displayed during the installation. This will not cause a problem. Simply - Panasonic PVGS2 | PVGS2 User Guide - Page 46
after "COM" will differ depending on the operating environment of your personal computer.) • When the Camcorder is in PC Mode: [USB Mass Storage Device] or [Panasonic DV DISK Port Driver] Windows Me: • When the Camcorder is in PC Mode: [USB Disk] • Some OS, such as Windows 98SE, may not show the - Panasonic PVGS2 | PVGS2 User Guide - Page 47
Software) If the Camcorder is connected to your personal computer, you can send video and sound from the Camcorder to the other parties via the network. • Do not connect the USB Cable until the WebCam Driver http://www.msn.com/ (For download and installation instructions, please refer to Help on the - Panasonic PVGS2 | PVGS2 User Guide - Page 48
98SE/Me users, "USB Audio Device" is required. Click [Next] and proceed. 5 Finish installation by following the on-screen instructions. • Click [Next] and proceed with installation. • After completing the installation, click [Finish]. Connecting the Camcorder to Personal Computer (For Using as - Panasonic PVGS2 | PVGS2 User Guide - Page 49
rm that equipment is connected correctly. 7 Select [USB Video Device] in the [Camera] menu. 2 Select [.NET Messaging Service] and click [OK]. 8 Select [DVC] Windows Messenger, then turn off the Camcorder. Finally, disconnect the USB Cable. • If the Camcorder is used as Web Camera continuously for - Panasonic PVGS2 | PVGS2 User Guide - Page 50
name and password, click [Get one here]. 8 Confirm the [Panasonic DVC Web Camera Device] 1 is selected. 3 Please carefully read the Camcorder. Finally, disconnect the USB Cable. Using the DV STUDIO 3.1E-SE (Optional Software) Operating environment OS: IBM PC/AT compatible personal computer - Panasonic PVGS2 | PVGS2 User Guide - Page 51
16 3 Connect the Camcorder to your personal computer with USB Cable. • After reading the displayed contents, please carry out the installation according to instructions. 5 After the completion of setup, click on [Finish]. 4 Select [Start] >> [All Programs (Programs)] >> [Panasonic] >> [DV Studio3 - Panasonic PVGS2 | PVGS2 User Guide - Page 52
English for the sake of example, other languages are supported as well. • In this Manual, the Panasonic make digital video camera with USB Jack is referred to as Camcorder. • These instructions do not cover the basic operations of the personal computer or define any terms. For this information, refer - Panasonic PVGS2 | PVGS2 User Guide - Page 53
and not all capacity is available as a conventional memory for a Camcorder, Personal Computer or others. Capacity that can be used as conventional memory: . • When using software without an indication function, indication data, such as date, are not displayed. Depending on the software in use, the - Panasonic PVGS2 | PVGS2 User Guide - Page 54
Camcorder status are shown on the screen. : Remaining Battery Power • When the battery power becomes low, the Indication changes. When the battery Playback (p. 33) Rewind/Review Playback (p. 33) Slow When you adjust shutter speed manually, this indication appears. (p. panasonic.com/contactinfo - Panasonic PVGS2 | PVGS2 User Guide - Page 55
flashes, please check the condition of the Camcorder. DEW (DEW DETECTED/EJECT TAPE): Condensation in inserted. (p. 15) (LOW BATTERY): The Battery is low. Recharge it. (p. 13) : The built-in battery is low. (p. 21) (NEED Button (p. 65). This may solve the problem. CARD FULL: Card does not have suffi - Panasonic PVGS2 | PVGS2 User Guide - Page 56
USB cable to the Camcorder. Notes and Hints Concerning the Power Supply • When the Camcorder has been used for a long time, the Camera body becomes warm, but this is not a malfunction. • If the [CHARGE] Lamp does not light up although the Battery shutter speed manually to 1/ panasonic.com/contactinfo - Panasonic PVGS2 | PVGS2 User Guide - Page 57
Start Standby Mode. • Operate the Mode Dial • The Battery is replaced • If the [QUICK START] Button is will go off and the Camcorder will be turned off. • If the Camcorder is not operated for approximately lapse-like manner. • Adjust the Focus manually. • The Progressive Photoshot Function is - Panasonic PVGS2 | PVGS2 User Guide - Page 58
[MULTI] and [P-IN-P] of [EFFECT1]. • Depending on the software in use, the imported Cinema picture may not be displayed correctly. or Program AE Mode (p. 27), you cannot adjust the shutter speed. Manual Iris Adjustment • Depending on zoom magnification, there are iris values panasonic.com/contactinfo - Panasonic PVGS2 | PVGS2 User Guide - Page 59
be used once the title is inserted. • A full-colored title made on other equipment cannot be played back or added to the picture with this Camcorder. • A title with a size than 640 x 480 pixels cannot be displayed. • When the title is displayed on the Multi screen, the recording and the playback - Panasonic PVGS2 | PVGS2 User Guide - Page 60
be displayed cannot be displayed if the software of the connected equipment does not support the display function. Cautions for Use Camcorder power and detach the Battery or AC Adaptor and then connect the Battery or AC Adaptor again. Thereafter, turn on the Camcorder power. Do not use your Camcorder - Panasonic PVGS2 | PVGS2 User Guide - Page 61
. (If they are left connected, a minute amount of current is consumed.) • Keep the electrodes of the AC Adaptor and Battery always clean. Condensation If you turn the Camcorder on when condensation occurs on the head or the tape, Condensation Indication [ DEW ] (yellow or red) blinks on the View - Panasonic PVGS2 | PVGS2 User Guide - Page 62
Long operating hours Using Panasonic cleanig cassette (AY-DVMCLA) 1 Insert the Head Cleaner into the Camcorder in the same manner Camcorder in places that expose it to high temperature. Battery • Extremely high temperatures or low temperatures will shorten the life of the Battery. • If the Battery - Panasonic PVGS2 | PVGS2 User Guide - Page 63
be seriously damaged. • When the Camcorder is used with a large capacity Battery (CGR-D16A/1B, CGP-D28A/1B instructions of your accessories. • Be sure to keep the Lens Hood attached to the Camcorder so as to shut out unnecessary light. Before Requesting Service (Problems and Solutions) The Camcorder - Panasonic PVGS2 | PVGS2 User Guide - Page 64
the Manual Review or Slow Motion Playback. • This phenomenon is characteristic of digital video systems. It is not a malfunction. Although the Camcorder is correctly connected to a TV, playback images cannot be seen. • Have you selected "Video Input" on the TV? Please read the operating instructions - Panasonic PVGS2 | PVGS2 User Guide - Page 65
computer Camcorder clatters when shaking it. • It is a sound of the lens moving, not a malfunction. When the USB Cable is disconnected, an error message will appear on PC. • To disconnect the USB cable safely, double-click the [ ] icon in the task tray and follow the instructions Camcorder Camcorder - Panasonic PVGS2 | PVGS2 User Guide - Page 66
later. (pp. 12, 18) 3 Start playback or recording. 4 After playback or recording has finished: Set the Camcorder to Tape Playback Mode. • The [POWER] Lamp lights up. 5 Rewind the tape. • The tape automatically stops -211-PANA(7262) or, contact us via the web at: http://www.panasonic.com/contactinfo - Panasonic PVGS2 | PVGS2 User Guide - Page 67
/writer function, USB 2.0 compliant (max. 12 Mbps) No copyright protection support Digital Interface: DV Input/Output Jack (IEEE1394, 4-pin) Dimensions: Approx. 87 (H) x 69 (W) x 112 (D) mm Approx. 3-3/8 (H) x 2-3/4 (W) x 4-3/8 (D) inch Weight: Approx. 0.40 kg (0.88 lbs.) (without Battery and DV - Panasonic PVGS2 | PVGS2 User Guide - Page 68
Camcorder Accessory System Accessory # Figure Others Description PV-DAC11A AC Adaptor with AC Cable and DC Cable Price $119.95 CGR-D08A/1B CGR-D16A/1B CGP-D28A/1B CGR-D53A/1K 800 mAh/1 h 30 min, Battery Pack 1 600 mAh/3 h, Battery Pack 2 800 mAh/5 h, Battery Pack 5 300 mAh/9 h, Battery Pack - Panasonic PVGS2 | PVGS2 User Guide - Page 69
OF OUR CAMCORDER ACCESSORIES YOU CAN DO ANY OF THE FOLLOWING: VISIT YOUR LOCAL PANASONIC DEALER OR CALL PANASONIC'S ACCESSORY ORDER LINE AT 1-800-332-5368 [6 AM-5 PM M-F, 6 AM-10:30 AM SAT, PACIFIC TIME] OR MAIL THIS ORDER TO: PANASONIC SERVICES - Panasonic PVGS2 | PVGS2 User Guide - Page 70
any symptom it is exhibiting. Mail this completed form and your Proof of Purchase along with your unit to: Panasonic Services Company 1705 N. Randall Road Elgin, IL. 60123-7847 Attn: Camcorder Repair 70 For assistance, please call : 1-800-211-PANA(7262) or, contact us via the web at: http://www - Panasonic PVGS2 | PVGS2 User Guide - Page 71
. Product Camcorder DVD/VCR Deck, A/V Mixer TV/VCR, TV/DVD, TV/DVD/VCR Combination TV/HDR Combination Rechargeable Batteries (in exchange Panasonic Web Site: http://www.panasonic.com For assistance in Puerto Rico call Panasonic Sales Company (787)-750-4300 or fax (787)-768-2910. In-Home service - Panasonic PVGS2 | PVGS2 User Guide - Page 72
Instruction Books online for all Panasonic Products by visiting our Web Site at: http://www.pasc.panasonic.com or, send your request by E-mail to: npcparts@panasonic MAIL TO : Panasonic Services Company 1705 N. Randall Road, Elgin, IL 60123-7847 Attention: Camcorder Repair Please carefully - Panasonic PVGS2 | PVGS2 User Guide - Page 73
Others Spanish Quick Use Guide/Guía Para Uso Rápido Precauciones para su seguridad ADVERTENCIA: Para evitar incendios y descargas eléctricas, no exponga este equipo a la lluvia ni a la humedad. Su Camcorder está diseñada para grabar y reproducir en el modo de Reproducción Estándar (SP) y modo - Panasonic PVGS2 | PVGS2 User Guide - Page 74
la lámpara [CHARGE] se apaga, se ha terminado la carga. 2 Coloque la batería cargada en el Camcorder. 1 2 Deslice la palanca [OPEN] 3 para abrir la cubierta de la ranura de tarjeta 4 . assistance, please call : 1-800-211-PANA(7262) or, contact us via the web at: http://www.panasonic.com/contactinfo - Panasonic PVGS2 | PVGS2 User Guide - Page 75
Others 2 Gire el dial de modo a modo de grabación de cinta. 2 Gire el dial de modo a Modo de reproducción de cinta. 3 Presione el botón de inicio/parada de grabación. • Comienza la grabación. 3 Presione el botón [ ] para rebobinar la cinta. 4 Presione el botón de inicio/parada de grabación - Panasonic PVGS2 | PVGS2 User Guide - Page 76
Focus 65 B Backlight 26 Black & White Mode 30 Blank Search 22 C Camcorder Accessory Order Form 69 Camcorder Accessory System 68 Charging the Battery 13 Cinema Mode 27 Condensation 61 Cue Playback 33 Customer Services Directory 72 D Date/Time Indication 55 Date/Time Setting 20 Digital
-
 1
1 -
 2
2 -
 3
3 -
 4
4 -
 5
5 -
 6
6 -
 7
7 -
8
-
9
-
10
-
11
-
12
-
13
-
14
-
15
-
16
-
17
-
18
-
19
-
20
-
21
-
22
-
23
-
24
-
25
-
26
-
27
-
28
-
29
-
30
-
31
-
32
-
33
-
34
-
35
-
36
-
37
-
38
-
39
-
40
-
41
-
42
-
43
-
44
-
45
-
46
-
47
-
48
-
49
-
50
-
51
-
52
-
53
-
54
-
55
-
56
-
57
-
58
-
59
-
60
-
61
-
62
-
63
-
64
-
65
-
66
-
67
-
68
-
69
-
70
-
71
-
72
-
73
-
74
-
75
-
76
 |
 |
Before attempting to connect, operate or adjust this product, please
read these instructions thoroughly.
LSQT0832 A
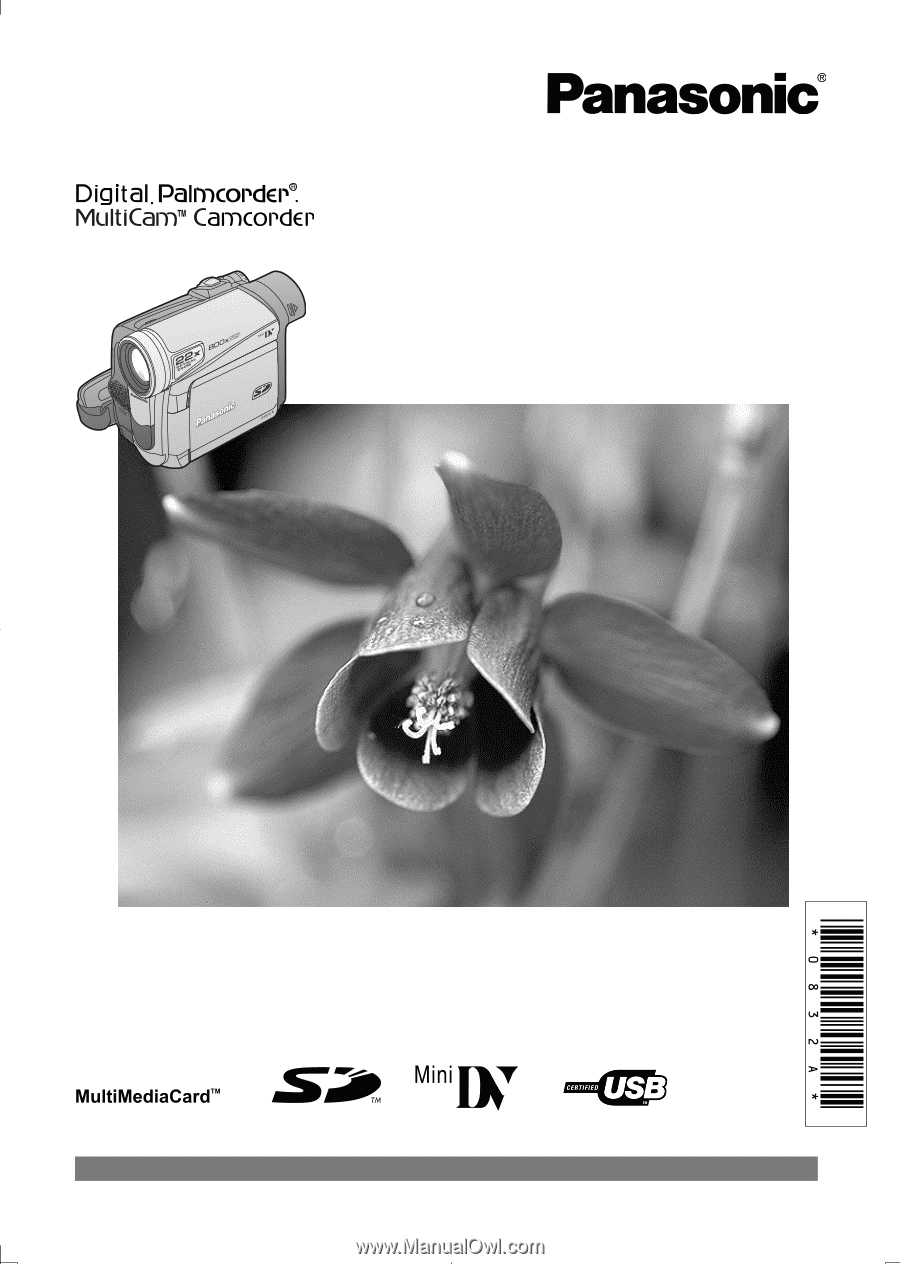
PV-GS2
Digital Video Camcorder
Operating Instructions
Model No.
Spanish Quick Use Guide is included.
Guía para rápida consulta en español está incluida.
For assistance, please call : 1-800-211-PANA(7262) or, contact us via the web at: http://www.panasonic.com/contactinfo