Panasonic PVGS70D PVGS70D User Guide - Page 77
Installation of ArcSoft Software Suite, Software Installation
 |
View all Panasonic PVGS70D manuals
Add to My Manuals
Save this manual to your list of manuals |
Page 77 highlights
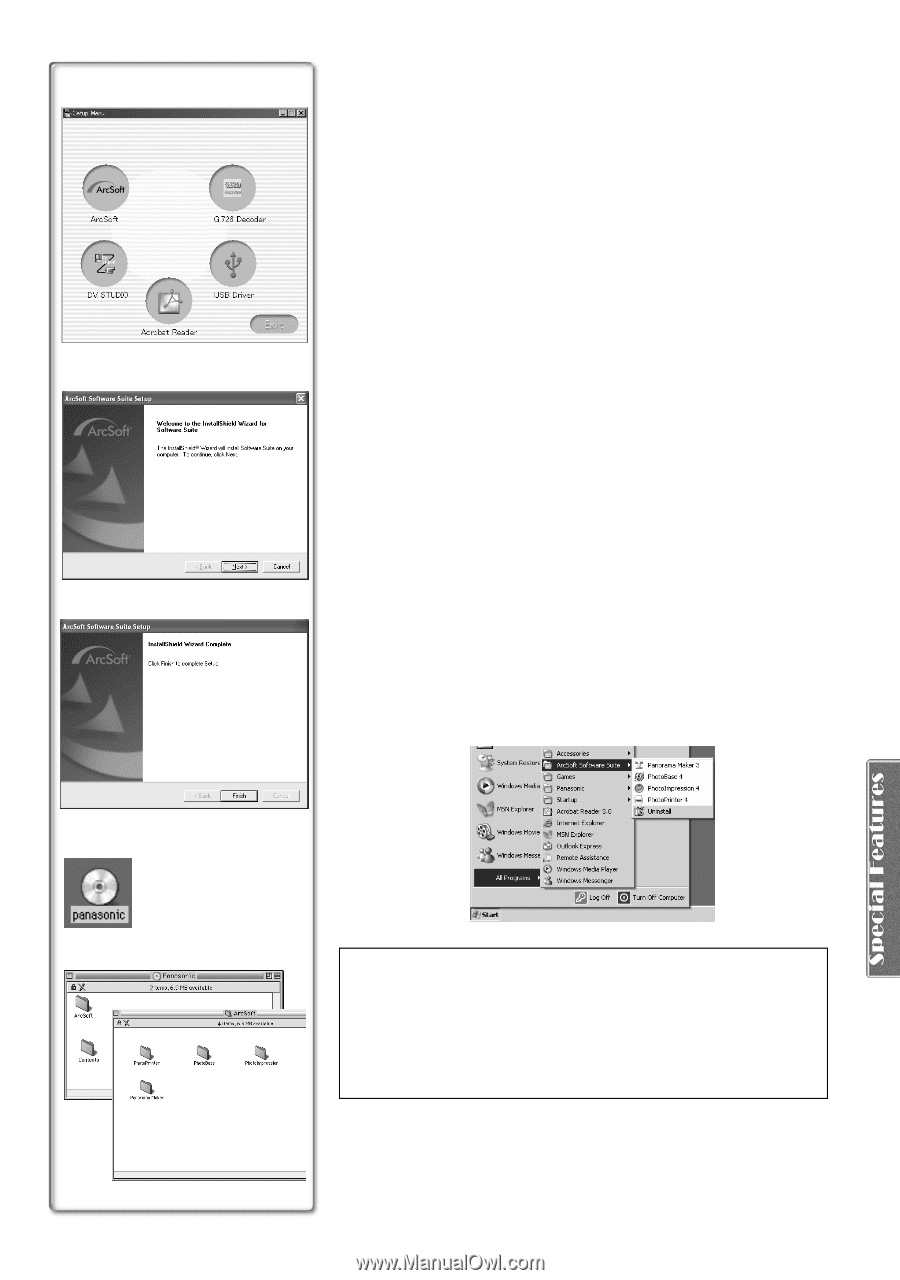
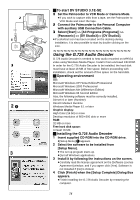
2 ª Installation of ArcSoft Software Suite 1 Insert the supplied CD-ROM into the personal computer's CD-ROM drive. 2 Select the software to be installed from [Setup Menu]. 3 Select the desired language on the [Choose Setup Language] dialogue, and click [OK]. ≥Installation begins. ≥After reading the displayed contents, please carry out the installation according to instructions. ≥If a language other than the OS language is selected, the characters may not be presented correctly. 4 When the component selection screen is displayed, 4 check the software to be installed and click [Next]. 5 After the completion of setup, click on [Finish] ≥Installation will be completed. ª Software Installation (Macintosh) 1 Turn on Computer and start up Macintosh. 2 Insert supplied CD-ROM into the CD-ROM drive. 3 Double click the icon of a CD-ROM that appears. 4 Double click the software to be installed from [ArcSoft]. 5 Follow the instructions on the computer screen until 5 the installation is complete. ª To start software in the ArcSoft Software Suite 1 Select [Start] >> [All Programs (Programs)] >> [ArcSoft Software Suite] >> [ArcSoft Panorama Maker 3.0] (or [ArcSoft PhotoBase 4.0] or [ArcSoft PhotoImpression 4.0] or [ArcSoft PhotoPrinter 4.0]). 3 4 For Information on ArcSoft Software: TEL: 1-510-440-9901 FAX: 1-510-440-1270 Web Site: www.arcsoft.com E-mail: [email protected] Refer to Help information about application operations and other Error messages. 77
-
 1
1 -
2
-
3
-
4
-
5
-
6
-
7
-
8
-
9
-
10
-
11
-
12
-
13
-
14
-
15
-
16
-
17
-
18
-
19
-
20
-
21
-
22
-
23
-
24
-
25
-
26
-
27
-
28
-
29
-
30
-
31
-
32
-
33
-
34
-
35
-
36
-
37
-
38
-
39
-
40
-
41
-
42
-
43
-
44
-
45
-
46
-
47
-
48
-
49
-
50
-
51
-
52
-
53
-
54
-
55
-
56
-
57
-
58
-
59
-
60
-
61
-
62
-
63
-
64
-
65
-
66
-
67
-
68
-
69
-
70
-
71
-
 72
72 -
 73
73 -
 74
74 -
 75
75 -
 76
76 -
 77
77 -
 78
78 -
 79
79 -
 80
80 -
 81
81 -
 82
82 -
83
-
84
-
85
-
86
-
87
-
88
-
89
-
90
-
91
-
92
-
93
-
94
-
95
-
96
-
97
-
98
-
99
-
100
-
101
-
102
-
103
-
104
-
105
-
106
-
107
-
108
-
109
-
110
-
111
-
112
-
113
-
114
 |
 |