Panasonic SABT100 Blu-ray Dvd Home Theater Sound System - Page 3

TABLE OF CONTENTS, Preparing the remote control, IMPORTANT SAFETY INSTRUCTIONS

Page 3 highlights

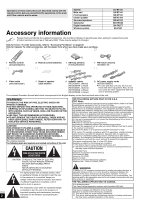
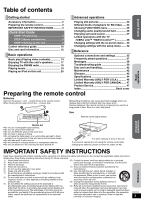
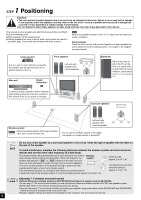
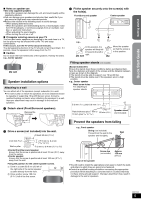
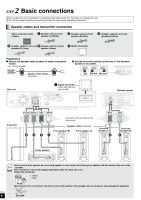
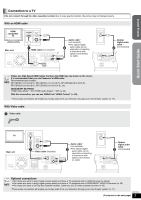
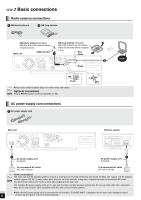
Getting started Table of contents Getting started Advanced operations Accessory information 2 Preparing the remote control 3 IMPORTANT SAFETY INSTRUCTIONS 3 Quick Start Guide STEP 1 Positioning 4 STEP 2 Basic connections 6 STEP 3 Setting up the unit 9 Control reference guide 10 Disc and card information 12 Playing still pictures 22 Different kinds of playback for BD-Video ..... 24 Showing FUNCTIONS menu 25 Changing audio quality/sound field 26 Enjoying surround sound 27 Linked operations with the TV (VIERA LinkTM "HDAVI ControlTM 28 Changing settings with the on-screen menu ... 30 Changing settings with the setup menu ....... 32 Reference Basic operations Basic play (Playing video contents 14 Enjoying TV with this unit's speakers........... 17 Enjoying the FM/AM radio 18 Playing music 19 Playing an iPod on this unit 20 Optional connections and settings 35 Frequently asked questions 37 Messages 38 Troubleshooting guide 39 Disc and card handling 42 Maintenance 42 Glossary 43 Specifications 44 Limited Warranty (ONLY FOR U.S.A 46 Limited Warranty (ONLY FOR CANADA) ...... 47 Product Service 47 Index Back cover Preparing the remote control Batteries Insert so the poles (i and j) match those in the remote control. When closing the lid, insert it from the j (minus) side. Mishandling of batteries can cause electrolyte leakage which can damage items the fluid contacts and may cause a fire. Remove batteries if the remote control is not going to be used for a long period of time. Store in a cool, dark place. Use Remote control signal sensor Basic operations Advance d operations R6/LR6, AA ≥Do not use rechargeable type batteries. ≥Do not mix old and new batteries. ≥Do not use different types at the same time. ≥Do not heat or expose to flame. ≥Do not leave the battery(ies) in an automobile exposed to direct sunlight for a long period of time with doors and windows closed. ≥Do not take apart or short circuit. ≥Do not attempt to recharge alkaline or manganese batteries. ≥Do not use batteries if the covering has been peeled off. 10˚ 30˚ 30˚ 30˚ 7 m (23 ft.) directly in front of the unit If you cannot operate the unit using the remote control after changing the batteries, please re-enter the codes (> 42). IMPORTANT SAFETY INSTRUCTIONS Read these operating instructions carefully before using the unit. Follow the safety instructions on the unit and the applicable safety instructions listed below. Keep these operating instructions handy for future reference. 1) Read these instructions. 10) Protect the power cord from being walked on or pinched 2) Keep these instructions. particularly at plugs, convenience receptacles, and the point 3) Heed all warnings. where they exit from the apparatus. 4) Follow all instructions. 11) Only use attachments/accessories specified by the 5) Do not use this apparatus near water. manufacturer. 6) Clean only with dry cloth. 12) Use only with the cart, stand, tripod, bracket, or 7) Do not block any ventilation openings. Install in accordance with table specified by the manufacturer, or sold with the manufacturer's instructions. the apparatus. When a cart is used, use caution 8) Do not install near any heat sources such as radiators, heat when moving the cart/apparatus combination to registers, stoves, or other apparatus (including amplifiers) that avoid injury from tip-over. produce heat. 13) Unplug this apparatus during lightning storms or 9) Do not defeat the safety purpose of the polarized or when unused for long periods of time. grounding-type plug. A polarized plug has two blades with one 14) Refer all servicing to qualified service personnel. Servicing is wider than the other. A grounding-type plug has two blades and required when the apparatus has been damaged in any way, a third grounding prong. The wide blade or the third prong are such as power-supply cord or plug is damaged, liquid has been provided for your safety. If the provided plug does not fit into your spilled or objects have fallen into the apparatus, the apparatus outlet, consult an electrician for replacement of the obsolete has been exposed to rain or moisture, does not operate outlet. normally, or has been dropped. RQT9129 3 Reference

  • 1
  • 2
  • 3
  • 4
  • 5
  • 6
  • 7
  • 8
  • 9
  • 10
  • 11
  • 12
  • 13
  • 14
  • 15
  • 16
  • 17
  • 18
  • 19
  • 20
  • 21
  • 22
  • 23
  • 24
  • 25
  • 26
  • 27
  • 28
  • 29
  • 30
  • 31
  • 32
  • 33
  • 34
  • 35
  • 36
  • 37
  • 38
  • 39
  • 40
  • 41
  • 42
  • 43
  • 44
  • 45
  • 46
  • 47
  • 48

3
RQT9129
Table of contents
Accessory information
.....................................
2
Preparing the remote control
...........................
3
IMPORTANT SAFETY INSTRUCTIONS
............
3
Control reference guide
..................................
10
Disc and card information
..............................
12
Basic play (Playing video contents)
..............
14
Enjoying TV with this unit’s speakers
...........
17
Enjoying the FM/AM radio
..............................
18
Playing music
..................................................
19
Playing an iPod on this unit
...........................
20
Playing still pictures
.......................................
22
Different kinds of playback for BD-Video
.....
24
Showing FUNCTIONS menu
...........................
25
Changing audio quality/sound field
..............
26
Enjoying surround sound
..............................
27
Linked operations with the TV
(VIERA Link
TM
“HDAVI Control
TM
”)
...............
28
Changing settings with the on-screen menu
... 30
Changing settings with the setup menu
.......
32
Optional connections and settings
...............
35
Frequently asked questions
...........................
37
Messages
.........................................................
38
Troubleshooting guide
...................................
39
Disc and card handling
...................................
42
Maintenance
....................................................
42
Glossary
...........................................................
43
Specifications
..................................................
44
Limited Warranty (ONLY FOR U.S.A.)
...........
46
Limited Warranty (ONLY FOR CANADA)
......
47
Product Service
...............................................
47
Index
..................................................
Back cover
Preparing the remote control
Batteries
Insert so the poles (
i
and
j
) match those in the remote control.
When closing the lid, insert it from the
j
(minus) side.
Do not use rechargeable type batteries.
Do not mix old and new batteries.
Do not use different types at the same time.
Do not heat or expose to flame.
Do not lea
v
e the battery(ies) in an automobile exposed to direct
sunlight for a long period of time with doors and windows closed.
Do not take apart or short circuit.
Do not attempt to recharge alkaline or manganese batteries.
Do not use batteries if the co
v
ering has been peeled off.
Mishandling of batteries can cause electrolyte leakage which can
damage items the fluid contacts and may cause a fire.
Remo
v
e batteries if the remote control is not going to be used for a
long period of time. Store in a cool, dark place.
Use
IMPORTANT SAFETY INSTRUCTIONS
Read these operating instructions carefully before using the unit. Follow the safety instructions on the unit and the applicable safety instructions
listed below. Keep these operating instructions handy for future reference.
Getting started
Quick Start Guide
STEP 1 Positioning
....................................
4
STEP 2 Basic connections
........................
6
STEP 3 Setting up the unit
........................
9
Basic operations
Advanced operations
Reference
R6/LR6, AA
±
²
30˚
30˚
30˚
10˚
Remote control signal sensor
7 m (23 ft.) directly in front of the unit
If you cannot operate the unit using the remote control after
changing the batteries, please re-enter the codes (
42).
1)
Read these instructions.
2)
Keep these instructions.
3)
Heed all warnings.
4)
Follow all instructions.
5)
Do not use this apparatus near water.
6)
Clean only with dry cloth.
7)
Do not block any
v
entilation openings. Install in accordance with
the manufacturer’s instructions.
8)
Do not install near any heat sources such as radiators, heat
registers, sto
v
es, or other apparatus (including amplifiers) that
produce heat.
9)
Do not defeat the safety purpose of the polarized or
grounding-type plug. A polarized plug has two blades with one
wider than the other. A grounding-type plug has two blades and
a third grounding prong. The wide blade or the third prong are
pro
v
ided for your safety. If the pro
v
ided plug does not fit into your
outlet, consult an electrician for replacement of the obsolete
outlet.
10)
Protect the power cord from being walked on or pinched
particularly at plugs, con
v
enience receptacles, and the point
where they exit from the apparatus.
11)
Only use attachments/accessories specified by the
manufacturer.
12)
Use only with the cart, stand, tripod, bracket, or
table specified by the manufacturer, or sold with
the apparatus. When a cart is used, use caution
when mo
v
ing the cart/apparatus combination to
a
v
oid injury from tip-o
v
er.
13)
Unplug this apparatus during lightning storms or
when unused for long periods of time.
14)
Refer all ser
v
icing to qualified ser
v
ice personnel. Ser
v
icing is
required when the apparatus has been damaged in any way,
such as power-supply cord or plug is damaged, liquid has been
spilled or objects ha
v
e fallen into the apparatus, the apparatus
has been exposed to rain or moisture, does not operate
normally, or has been dropped.
Getting started
Basic
operations
Advanced
operations
Reference