Panasonic SABT300 Blu-ray Disc Home Theater Sound System - Page 10
TV connections
 |
View all Panasonic SABT300 manuals
Add to My Manuals
Save this manual to your list of manuals |
Page 10 highlights
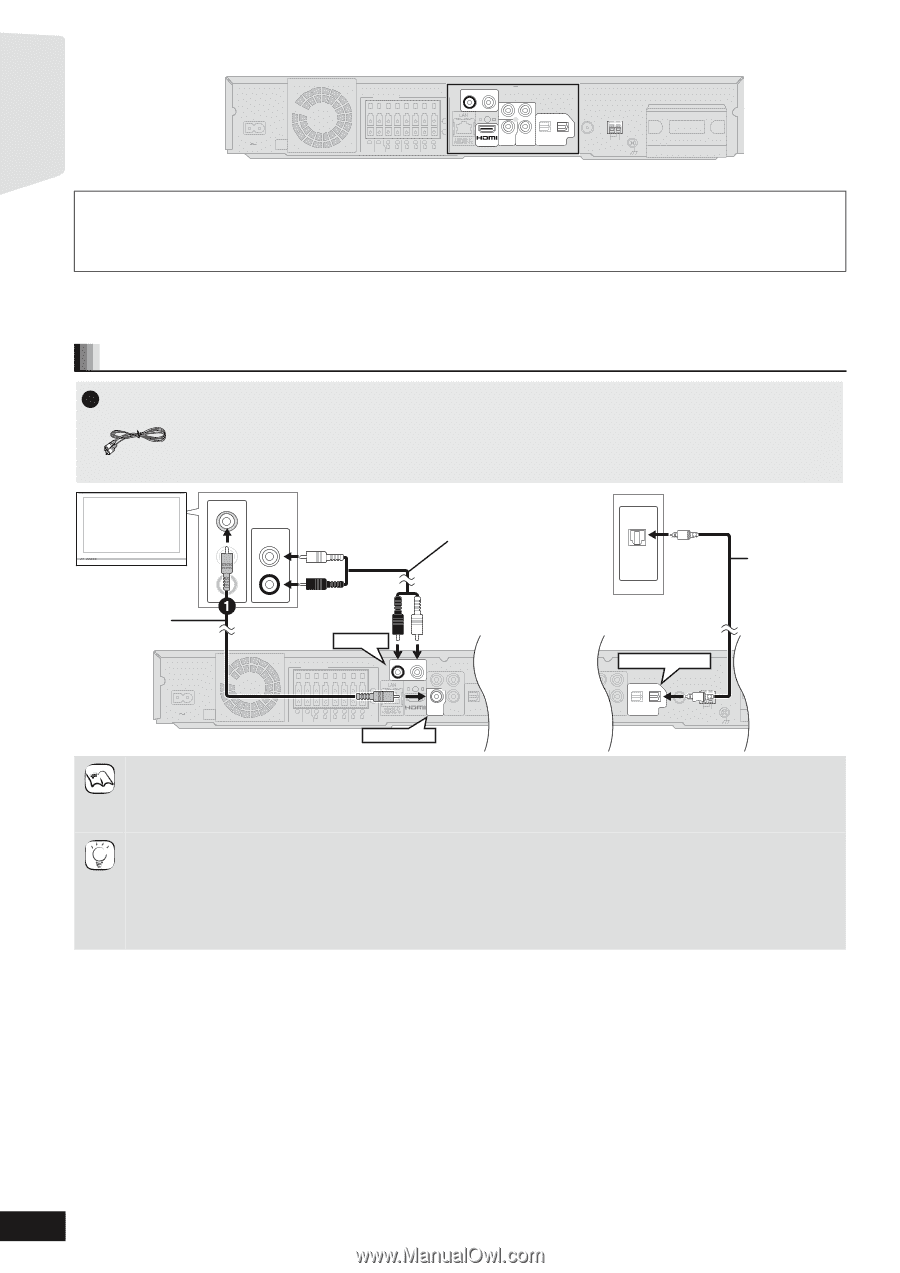
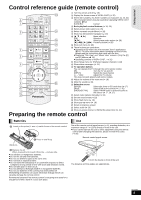
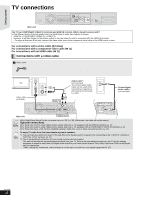
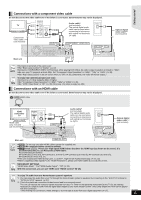
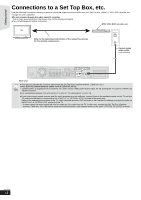
Getting started + + TV connections AC IN Main unit SPEAKERS R AUX(TV) L ( 6 5 21 4387 3Ω SUB- 3Ω R 3Ω L R 3Ω L R 3Ω L WOOFER CENTER FRONT SURROUND SURROUND BACK Y PB OPTICAL ) AV OUT PR 2(STB) 1(TV) VIDEO COMPONENT OUT VIDEO OUT DIGITAL IN 75Ω FM ANT LOOP EXT AM ANT LOOP ANT GND PUSH DIGITAL TRADNIGSIMTAITLTER TRANSMITTER PUSH My TV has COMPONENT VIDEO IN terminals and HDMI IN terminal. Which should I connect with? ≥The different levels of picture quality input are listed below in order from highest to lowest. HDMI IN )COMPONENT VIDEO IN )VIDEO IN. However, it will take longer for the picture output to start up when this unit is connected with the HDMI IN terminal. - To enjoy all features of this unit, connect the video cable, even if the component video cable or the HDMI cable is used. For connections with a video cable (> below) For connections with a component video cable (> 11) For connections with an HDMI cable (> 11) Connections with a video cable 1 Video cable TV VIDEO IN AUDIO IN L AUDIO OUT L R R Audio cable*1 (not included) The optical digital audio cable can be used when connecting to televisions with optical out terminals ( right). OPTICAL OUT Optical digital audio cable*1,2 (not included) Video cable (included) AUX(TV) SPEAKERS R AUX(TV) L OPTICAL 1(TV) AC IN Main unit Y PB OPTICAL ( 6 5 21 4387 3Ω SUB- 3Ω R 3Ω L R 3Ω L R 3Ω L WOOFER CENTER FRONT SURROUND SURROUND BACK ) AV OUT PR 2(STB) 1(T VIDEO COMPONENT OUT VIDEO OUT DIGITAL IN VIDEO OUT PB OPTICAL PR 2(STB) 1(TV) VIDEO COMPONENT OUT VIDEO OUT DIGITAL IN 75Ω FM ANT LOOP EXT AM ANT LOOP ANT GND NOTE ≥Set "High Clarity Sound" in the on-screen menu to "Off" (> 36). (Otherwise, the video will not be output.) Optional connections ≥For those who want to enjoy higher picture quality and have a TV equipped with an HDMI IN terminal (> 11) ≥For those who want to enjoy higher picture quality and have a TV equipped with a COMPONENT VIDEO IN terminal (> 11) ≥For those who have a Set Top Box (Satellite receiver, Cable box, etc.) or video cassette recorder (> 12) TIPS To enjoy TV audio from this home theater system's speakers *1 You can enjoy the audio from your TV through this home theater system's speakers by connecting to the "AUX(TV)" terminal or "OPTICAL 1(TV)" terminal. (> 27) *2 This is the preferred connection for best sound and true surround sound. This unit can decode the surround signals received from your TV. Refer to the operating instructions for the TV for the settings necessary to output its audio from the digital audio output to your home theater system. Only Dolby Digital and PCM can be played with this connection. - After making this connection, make settings to suit the type of audio from your digital equipment (> 27). RQT9508 10
-
 1
1 -
2
-
3
-
4
-
 5
5 -
 6
6 -
 7
7 -
 8
8 -
 9
9 -
 10
10 -
 11
11 -
 12
12 -
 13
13 -
 14
14 -
 15
15 -
16
-
17
-
18
-
19
-
20
-
21
-
22
-
23
-
24
-
25
-
26
-
27
-
28
-
29
-
30
-
31
-
32
-
33
-
34
-
35
-
36
-
37
-
38
-
39
-
40
-
41
-
42
-
43
-
44
-
45
-
46
-
47
-
48
-
49
-
50
-
51
-
52
-
53
-
54
-
55
-
56
-
57
-
58
-
59
-
60
 |
 |