Panasonic SABT300 Blu-ray Disc Home Theater Sound System - Page 15
Smart Setup / Easy Setup
 |
View all Panasonic SABT300 manuals
Add to My Manuals
Save this manual to your list of manuals |
Page 15 highlights
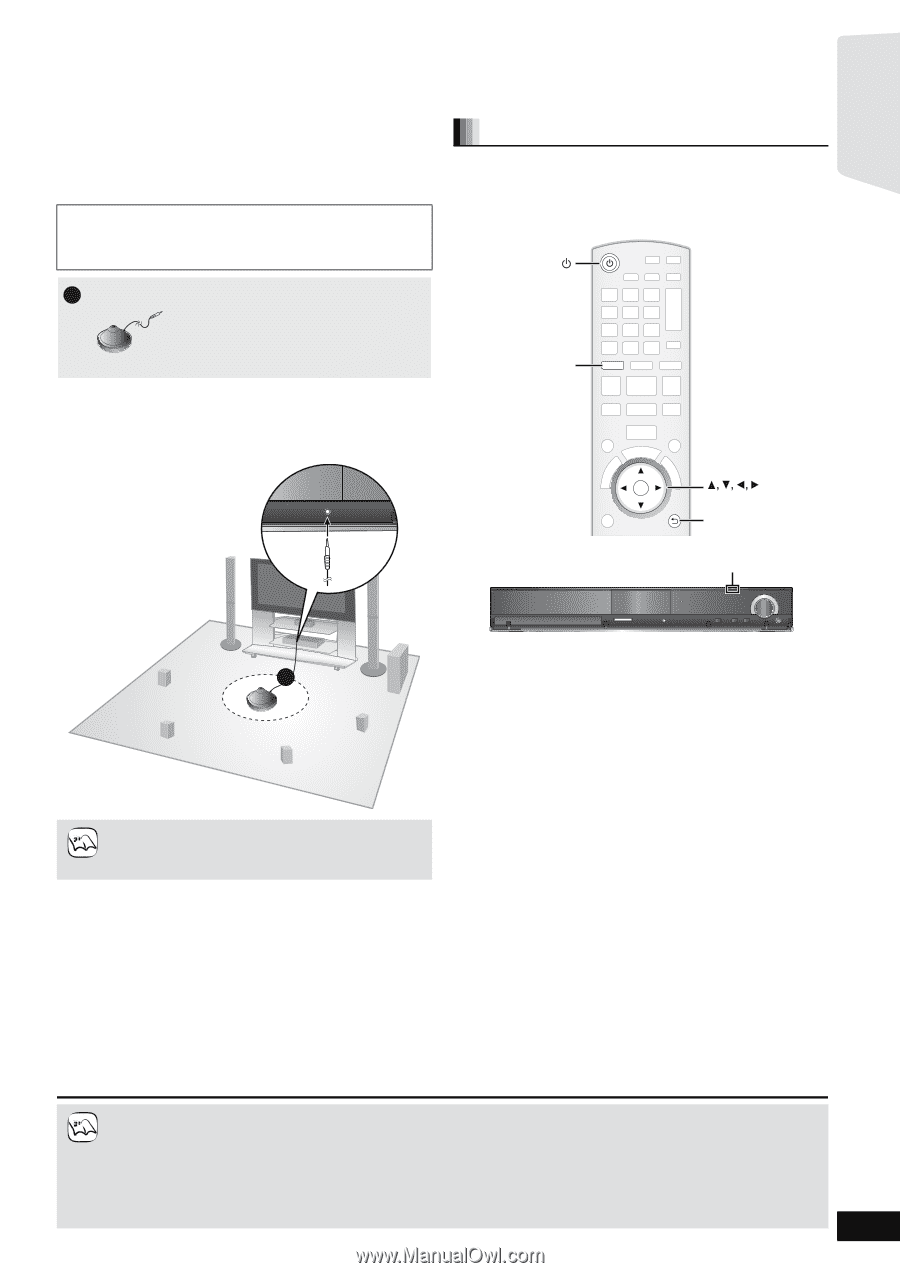
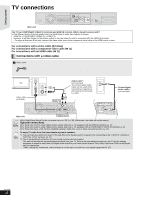
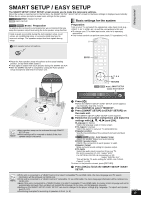
Getting started SMART SETUP / EASY SETUP The SMART SETUP / EASY SETUP screen assists you to make the necessary settings. When the system is switched on for the first time, the SMART SETUP / EASY SETUP screen for the basic settings is displayed automatically. Follow the on-screen prompts to make basic settings for the system. [BT300] \BT303\ [BT200]: SMART SETUP \BT203\: EASY SETUP Basic settings for the system [BT300] \BT303\ [BT200]: Preparation To optimize the surround sound experience we recommend that you setup the speaker output level using the Auto speaker setup function. Keep as quiet as possible during the Auto speaker setup. Loud voices, air-conditioning noise, or excessive wind may lead to incorrect settings. The speakers output loud test signals during setup. Preparation Turn on your TV and select the appropriate video input mode (e.g., VIDEO 1, AV 1, HDMI, etc.) to suit the connections to this unit. ≥To change your TV's video input mode, refer to its operating instructions. ≥This remote control can perform some basic TV operations (> 5). 1 Auto speaker setup microphone ≥Place the Auto speaker setup microphone at the actual seating position. (At ear level when seated.) ≥A test signal is output from each speaker during the SMART SETUP. ≥After the SMART SETUP is completed, unplug the Auto speaker setup microphone and keep it for future use. BD/SD BD/SD OK RETURN OK RETURN [BT300] [BT303] [BT200]: SMART SETUP [BT203]: EASY SETUP 1 NOTE ≥Auto speaker setup can be activated through SMART SETUP only. ≥Audio settings will be restored to default if the Auto speaker setup is canceled. SD CARD SETUP MIC SELECTOR TUNE 1 Press [Í]. ≥When the SMART SETUP / EASY SETUP screen appears automatically, skip step 2 and 3. 2 Press [BD/SD] to select "BD/DVD". 3 Press [SMART SETUP] (or [EASY SETUP]) on the main unit. ≥The SMART SETUP / EASY SETUP screen appears. 4 Follow the on-screen instructions and make the settings with [3, 4, 2, 1] and [OK]. ≥Language (> below) Select the language used on menu screen. ≥TV Aspect (> below) Select the aspect to suit your TV and preference. ≥Speaker position Specify the positioning of the surround and surround back speakers. ≥[BT300] \BT303\ [BT200]: Auto Speaker Setup Adjust the speaker output level automatically ≥[BT203]: Speaker check Check if the connection to each speaker is valid. ≥Speaker Output Make surround sound setting for speaker output. ≥TV Audio Select the audio input connection from your TV. For AUX connection (> 10): Select "AUX". For OPTICAL DIGITAL IN connection (> 10): Select "DIGITAL IN 1". This will be the TV audio setting for VIERA Link "HDAVI Control". (> 28) To return to the previous screen, press [RETURN]. 5 Press [OK] to finish the SMART SETUP / EASY SETUP. NOTE ≥If this unit is connected to a "HDAVI Control 3 (or later)" compatible TV via HDMI cable, the menu language and TV aspect information will be retrieved via VIERA Link. ≥If this unit is connected to a "HDAVI Control 2" compatible TV via HDMI cable, the menu language information will be retrieved via VIERA Link. ≥Even if this unit is connected to a "HDAVI Control 2 (or later)" compatible TV via HDMI cable, the menu screen language will not be automatically retrieved if this unit does not support the language. In this case, set the language manually. ≥Settings in the SMART SETUP / EASY SETUP can also be changed in the player settings [e.g., language, TV aspect and speaker level (> 37)]. ≥Positioning examples for mounting all speakers in front. (> 8) RQT9508 15
-
 1
1 -
2
-
3
-
4
-
5
-
6
-
7
-
8
-
9
-
 10
10 -
 11
11 -
 12
12 -
 13
13 -
 14
14 -
 15
15 -
 16
16 -
 17
17 -
 18
18 -
 19
19 -
 20
20 -
21
-
22
-
23
-
24
-
25
-
26
-
27
-
28
-
29
-
30
-
31
-
32
-
33
-
34
-
35
-
36
-
37
-
38
-
39
-
40
-
41
-
42
-
43
-
44
-
45
-
46
-
47
-
48
-
49
-
50
-
51
-
52
-
53
-
54
-
55
-
56
-
57
-
58
-
59
-
60
 |
 |