Panasonic SAHT730 Technical Guide
Panasonic SAHT730 - DVD THEATER RECEIVER Manual
 |
View all Panasonic SAHT730 manuals
Add to My Manuals
Save this manual to your list of manuals |
Panasonic SAHT730 manual content summary:
- Panasonic SAHT730 | Technical Guide - Page 1
B02 Technical Guide 5-DVD Changer Home Theater System SC-HT730, SC-HT930 Models Practical Servicing of Start Up, Shutdown, and Video Circuits Panasonic Services Company National Training 1 - Panasonic SAHT730 | Technical Guide - Page 2
of BBE Sound, Inc. Photoshop is a registered trademark of Adobe Systems Incorporated in the United States or other countries. Dolby is a registered trademark of Dolby Laboratories. DTS is a registered trademark of Digital Theater Systems Corporation. Copyright © 2006 by Panasonic Services Company - Panasonic SAHT730 | Technical Guide - Page 3
OBJECTIVE...4 I NO START-UP AND DVD TRANSPORT PROBLEMS 5 1. POWER-ON START-UP SEQUENCE - WHERE IS THE PROBLEM 5 2. SENSORS, BELTS, AND CONTROL UNIT REPAIR (SA-HT730 / SA-HT930) STRATEGY 13 Control unit repair Procedure 14 Jumper Paths to System Control IC2018 for Shutdown Problems 15 Control - Panasonic SAHT730 | Technical Guide - Page 4
on signal path to simplify the task of signal tracing and to locate the cause of a defect. • Furnish troubleshooting procedures that contribute to a speedier repair of the product. • Provide examples of typical problems that may have occurred in similar types of circuits. SA-HT730 / SAHT930 4 - Panasonic SAHT730 | Technical Guide - Page 5
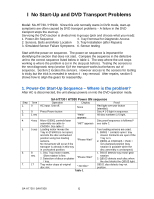
Transport Problems Model: SA-HT730 / HT930. Since this unit normally starts in DVD mode, start-up symptoms are often caused by DVD transport problems - A failure in the DVD transport stops the start up. Servicing the DVD section is divided into 6 groups (pick and choose what you need): 1. Power - Panasonic SAHT730 | Technical Guide - Page 6
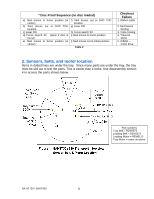
. Since many parts are under the tray, the tray must be slid out to test the parts. This is easier than it looks. Use disassembly section 4 to access the parts shown below. Part numbers Tray Belt = RDV0073 Loading Belt = RDV0073 Loading Motor = REM0112 Tray Motor = same as above SA-HT730 / SAHT930 - Panasonic SAHT730 | Technical Guide - Page 7
tray button permits the tray to open but it closes automatically. Front panel display = "Please Wait" or "Open/Close" Front panel display = "Please Wait" Table 3 Comments Unit shuts down. Unit does not shutdown. Unit does not shutdown. Tray will not stay open. Motor = 14 ohms SA-HT730 / SAHT930 7 - Panasonic SAHT730 | Technical Guide - Page 8
). 3. Unplug the two front panel cables (CN2008 & CN2009) and remove the front panel (not shown). 4. On the main board, remove the cable (CN2010) attached to the tray the bottom. Figure 2 - Tray removal revealed SA-HT730 / SAHT930 8 CN2010 Contacts = rear CN2008 Contacts = left CN2009 Contacts = - Panasonic SAHT730 | Technical Guide - Page 9
and a white gear is all that is required to slide the tray back in. Procedure: 1. Main black gear - Rotate the gear so that cable, slide the tray halfway into the mechanism. 4. Plug in the tray's ribbon cable into CN2010. The cable's contacts face rearward. 5. Push the tray all the way in. SA-HT730 - Panasonic SAHT730 | Technical Guide - Page 10
all 5 sensors and 2 motors as a group once the tray is removed. If the parts test OK, the problem is mechanical or a ribbon cable is bad. Testing the Tray Loading Motor and Related Sensors With the tray removed (section 4), install the front panel to test the tray loading operation. Plug in front - Panasonic SAHT730 | Technical Guide - Page 11
the remaining tests. 2. Place the plastic tray on top of the unit between the laser block and front panel. 3. Plug the tray ribbon cable into CN2010 for testing. Part 4. Tray rotation motor 5. Tray M rotation sensor S9102 6. Tray position sensor Q9101 7. Disc presence detector Q9103 Setup Press - Panasonic SAHT730 | Technical Guide - Page 12
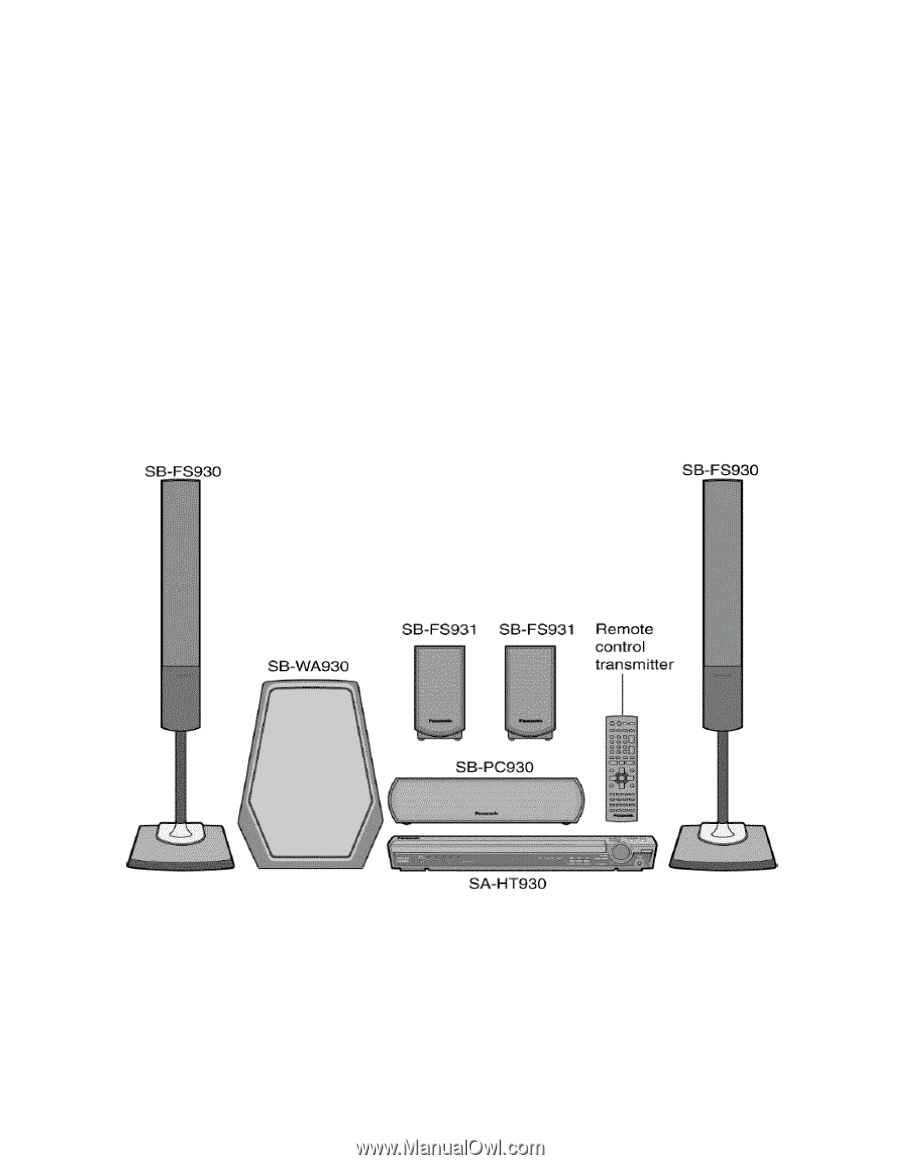
II Shutdown Problem Protection Concept - all the shutdown possibilities Refer to figure 6. The models SCHT730 and SCHT930 are both 2-piece units (with speakers). The SA-HT930 / SA-HT730 control piece (figure 6, right) has no AC input. The control unit power comes from the SB-WA 30 "Subwoofer" piece - Panasonic SAHT730 | Technical Guide - Page 13
Unit Repair (SA-HT730 / SA-HT930) Strategy SC-HT730 / SC-HT930 Repair Strategy for a shutdown (F61) symptom: These two units differ in power output so the 'HT930 has an additional board in the subwoofer. Troubleshooting of the control unit is almost identical for both models. Shutdown can be either - Panasonic SAHT730 | Technical Guide - Page 14
the voltage is now present at one end after the cut, its load is shorted. Trace down and troubleshoot the Use the "Protect Paths to Micro IC2018" diagram (figure 9) to make sure that the jumper is the load jumper that bridges the load and the source voltage before cutting. SA-HT730 / SAHT930 14 - Panasonic SAHT730 | Technical Guide - Page 15
Jumper Paths to System Control IC2018 for Shutdown Problems SYS 6 from JK2000 / PIN 4 Subwoofer TP Jumpers (eg. W____ ) are accessible from the top of the board. W2145 /M6 Stby 6V D2001 W2541 /K6 Pull up resistor R2069 Pin 2 of JK2000 From SUB W SYSTEM CONTROL IC2018 DC Det SW5 source Q2813 - Panasonic SAHT730 | Technical Guide - Page 16
Control Unit Protection Concept Figure 10 - Control Unit Shutdown Simplified Schematic SA-HT730 / SAHT930 16 - Panasonic SAHT730 | Technical Guide - Page 17
pin round umbilical cord that carries power from the Subwoofer to the control unit and audio from the control unit back to the subwoofer. When connected together and plugged in to AC, the Subwoofer provides standby (SYS6V) voltage to the micro in the control unit. The SC-HT730 model is similar but - Panasonic SAHT730 | Technical Guide - Page 18
supply voltage from T501 (H601) is unbalanced (+V not = -V). Check for open foils to connector H601 and replace IC601 on the board. SB-WA730 - The problem is not in the subwoofer. Check the control unit. 4. Remove the 10k ohm test resistor across D508 to prevent micro damage. SA-HT730 / SAHT930 18 - Panasonic SAHT730 | Technical Guide - Page 19
Figure 12 - Subwoofer Power On / Protection Circuit SA-HT730 / SAHT930 19 - Panasonic SAHT730 | Technical Guide - Page 20
Subwoofer Disassembly SA-HT730 / SAHT930 Figure 13 - Subwoofer Disassembly 20 - Panasonic SAHT730 | Technical Guide - Page 21
to troubleshoot the subwoofer independently (Subwoofer isolation procedure on page 15). 5. The subwoofer assembly is now operational and in a serviceable position. Ground screw terminal Front Bd. SBWA930 only Figure 14 - Subwoofer Operational Service Position - SB-WA930 shown SA-HT730 / SAHT930 - Panasonic SAHT730 | Technical Guide - Page 22
. 2. DVD - When playing a DVD movie with DTS or Dolby Digital ("SFC" will light in the display and) all 6-channels will work. Older stereo-only movies (no SFC light) will only deliver 2-channel stereo sound. When the remote's "Super Srnd" is pressed, the front panel display shows "Error". SA-HT730 - Panasonic SAHT730 | Technical Guide - Page 23
b) Press the front panel or remote input selector to select DVD / CD (front panel display). c) On the remote top opaque buttons, press DVD (so the remote buttons are for DVD mode. d) On the remote, press both the SHIFT a scope to determine where the signal is lost. Figure 16 SA-HT730 / SAHT930 23
-
 1
1 -
 2
2 -
 3
3 -
 4
4 -
 5
5 -
 6
6 -
 7
7 -
8
-
9
-
10
-
11
-
12
-
13
-
14
-
15
-
16
-
17
-
18
-
19
-
20
-
21
-
22
-
23
 |
 |
1
Technical Guide
5-DVD Changer Home Theater System
SC-HT730, SC-HT930 Models
Practical Servicing
of
Start Up, Shutdown,
and
Video
Circuits
Panasonic Services Company
National Training
B02