Panasonic SAHT822V SAHT822V User Guide - Page 16
Step 5 Radio And System Connection
 |
View all Panasonic SAHT822V manuals
Add to My Manuals
Save this manual to your list of manuals |
Page 16 highlights
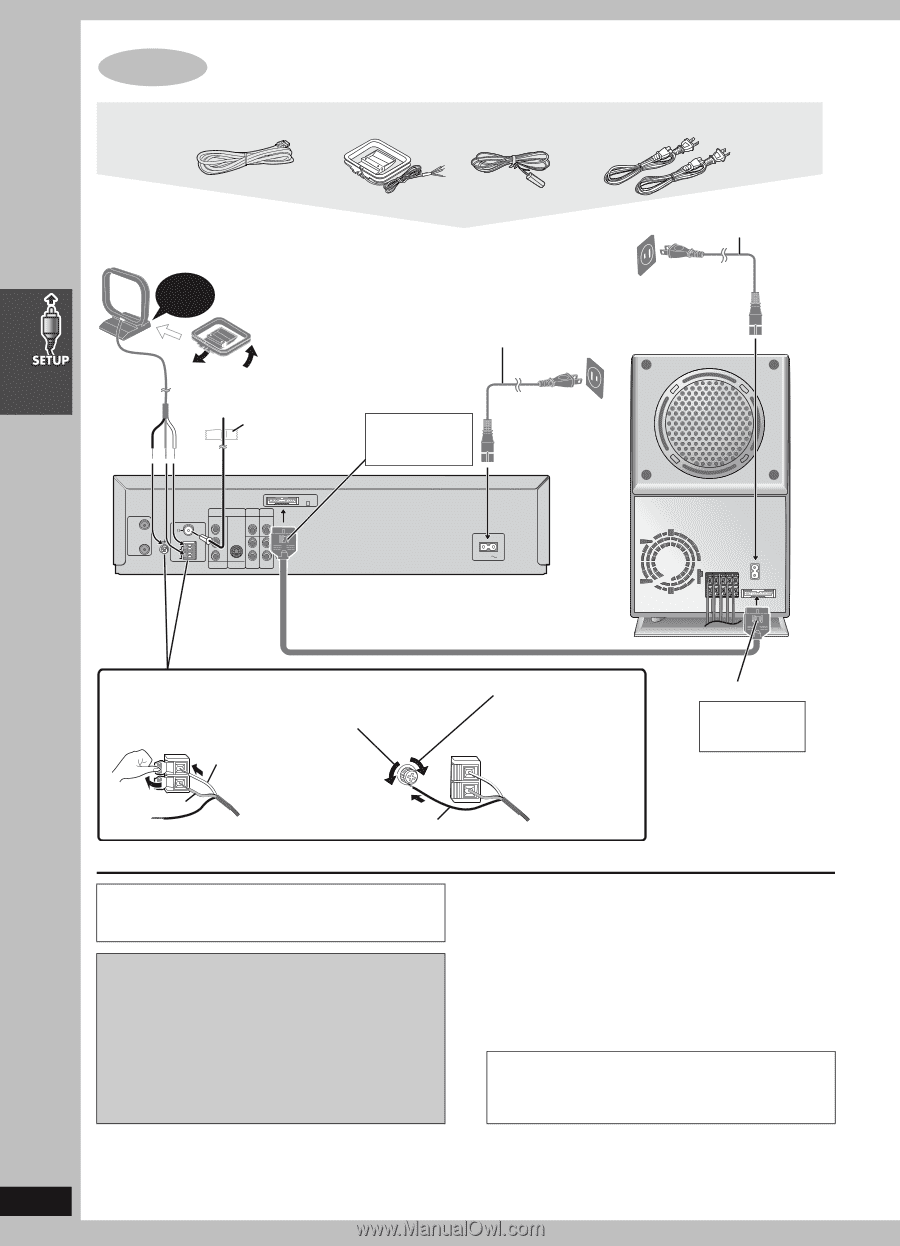
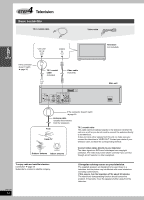
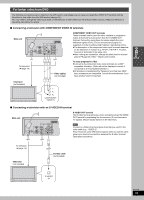
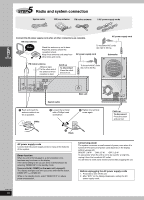
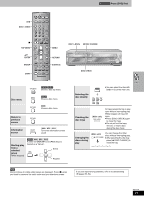
5 STEP Radio and system connection System cable AM loop antenna FM indoor antenna 2 AC power supply cords Connect the AC power supply cords after all other connections are complete. AC power supply cord AM loop antenna Click! Stand the antenna up on its base. Place the antenna where the reception is best. Keep loose antenna cord away from other wires and cords. To household AC outlet (AC 120 V, 60 Hz) AC power supply cord Subwoofer FM indoor antenna Adhesive tape Fix the other end of the antenna where reception is best. Catch up To disconnect Press the catch and pull out. To household AC outlet (AC 120 V, 60 Hz) A RF IN RF OUT 75 LOOP ANT LOOP GND EXT DVD Y FM ANT PB/CB AM PR/CR ANT DVD/ VHS VIDEO OUT EXT VIDEO IN L R COMPONENT S-VIDEO LINE VIDEO OUT OUT OUT LINE IN AC IN Main unit System cable 1 Push and insert the antenna cables in as far as possible. White Red 2 Loosen the terminal with a Phillips-head screwdriver. 4 Tighten the terminal screw again. 3 Black Catch up To disconnect Press the catch and pull out. AC power supply cords Connect both AC power supply cords to enjoy all the features of this system. Demo function When the unit is first plugged in, a demonstration of its functions may be shown on the display. If the demo setting is off, you can show a demonstration by selecting "DEMO ON" in the standby mode. Press and hold [-DEMO] on the main unit (➜ page 9). The display changes each time you press and hold the button. DEMO OFF()DEMO ON While in the standby mode, select "DEMO OFF" to reduce power consumption. Conserving power The system consumes a small amount of power, even when it is turned off. The amount of power used depends on the display setting (➜ page 42): BRIGHT: 3.8 W DIM: 3.5 W OFF: 2.2 W To save power when the unit is not to be used for a long time, unplug it from the household AC outlet. You will need to reset some memory items after plugging the unit. Before unplugging the AC power supply cords 1. Press [Í] to turn off the unit. 2. After "BYE" on the display disappears, unplug the AC power supply cords. RQT7708 16
-
 1
1 -
2
-
3
-
4
-
5
-
6
-
7
-
8
-
9
-
10
-
 11
11 -
 12
12 -
 13
13 -
 14
14 -
 15
15 -
 16
16 -
 17
17 -
 18
18 -
 19
19 -
 20
20 -
 21
21 -
22
-
23
-
24
-
25
-
26
-
27
-
28
-
29
-
30
-
31
-
32
-
33
-
34
-
35
-
36
-
37
-
38
-
39
-
40
-
41
-
42
-
43
-
44
-
45
-
46
-
47
-
48
-
49
-
50
-
51
-
52
-
53
-
54
-
55
-
56
 |
 |