Panasonic SAHT822V SAHT822V User Guide - Page 34
MANUAL RECORDING, Press [DVD/VHS] to select VHS
 |
View all Panasonic SAHT822V manuals
Add to My Manuals
Save this manual to your list of manuals |
Page 34 highlights
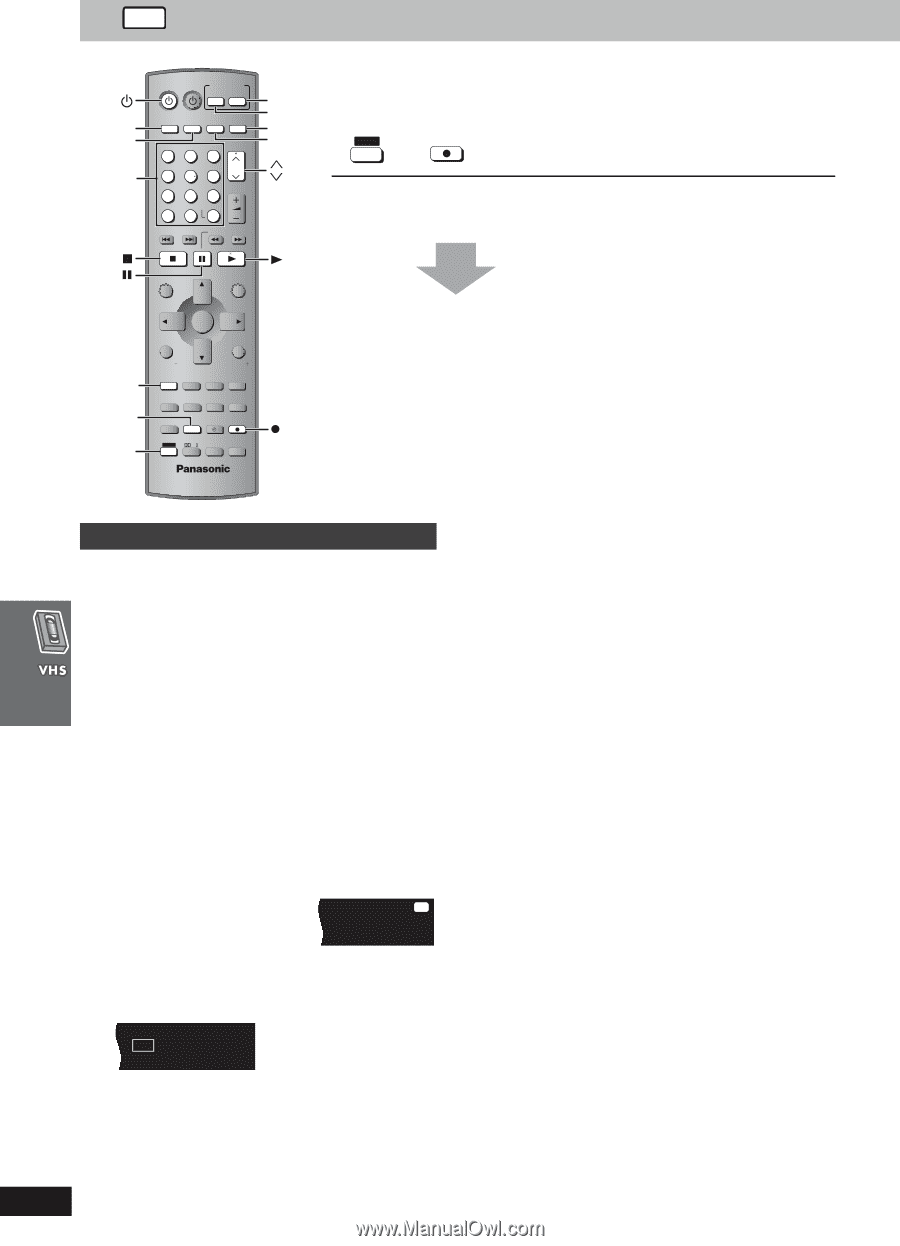
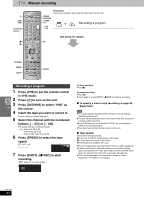
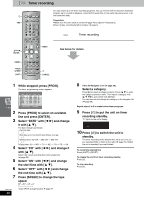
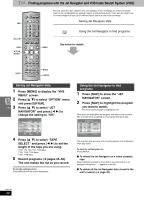
VHS Manual recording TV INPUT SELECTOR DVD/VHS FM/AM DVD VHS Numbered buttons DVD VHS TV TUNER DISC 1 1 DISC 2 2 DISC 3 3 DISC 4 DISC 5 CH 456 PICTURE MODE 78 VOLUME 9 SETUP ENTER 100 0 S10 SKIP SLOW/SEARCH OPEN/CLOSE/EJECT JET REW CD MODE FM/AM DVD/VHS TUNER TV CH CH Preparation Turn on the television and select the video input for the VHS. SHIFT i REC Recording a program See below for details. TOP MENU NAVI DIRECT NAVIGATOR OSD/ DISPLAY ENTER MENU PLAY LIST RETURN TV/VIDEO SPEED SHIFT TV VOL RESET TV/VIDEO PAGE GROUP TV VOL MIX 2CH REPEAT SUBTITLE PLAY MODE MULTI RE-MASTER C.S.M C.FOCUS PROGRESSIVE SUBWOOFER LEVEL SFC SUPER SRND MUTING POSITION MEMORY PROG SHIFT ZOOM QUICK REPLAY REC SPEED SLEEP PL AUDIO CANCEL TEST CH SELECT REC Recording a program 1 Press [VHS] to put the remote control in VHS mode. 2 Press [Í] to turn on the unit. 3 Press [DVD/VHS] to select "VHS" as the source. 4 Insert the tape you want to record to. Ensure its tab is in place (➜ page 5). 5 Select the channel with the numbered buttons, [W CH] or [X CH]. ≥To select with the numbered buttons: e.g. channel 2: [0] ➜ [2] channel 23: [2] ➜ [3] channel 123: [100] ➜ [2] ➜ [3] 6 Press [SPEED] to select the tape speed. SP>EP>VP ^""-""""b SP EP VP 7 Press [SHIFT]i[¥ REC] to start recording. "REC" lights on the unit's display. REC To stop recording Press [∫]. To pause recording Press [;]. Press it again or press [SHIFT]i[¥ REC] to continue recording. ∫ To specify a time to stop recording (➜ page 48, Sleep timer) [Note] ≥You cannot change channels while recording. You can change channels while paused. ≥The unit will automatically return to the stop mode after a pause of 5 minutes while recording. ≥Even if the tape you use is labeled "S-VHS", the recordings you make do not use this system. ≥You cannot record from the disc section to the unit. ∫ Tape speeds There are three tape speeds. SP: You can record the length shown on the tape. EP: Three times the length of SP mode. VP: Five times the length of SP mode. ≥You cannot play tapes recorded with VP mode on other equipment. ≥It takes more time for automatic tracking to work when playing tapes recorded with VP mode, and it may not work at all with some tapes. Do tracking manually if this is the case (➜ page 33). ≥This unit can play tapes recorded with LP mode on other equipment ("LP" lights on the display). RQT7708 34
-
 1
1 -
2
-
3
-
4
-
5
-
6
-
7
-
8
-
9
-
10
-
11
-
12
-
13
-
14
-
15
-
16
-
17
-
18
-
19
-
20
-
21
-
22
-
23
-
24
-
25
-
26
-
27
-
28
-
 29
29 -
 30
30 -
 31
31 -
 32
32 -
 33
33 -
 34
34 -
 35
35 -
 36
36 -
 37
37 -
 38
38 -
 39
39 -
40
-
41
-
42
-
43
-
44
-
45
-
46
-
47
-
48
-
49
-
50
-
51
-
52
-
53
-
54
-
55
-
56
 |
 |