Panasonic SAPT760 Dvd Home Theater Sound System - Page 7
Attaching to a wall, Fitting speaker stands, Reattaching the front speaker cable - service manual
 |
View all Panasonic SAPT760 manuals
Add to My Manuals
Save this manual to your list of manuals |
Page 7 highlights
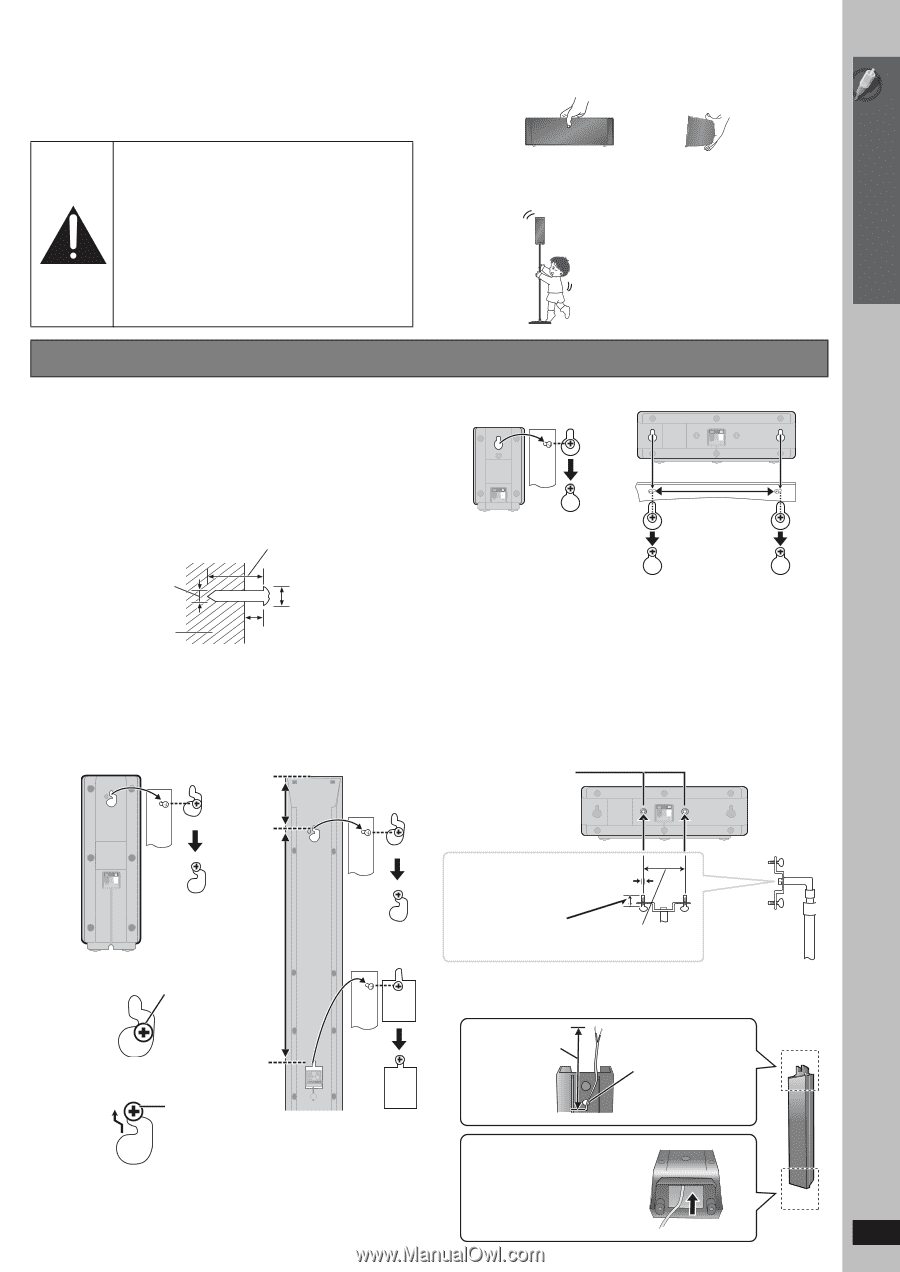
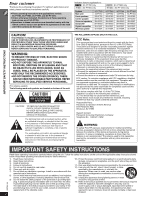
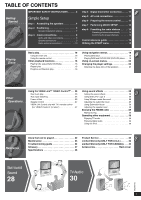
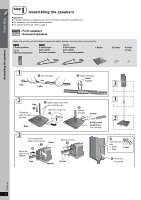
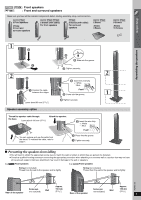
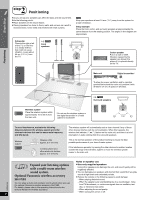
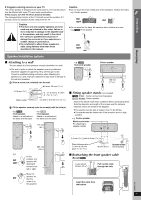
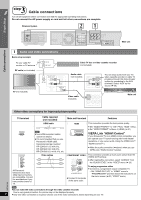
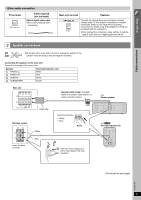
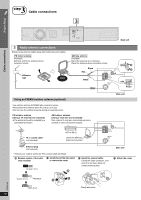
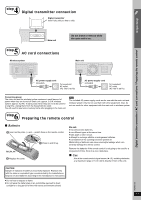
Simple Setup Positioning If irregular coloring occurs on your TV The center speaker is designed to be used close to a TV, but the picture may be affected with some TVs and setup combinations. If this occurs, turn the TV off for about 30 minutes. The demagnetizing function of the TV should correct the problem. If it persists, move the speakers further away from the TV. Caution ≥ The main unit and supplied speakers are to be used only as indicated in this setup. Failure to do so may lead to damage to the amplifier and/ or the speakers, and may result in the risk of fire. Consult a qualified service person if damage has occurred or if you experience a sudden change in performance. ≥ Do not attempt to attach these speakers to walls using methods other than those described in this manual. Caution ≥ Do not touch the front netted area of the speakers. Hold by the sides. e.g. Center speaker DO DO NOT ≥ Do not stand on the base. Be cautious when children are near. e.g. [PT760] Front speaker DO NOT Speaker installation options ∫ Attaching to a wall You can attach all of the speakers (except subwoofer) to a wall. ≥ The wall or pillar on which the speakers are to be attached should be capable of supporting 10 kg (22 Ibs) per screw. Consult a qualified building contractor when attaching the speakers to a wall. Improper attachment may result in damage to the wall and speakers. 1 Drive a screw (not included) into the wall. At least 30 mm (13/16q) e.g. [PT760] Surround speaker Center speaker 190 mm (7 15/32q) ‰4.0 mm (5/32q) Wall or pillar ‰7.0 mm to 9.4 mm (9/32q to 11/32q) 4.0 mm to 6.0 mm (5/32q to 1/4q) 2 Fit the speaker securely onto the screw(s) with the hole(s). e.g. [PT760] Front speaker Attach to a wall without the base and the pipes e.g. [PT960] Front speaker Attach to a wall without the base and the stand 116 mm (44/7q) ∫ Fitting speaker stands (not included) [PT760] [PT954] : Center and surround speakers [PT960] [PT1054]: Center speaker Ensure the stands meet these conditions before purchasing them. Note the diameter and length of the screws and the distance between screws as shown in the diagram. ≥ The stands must be able to support over 10 kg (22 Ibs). ≥ The stands must be stable even if the speakers are in a high position. e.g. Center speaker Metal screw holes For attaching to speaker stands e.g. DO NOT DO 384 mm (151/8q) In this position, the speaker will likely fall if moved to the left or right. Move the speaker so that the screw is in this position. 5.0 mm (3/16q), pitch 0.8 mm (1/32q) Plate thickness plus 7.0 mm to 10 mm (plus 9/32q to 13/32q) Speaker stand 60 mm (23/8q) (not included) ∫ Reattaching the front speaker cable (Except [PT760]) Leave about 80 mm (35/16z) Pull out the cable through the hole. RQTX0105 Insert the cable from the bottom. 7
-
 1
1 -
 2
2 -
 3
3 -
 4
4 -
 5
5 -
 6
6 -
 7
7 -
 8
8 -
 9
9 -
 10
10 -
 11
11 -
 12
12 -
13
-
14
-
15
-
16
-
17
-
18
-
19
-
20
-
21
-
22
-
23
-
24
-
25
-
26
-
27
-
28
-
29
-
30
-
31
-
32
-
33
-
34
-
35
-
36
-
37
-
38
-
39
-
40
-
41
-
42
-
43
-
44
 |
 |