Pentax 645 645 Manual
Pentax 645 Manual
 |
View all Pentax 645 manuals
Add to My Manuals
Save this manual to your list of manuals |
Pentax 645 manual content summary:
- Pentax 645 | 645 Manual - Page 1
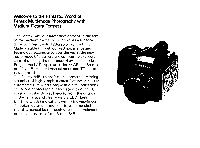
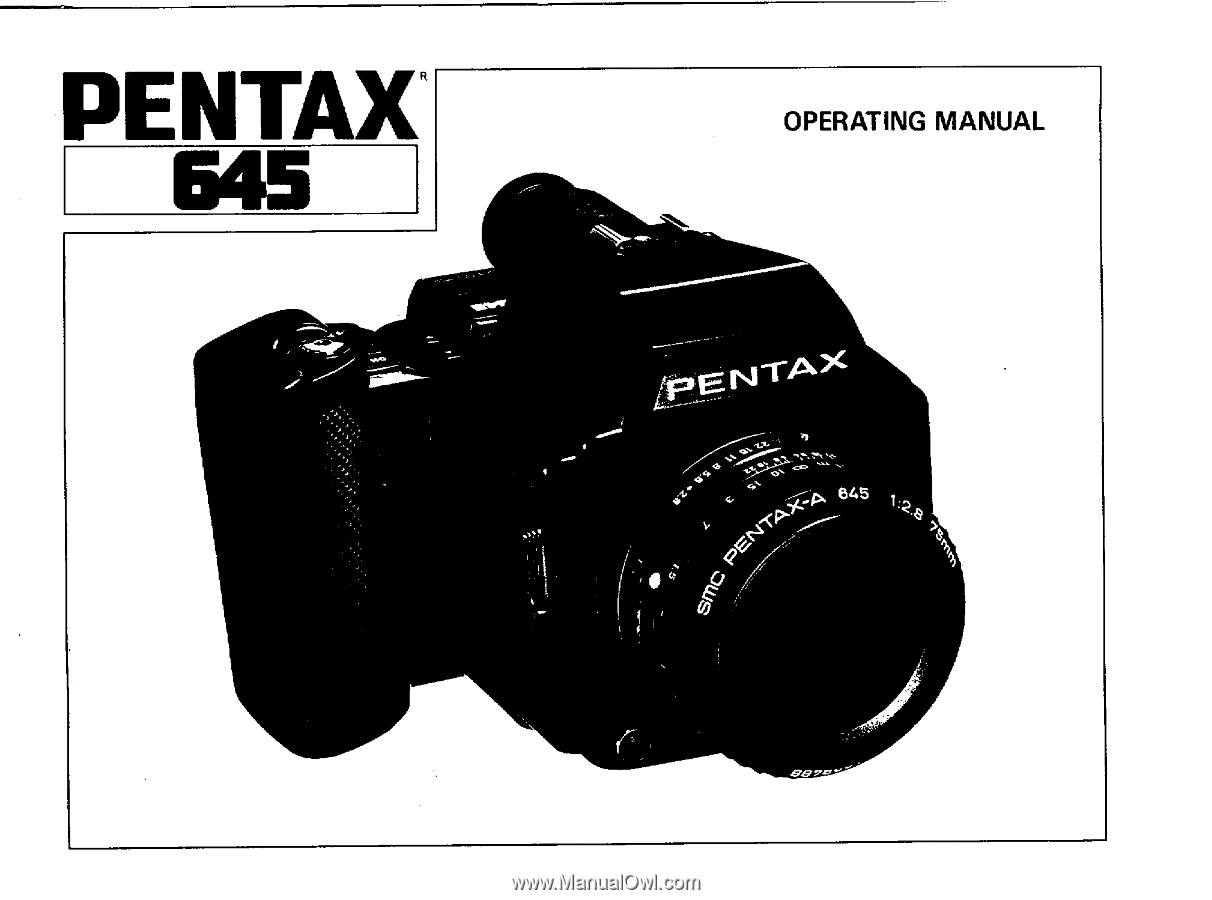
PENTAX 646 OPERATING MANUAL f E.NTA 545 12. > 6. ) o - Pentax 645 | 645 Manual - Page 2
with Medium Picture Format ! The Pentax 645, our latest development in the area of the medium format SLR, promises a superior 6 x 4.5cm result with 120/220 or 70mm film. Made possible through our vast experience and technology accumulated over the years, the new multi-mode 645 camera allows - Pentax 645 | 645 Manual - Page 3
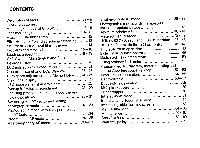
645 Lens mounting/interchange Attaching Shoulder Strap Film Holders 645 and attaching/detaching Shutter release without film in camera Problems support 60 Infrared index mark 61 Interchanging focusing screens 62 Interchangeable focusing screens 63 Manual film wind 64-65 Maintenance 66-67 - Pentax 645 | 645 Manual - Page 4
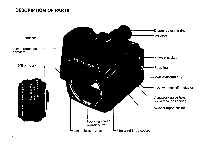
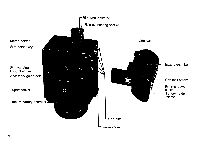
contacts 645 A mount - • • E-e •~ • • I 2 Diopter adjusting ring Eyepiece r4, ' 4'14/ 3c I X-synch socket Strap lug Multi-exposure ring "Shutter cocked" indicator Accessory guide hole for vertical positioning Vertical tripod socket Focusing screen release button Lens release button Film - Pentax 645 | 645 Manual - Page 5
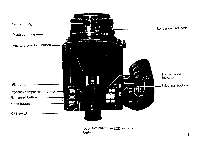
ring Diaphragm ring Aperture auto lock button I'd, Sy. "a& ti IC 15 3 7 1.5 72 IC 11 8 5.1 .21 inn se Lens alignment node LED button Exposure compensation button Film speed button Mode button C/ S switch 545 LCD illumination 4-- LCD window button Film advance indicator Selecting buttons 3 - Pentax 645 | 645 Manual - Page 6
Memo holder Film holder key Film winding knob chamber Accessory guide hole Tripod socket Lithium battery chamber 4 Film type indicator Grip connecting socket Grip 645 Grip pins Preview lever Battery chamber Grip lock screw External power socket Battery holder release - Pentax 645 | 645 Manual - Page 7
Shutter release button Main switch Grip holes - Grip connecting plug Spool retainer__ Start mark-, Film wind gear - Spool key Contacts Pressure plate 5 - Pentax 645 | 645 Manual - Page 8
INSERTING BATTERIES (GRIP 645) BASIC PREPARATION x 4 Use six AA batteries of the types mentioned below in accordance with the instructions on the battery case; • Manganese batteries • Alkaline batteries • Ni-Cd rechargeable batteries (a charger needed) ( New batteries are packed at the time of - Pentax 645 | 645 Manual - Page 9
645 5 A common battery source is used for LCD display and motor drive new ones. • Remove batteries when not using your equipment for a long time. Batteries may cause serious damage. • Never throw used batteries into fire since they may explode, soon as batteries are brought back to room temperature. Keep - Pentax 645 | 645 Manual - Page 10
GRIP 646 Confirm that the main switch located on the grip has been turned to OFF position. Removal: 1. Using a coin or similar tool, completely loosen the grip lock screw by turning the same in the directiorr opposite the same out to the side. The grip will come away from the camera body. 8 - Pentax 645 | 645 Manual - Page 11
the grip lock screw. As indicated in the photographic illustration, align grip holes on the grip with the corresponding pins on the side of the camera. 2. Push up the grip until it engages with an audible click, signifying correct contact. 3. Turn the grip locking screw located on the bottom, in - Pentax 645 | 645 Manual - Page 12
to remove it. 2. To mount the lens, align red dot (A) found on the camera body with red dot (B) on the lens unit, then seat the lens mount into the camera mounting. Turn clockwise until the lens locks with a click. The procedure (C) illustrated is recommended in mounting lenses in a dimly lit area - Pentax 645 | 645 Manual - Page 13
bodies and finger marks from accidentally gathering on the lens itself. Note: Particular care must be taken in preventing damage or staining of the electrical contact points on the mount surface of the lens. A clean, dry cloth should be used to immediately wipe off any grease or accidental stains - Pentax 645 | 645 Manual - Page 14
Strap clasp Fastener For carrying convenience, a shoulder strap can be attached to the camera by the lugs provided. 1. As illustrated, release lock by depressing the lock plate of the fastner in the direction of the arrow, using a coin. 2. Fit the strap lug into the opening of the fastner with its - Pentax 645 | 645 Manual - Page 15
audible click, permitting the film holder to be serious damage. removed from the camera body. 1. Align the red dots on the film holder and film Refer to the 70mm film holder operating manual holder key as shown, then insert the film holder for its use. into the camera chamber. Make sure that - Pentax 645 | 645 Manual - Page 16
film in the camera, remove the film holder or fix the rear body cap. The lens can be removed without affecting shutter release operation. However, such operation is not possible if the film holder without film problems. 2. With the film holder Cap 645 is attached in place of the film holder - Pentax 645 | 645 Manual - Page 17
PROBLEMS AND REMEDIAL SOLUTIONS • Under thd following conditions, camera's film chamber. 4. The available film frames have been completely exposed. 5. During photographic operations. • Should the exposure counter not register "1" or should a non-A lens be used even if the film be loaded in the camera - Pentax 645 | 645 Manual - Page 18
, foreign bodies or film residues collect on the film holder or within the film holder chamber of the camera body, they may inadvertently register photographically; clean them off carefully to prevent problems. Should film residue or dust collect at the contact point (for film detection) located on - Pentax 645 | 645 Manual - Page 19
BASIC OPERATION 17 - Pentax 645 | 645 Manual - Page 20
) connected with the camera body. If the power source connection is done after the film exchange, the camera's shooting functions work properly the spool retainer. [While loading a roll of film, securely hold onto the roll to prevent the backing (paper) from loosening. Carefully tear off the tape - Pentax 645 | 645 Manual - Page 21
last frame(s) 6. While firmly holding the wound film roll, on the roll. Then attach the holder to the camera remove it after pushing the spool retainer body according to the holder attaching/detaching out. Using the paper seal on the back of instructions. Refer to p. 20 - 43 for shooting. the - Pentax 645 | 645 Manual - Page 22
RELEASE BUTTON Lo2J IN • 000 The Pentax 645 incorporates a motor drive unit, permitting either release button, the motor will halt after winding the film to the next frame. 20 • Main switch and indicator to appear in the viewfinder of the camera; further pressure on the button will release the - Pentax 645 | 645 Manual - Page 23
be automatically wound up to the first frame. 15 frames can be exposed using a 120 film roll and 30 exposures with a 220 film roll. • When the 6-exposure 120 film is used with your camera, you can take about seven pictures. And, the shutter and the exposure counter LCD continue to work until about - Pentax 645 | 645 Manual - Page 24
NNW 5 LCD illumination button 8 LCD exposure count 7 Exposure compensation LCD 6 LCD mode indication When you practice setting photographic mode, shutter speed or f/stop without the film holder, attach Rear Body Cap 645 in place and release the shutter once before commencing practice. 22 - Pentax 645 | 645 Manual - Page 25
desired photographing mode, shutter speed and aperture value; to adjust the film speed; and to set exposure compensation. Even when film is loaded in the camera, it is not possible to operate mode button or selecting buttons unless the film counter is set to the frame number ready for shooting, viz - Pentax 645 | 645 Manual - Page 26
ISO 6 and 6400. By continuously maintaining the selecting button pressure, the changes will keep on. The "ISO" designation is identical with the "ASA" film speed information. "up" button "down" button towards higher ISO towards lower ISO • • Lti . A El t let I Tear off the top cover of the - Pentax 645 | 645 Manual - Page 27
art - Pentax 645 | 645 Manual - Page 28
VIEWFINDER DISPLAY Shutter inform = " 6 6 • - Pentax 645 | 645 Manual - Page 29
- Pentax 645 | 645 Manual - Page 30
EYECUP 645 1"" , • • 1 Two types of eyecup, a standard and another largersized one are provided as accessories; they may be utilized according to a larger eyecup, first remove the standard eyecup, matching the eyecup pin with the fitting eyepiece hole. 3. The larier e ecu • should b II I • • - Pentax 645 | 645 Manual - Page 31
equipped with a diopter adjusting ring. Accurate focusing of the viewfinder image becomes possible only with the diopter adjusting operation. 1. As visual requirements, avoiding adjustments during picture taking. 2. To adjust diopter, as illustrated, direct the camera to face a bright/plain color - Pentax 645 | 645 Manual - Page 32
case of the matte surface, focusing should be adjusted until the image becomes sharp and crisp. At times, when the maximum aperture of the lens in use is limited in f/stop capability (less than f/5.6; example, f/8), the split-image or microprism collar may not render a satisfactory focusing view. In - Pentax 645 | 645 Manual - Page 33
HOLDING POSITIONS It is important that the camera be held correctly to minimize camera shake, which can result in blurred pictures. It is suggested that the Pentax 645 be handled for familiarization prior to actual use. Basically, two methods of camera holding as illustrated, are recommended; both - Pentax 645 | 645 Manual - Page 34
lock button "A" (auto) Up button Switching to "A" (Auto) To set the lens aperture ring to the "A" (Auto) position, align the ring's aperture - "A" can be set depending on the position of the aperture ring: L S a • t 645 40 016 "I 4) 1 I riP Down button Mode button 32 "A" (auto) Respective f/ - Pentax 645 | 645 Manual - Page 35
the picture, using the Metered manual the aperture range of the lens in use. Aperture set to the "A" camera's exposure control circuitry. Aperture set to each f/stop and also at the time of blank exposures: 8 I I :coo I Auto F - = B (Bulb) =60 (1/60 sec., fixed) (up button) = Metered manual - Pentax 645 | 645 Manual - Page 36
MODE • • • Ca! Li "!. E •• • OFT _ Programmed AE The Pentax 645 has been designed to control the f/stop and the shuter speed, which automatically vary "Auto" and "P" are displayed on the external LCD window. The camera mode can be switched to the Programmed AE by depressing the selecting - Pentax 645 | 645 Manual - Page 37
the shutter speed and f/stop automatically programmed by the camera circuit. Additional pressure will release the shutter, enabling coupling range of the Programmed AE mode. It may be remedied by either using a slower speed film or employing an ND filter available on the market. -F= ps E ( - Pentax 645 | 645 Manual - Page 38
APERTURE-PRIORITY AE MODE 1 I • • • [ L ' J Aperture-priority AE Predetermine the f/stop to meet with a given photographic situation; the shutter speed will automatically adjust itself and provide the proper exposure in line with the subject's brightness. This method is ideally suited whenever - Pentax 645 | 645 Manual - Page 39
III_:11: 1:1 I LI 3. After turning on the main switch, the LED displays of the shutter speed and f/stop will visually appear within the viewfinder by a slight depressing of the shutter release button; additional pressure upon the shutter will cause the same to release for shooting. Visual warnings - Pentax 645 | 645 Manual - Page 40
of a desired shutter speed will vary the aperture value automatically according to the subject's brightness. Proper exposure is controlled through the camera's AE capability. In addition to general photographic requirements, this mode is recommended for fast-moving subjects as found at sports events - Pentax 645 | 645 Manual - Page 41
3 I_ I Li CI CI 3. Turn on the main switch. By slightly depressing the shutter release button, the shutter speed and aperture value are indicated by the LED within the viewfinder. Additional pressure will cause the shutter to release, thus completing exposure. Visual warnings during Shutter- - Pentax 645 | 645 Manual - Page 42
APERTURE-PRIORITY AE MODE 1 • I /Lt. PHOTOGRAPHIC MODES WITH THE APERTURE SET AT APPROPRIATE f/STOPS • • 1.7 ft Aperture-Priority AE mode Metered manual mode 60 (1/60 sec., fixed) B (Bulb) 40 Aperture-priority AE The Aperture-priority AE control is possible by adjusting the aperture ring to - Pentax 645 | 645 Manual - Page 43
2 2. Rotate the aperture ring to select the desired f/stop. Turn on the main switch; a slight depressing upon the shutter release button will cause the LED indication of the shutter speed to appear in the viewfinder. Additional pressure on the button will release the shutter to photograph the - Pentax 645 | 645 Manual - Page 44
, the photographer is able to control the exposure value (over/under exposure) as may be required for his photographic purposes. 1. When using this Metered manual mode, the shutter speed is indicated in the external LCD window. In switching from another mode, depress the selecting button ("up" or - Pentax 645 | 645 Manual - Page 45
of the ±3 steps. Then, having completed your own exposure determination, release the shutter to take the photograph. Visual warnings during Metered manual mode Excessive "over/under exposure" will be indicated in the viewfinder in the following manner: es 1_ "."3; 133 I I es 1 1 '3 -3 (flow - Pentax 645 | 645 Manual - Page 46
the 1/60 sec. flash synchronization mode. Although 1/60 sec. may be used for general photography without flash, there is no exposure meter indication. 1. unit.) When utilizing the Pentax 645 and a flash unit via a synch cord as illustrated, connect the cord to the camera's X-synch socket. The - Pentax 645 | 645 Manual - Page 47
or a cable release (available optionally) be employed to prevent possible camera shake. The Cable Switch A or a cable release may be easily screwed into the shutter release button. Time exposures are made simple through the use of the Pentax Cable Release 50. Cable Release 30 is not recommended for - Pentax 645 | 645 Manual - Page 48
, the camera's flash coupling capability will fail to function. A dedicated flash unit, when used with the Pentax 645, may not film plane while photographing. When the Metered manual mode is used, synchronized flash photography is possible at shutter speed at 1160 sec or lower. indicates Pentax - Pentax 645 | 645 Manual - Page 49
Of AF200SA O I A F200T P .ENTAX PE NJ -FAX PEN -FAX 0 A F280T A F080C A F400T 47 - Pentax 645 | 645 Manual - Page 50
AF080C ring flash). With a film of a different speed, the f/stop will automatically change. However, the maximum flash-to-subject distance will remain unchanged. Refer to the operating manual of your flash unit. The standard 75mm f/2.8 lens is the only one that can be used with the AF080C Ring Light - Pentax 645 | 645 Manual - Page 51
a Pentax dedicated film) AF200T AF280T AF400T Red Green Yellow f/2.8 F/4 f/4 f/5.6 f/8 f/8 - - f/11 (With ISO 100 film guide found on the flash unit. • With a dedicated auto flash unit, the completion of the charging automatically adjusts the shutter speed to 1/60 sec. (In metered manual - Pentax 645 | 645 Manual - Page 52
mode selector to MS (Manual synch.) or to the M (Manual) position utilizing a of dedicated auto flash unit in use. It is recommended that the flash unit instructions be read and followed for optimum be kept ON, the power source timer for the camera's exposure meter will be kept turned ON. Once the - Pentax 645 | 645 Manual - Page 53
using a clip-on type flash unit equipped with a hot shoe bracket, attach the same directly onto the hot shoe of your Pentax 645. Should a cord be required for flash/camera B. For detailed use of flash units, flash guns or flash bulbs, refer to the operational instructions on the respective units. 51 - Pentax 645 | 645 Manual - Page 54
PROGRAMMED AE DIAGRAM, METER COUPLING AND SHUTTER/APERTURE COUPLING RANGE .NN'N ...NN.Nre..N.. Ocu. t of Shutter/Aperture upling range 16 NN. 1 'N '\ 4 8 15 8 4 Shutter speed .N...1 S tie Ape Lure nd ter up 9 rte ge Ns. '1, \ , .0 2 50 500 1000 gut Shutter/Aperture o in, nge Out of Meter - Pentax 645 | 645 Manual - Page 55
Programmed AE Diagram The Pentax 645's shutter/aperture combination in the Programmed AE mode is shown in the chart. The green line represents the variation of shutter speed and aperture combination with the standard 75mm f/2.8 lens (w/ISO 100 film). Note that only the shutter speed slows down after - Pentax 645 | 645 Manual - Page 56
• • • ;sS''ttIill 1. 1 'VP Automatic exposure cameras tend to underexpose backlit subjects and to overexpose spotlighted subjects appearing against a dark background, the -1, -2, or -3 compensating controls are used. The compensating controls are operated by depressing the selecting button ("up - Pentax 645 | 645 Manual - Page 57
will also be seen. Return to "0" position immediately following use. Exposures may be compensated automatically by adjusting the shutter speed in and the programmed value in the Programmed AE. When photographing in Metered manual mode, the correct exposure sign 'Oh ' must be first obtained, - Pentax 645 | 645 Manual - Page 58
; as the focal length of a lens becomes shorter; or the camera-to-subject distance is extended further back. By varying the f/stop, the range "in focus" will change accordingly, allowing the creating of different photographic effects in your pictures. As illustrated in the pictures on the right page - Pentax 645 | 645 Manual - Page 59
f/2.8 [2.83 - 3.20m] ft rn co to 15 1- 22 1881 318 P 22 16 11 8 5.6 .2.8 1.5 4 f/22 [2.04 - 5.82m] r- i.,.., , r rsv 17,-..,eve_l_11St149ed I. ft m a) 10 15 3 1T 1.5 22 4Iiltiltle tat. . • A 22 16 11 8 5.6 .2.8 57 - Pentax 645 | 645 Manual - Page 60
the viewfinder. The aperture will ri return to maximum when the preview lever is released. The depth-of-field cannot be confirmed while the lens is set to "A". Note: Exposure value measured during preview may register incorrectly. While depth of field is being previewed, the shutter cannot be - Pentax 645 | 645 Manual - Page 61
. In this case, turn off the main switch, take out the film holder once and cancel the multi-exposure ring setting. Then, newly start the correct procedure. Set the C/S switch to S position when using the multiple exposure. M.E. = Multiple Exposures Multiple exposure operational sequence: 1. Set the - Pentax 645 | 645 Manual - Page 62
TRIPOD SUPPORT When photographing at slower shutter speeds, the use of tripod and cable release is suggested to prevent possible camera shake. As illustrated, the Pentax 645 has been provided with two tripod sockets for vertical and horizontal format positioning of the camera. In both positions, the - Pentax 645 | 645 Manual - Page 63
ring until the distance setting aligns with the red infrared index marking (red line). The picture shows an example where the camera-to-subject distance is set at infinity (co). For exposure control required in infrared photography, refer to the instructions contained in the film package. 61 - Pentax 645 | 645 Manual - Page 64
body and turn off the main switch. 1. As seen in the photo, firmly hold the camera with the lens mount facing up, and slide the focusing screen release button in the direction of the arrow, using the tweezers supplied with the new focusing screen set. 2. The focusing screen will release together - Pentax 645 | 645 Manual - Page 65
for the central spot (11mm diameter) is covered by the fresnel lens, and has been designed for the slower speed lenses with a maximum aperture smaller than f/6.8; situations under which microprism LAJ and split-image areas are not clearly defined in focusing. UG-20 Section-line Matte - Pentax 645 | 645 Manual - Page 66
is fixed at the 1/50 sec. only. 1. Turn the film wind knob located at the bottom of the Pentax 645 counterclockwise using a coin or a similar tool, and remove it. 2. Thread the manual film wind knob into the small screw opening provided on the camera body, 64 and firmly tighten the screw knob with - Pentax 645 | 645 Manual - Page 67
wound up on the spool. After completing film winding operation keep the film winding knob at the bottom of the camera body. Notes: • Should the knob be accidentally turned counterclockwise while you are winding manually, light leakage on the exposed film may occur through the fine slit of the - Pentax 645 | 645 Manual - Page 68
.645 is a precision instrument. Please read the following instructions concerning handiling/maintenance. • Do not drop or strike the camera against solid objects. In the event the camera may have sustained a heavy blow or shock, it is recommended that it be taken to an authorized Pentax service - Pentax 645 | 645 Manual - Page 69
. If you have not used your camera over a long period of time, or when important pictures are planned on an assignment, a pre-check of the operating parts and/or trial shooting is suggested. • Non-dedicated lenses or accessories used in conjunction with the Pentax cameras may cause malfunctions and - Pentax 645 | 645 Manual - Page 70
Selection Via Mode setting buttons and Aperture ring of 645 lenses. Film 120 film 115 exposures), 220 film 130 exposures) and 70mm roll film (about 90 exposures) Picture Size 56 x 41.5 mm Lens Mount Pentax 645 A mount (with electronical contacts) Shutter Electronically-controlled vertical-run cloth - Pentax 645 | 645 Manual - Page 71
life 5 years. (Replaced at Pentax service center). Size and Weight 147 (W)x 109 (H) x 117mm (D), 1.320g, 5.7" (W) x 4.3" (H) x 4.6" (D), 46.2 oz. (with grip and film holder without lens) Accessories Large eyecup 645, Body mount cap 645, Rear body cap 645 and Strap B. SPECIFICATIONS ARE SUBJECT - Pentax 645 | 645 Manual - Page 72
cost to you within that period, provided your camera has not been abused, altered, or operated contrary to instruction. Because the tolerances, quality, and design compatibility of lenses other than Pentax lenses are beyond our control, damage caused by use of such lenses will not be covered by this - Pentax 645 | 645 Manual - Page 73
to the manufacturer. Always obtain a quotation of the service charge, and only after you accept the quoted service charge, instruct the service station to proceed with the servicing. This warranty policy does not apply to Pentax cameras purchased in the U.S.A., U.K., or Canada. The local warranty - Pentax 645 | 645 Manual - Page 74
FOR YOUR MEMO. 72 - Pentax 645 | 645 Manual - Page 75
11-1, Nagata-cho 1-chome, Chiyoda-ku, Tokyo 100, JAPAN Pentax Europe n.v. Weiveldlaan 3-5, 1930 Zaventem, BELGIUM Pentax Handelagesellschaft mbH. Julius-Vosseler-Strasse, 104, 2000 Hamburg 54, GERMANY Pentax U.K. Limited. Pentax House, South Hill Avenue, South Harrow, Middlesex HA2 OLT, U.K. Pentair
-
 1
1 -
 2
2 -
 3
3 -
 4
4 -
 5
5 -
 6
6 -
 7
7 -
8
-
9
-
10
-
11
-
12
-
13
-
14
-
15
-
16
-
17
-
18
-
19
-
20
-
21
-
22
-
23
-
24
-
25
-
26
-
27
-
28
-
29
-
30
-
31
-
32
-
33
-
34
-
35
-
36
-
37
-
38
-
39
-
40
-
41
-
42
-
43
-
44
-
45
-
46
-
47
-
48
-
49
-
50
-
51
-
52
-
53
-
54
-
55
-
56
-
57
-
58
-
59
-
60
-
61
-
62
-
63
-
64
-
65
-
66
-
67
-
68
-
69
-
70
-
71
-
72
-
73
-
74
-
75
 |
 |
PENTAX
646
OPERATING
MANUAL
f
E.NTA
545
12.
>
6.
)
o