Pentax Espio Espio Manual
Pentax Espio Manual
 |
View all Pentax Espio manuals
Add to My Manuals
Save this manual to your list of manuals |
Pentax Espio manual content summary:
- Pentax Espio | Espio Manual - Page 1
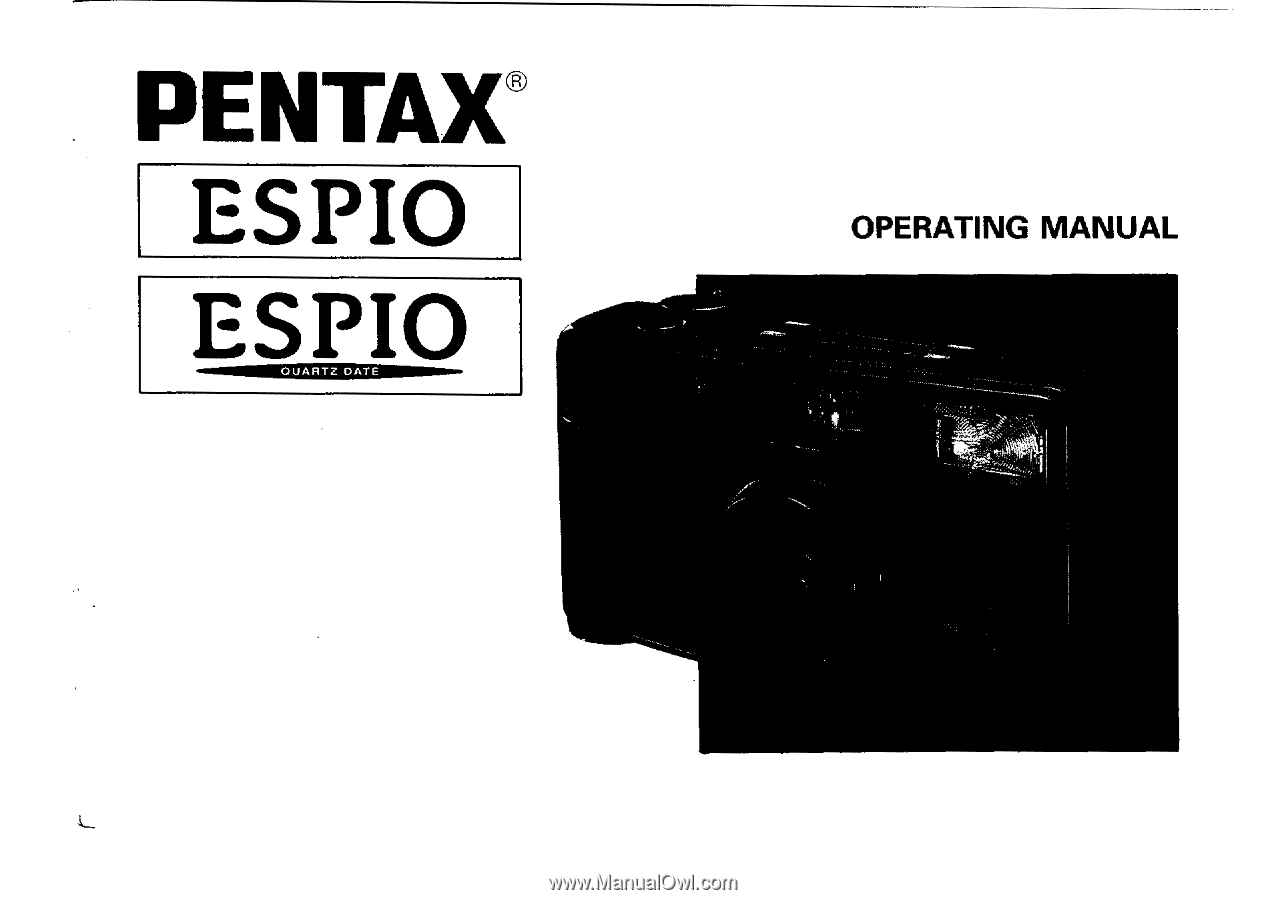
PENTAX® ESPIO ESPIO OPERATING MANUAL - Pentax Espio | Espio Manual - Page 2
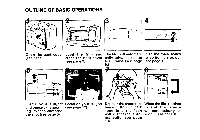
OUTLINE OF BASIC OPERATIONS 3 I I 4 1 Open the back cover Load the film and The film will automati- Push the main switch (see page 8). close the back cover cally advance to the to switch on power (see page 9). first frame (see page (see page 4). 9.) 7 8 e •l Frame your subject Focus on - Pentax Espio | Espio Manual - Page 3
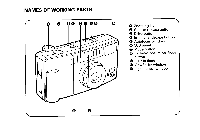
NAMES OF WORKING PARTS r 0 0 00 , ( o 0 0 Zooming lever O Shutter release button O Drive button O Infinity-landscape button O Autofocus window O LCD panel 0 Mode button O Red-eye reduction flash button O Built-in flash OtiD Viewfinder window Light sensor window } - Pentax Espio | Espio Manual - Page 4
Congratulations on your purchase of Pentax ESPIO and welcome to the world of Pentax zoom compact photography! Your compact, it easy to remember the dates when you took pictures. • Please read this manual carefully before operating the camera to take consistently superior pictures. • Pay special - Pentax Espio | Espio Manual - Page 5
vibrations, shock or pressure. • Do not apply force to the zoom lens; do not place the camera with the lens facing down. • Never attempt to manually open the lens cover: it will automatically open and close as the main switch is turned on and off. • Make sure not to obstruct the - Pentax Espio | Espio Manual - Page 6
27 Infinity-landscape shooting 28 Date model 30 MAINTENANCE CONSIDERATIONS Battery exhaustion warning 32 Installing/Replacing the battery 33 Taking care of your camera 34 Troubleshooting 36 Specifications 38 Warranty policy 40 LCD panel Back foldout - Pentax Espio | Espio Manual - Page 7
PREPARATIONS BEFORE TAKING PHOTOGRAPHS You should be aware of certain fundamentals to make it easier to use this camera in the best way. 1. STRAP ATTACHMENT An% Fit the strap on the camera as illustrated. Use the clamp's protrusion to depress the ADJUST button on the date model. • To prevent the - Pentax Espio | Espio Manual - Page 8
2. MAIN SWITCH AND BATTERY CHECK it5 O,tc/) 1-7.n D Main switch To switch on, push the main switch button. The lens extends slightly to the wide-angle 35mm setting and LCD panel is on. To switch off, push the main switch button again. Make sure the camera is switched off when not in use. • Use one - Pentax Espio | Espio Manual - Page 9
much force is applied, the camera is likely to shake, and the picture will be blurred.) Try to brace your elbows against your body, or support yourself and the camera against a stable, stationary object, such as a wall. When using the flash with the camera positioned vertically, hold the camera so - Pentax Espio | Espio Manual - Page 10
4. OPERATING 35-70 mm ZOOM LENS C- Ln When you move the zooming lever to the right ( the lens moves towards the 70mm telephoto setting and frames the subject - Pentax Espio | Espio Manual - Page 11
TAKING PHOTOGRAPHS After familiarizing yourself with operations on the camera by reading this instruction manual, you're ready to insert the film. Notes: • When buying DX-coded films, make sure the package bears the "DX" mark. • Non-DX coded film - Pentax Espio | Espio Manual - Page 12
film leader end mark 0. Notes: • Make sure not to touch the lens with your fingers. • Make sure the film is placed properly be- tween the guide rails 0. • If there is dirt on the film detection section 0, film cannot be wound properly. X Slack NO! C Flat YES! 8 - Pentax Espio | Espio Manual - Page 13
r 4 After the back cover is closed, the film automatically advances to the first frame. * Even if no film is loaded, the motor operates for a second or two after the back cover is closed. 5 When ( / ) appears in the exposure counter on the LCD panel, the film automatically stops winding. The - Pentax Espio | Espio Manual - Page 14
3. VIEWFINDER DISPLAYS AND SHOOTING RANGES 0 0 0 First, switch on power by depressing the main switch button. O Autofocus frame 0 Focus on the subject with this frame. O Close distance compensation frame When the camera-to-subject distance is between 0.6m (2ft) and 1m (3.3ft), compose the - Pentax Espio | Espio Manual - Page 15
4. GREEN/RED LAMPS 5. ORDINARY PHOTOGRAPHY When you de- press the shut- Iv to AF O ter release button halfway, the lamps 0 and/or 0 light up or blink as shown at left. • Green lamp: When the subject is in focus, it will light up to indicate that you can take the picture; when the subject is - Pentax Espio | Espio Manual - Page 16
6. TAKING PICTURESShooting distance: 0.6inl2ft) -oo(Infirdty) ( "N t _. -0-- - --. s / A.AF\ 1 Composing the shot After zooming the lens and composing your shot, focus on the subject with the autofocus frame in the center of the viewfinder. 2 Checking the lamp indication Depress the shutter - Pentax Espio | Espio Manual - Page 17
0 O 3 Shooting Depress the shutter release button fully, and the shutter will release. Then, the film automatically advances to the next frame. Notes: • When the shutter is released, the self-timer lamp lights up momentarily to indicate that a picture has been taken. • If you wish to focus on - Pentax Espio | Espio Manual - Page 18
7. FOCUS-LOCK SHOOTING 0 6 If you shoot without positioning the autofocus frame ([ ]) on the main subject of the picture as shown above, only the background will be in focus. When the main subject is off the autofocus frame in the center of the viewfinder, use the focus-lock technique. ( Focus- - Pentax Espio | Espio Manual - Page 19
3 While depressing the shutter release but ton halfway, re-aim the camera or recompose the picture, then release the shutter. Note: • You can release focus-lock simply by lifting your finger off the shutter release button. Hard-to-autofocus subjects Like many other autofocus cameras, the camera's - Pentax Espio | Espio Manual - Page 20
(Be sure to remove the film from the camera in 8. UNLOADING FILM the shade or by using your body to shade the camera.) r -P•IM•• L 0 • • •• •. r 4 • • Lt.•..• • • 1 Rewinding the film After you have exposed the last frame of the roll, the film rewinds automatically. Then, the motor stops, - Pentax Espio | Espio Manual - Page 21
• . • O 0 ODD 0 Rewinding a film in mid-roll If you wish to unload a film before exposing all the frames, follow the procedures as follows. 1 Turn the main switch ON and keep the drive button depressed for more than 3 sec., the rewind mode will be set and the ( 20 1) ) mark appears on the LCD - Pentax Espio | Espio Manual - Page 22
Self-Time Shooting 18 UJ Dual-Frame Self-Timer 4 Auto telewide selftimer Consecutive Shooting tEl MultiExposure Shooting IT INT SO nterval Shooting (3 minutes) 4 Interval Shooting (60 minutes) - Pentax Espio | Espio Manual - Page 23
BULB,BULB-SYNCHRO SHOOTING Bulb mode '4) Lei (B) Depress the mode button until ( B) ap- pears on the . LCD panel. The shutter remains open as long as the shutter release button is held down. This mode is useful for long exposures re- quired for shooting fireworks and night ^:1.11111111 - Pentax Espio | Espio Manual - Page 24
Backlight Compensation Portraits with a • 1_41) window, blue sky or other s-t41.* , bright background often results in underexposure because the exposure is auto- matically set for the background. Backlight Compensation makes good use of natural lighting to improve the balance of light - Pentax Espio | Espio Manual - Page 25
TAKING PICTURES AT SLOW SHUTTER SPEED Slow Shutter Speed (Flash- OFF) Depress the mode button until the (El ®) symbol appears on the LCD panel. In this mode, the flash does riot discharge, and a picture is taken at a slow shutter speed up to approx. 1/5 second. Use it in places where using flash is - Pentax Espio | Espio Manual - Page 26
DAYLIGHT-SYNCHRO SHOOTING Depress the mode button until the ( ) appears on the LCD panel. The flash will discharge both in dark and bright conditions. When a portrait is taken with the subject in a backlit situation, the front of your subject may be cast in shadow. In such a case, use the Daylight- - Pentax Espio | Espio Manual - Page 27
SELF-TIMER PHOTOGRAPHY Self-Timer Use the selftimer if you wish to get in the picture. Use of a tripod is recommended. Depress the drive button until the ( appears on the LCD panel. Dual-Frame Self-Timer In this mode, i6)Sy you can take two consecutive self-timer pictures. Depress the drive button - Pentax Espio | Espio Manual - Page 28
Auto Tele-Wide Self-Timer Two consecutive self-timer pictures can be taken: The first at a selected focal length; the second at the 35mm focal length. Depress the drive button until the ( UJ ) appears on the LCD panel. Move the zooming lever to determine the first shot's focal length, and focus on - Pentax Espio | Espio Manual - Page 29
CONSECUTIVE PHOTOGRAPHY Depress the drive button until the ( i ) sym- bol appears on the LCD panel. While the shutter release button is held down, a frame is shot every 1.3 sec. • The camera focuses on the subjects frame by frame in this mode, so make sure to keep the autofocus frame on the - Pentax Espio | Espio Manual - Page 30
MULTI-EXPOSURE SHOOTING • Multi-Exposure mode will disengage the film advance, letting you superimpose images on a single frame for fantastic illusions. Your imagination can produce striking creative effects. 26 Procedure 1. Depress the drive button until the symbol ( appears on the LCD panel. - Pentax Espio | Espio Manual - Page 31
drive button until the ('5T ) or ( o ) symbol appears on the LCD panel. • This mode allows you to shoot with an interval of 3 minutes ( ) or 60 minutes ( )• 2. Depress the shutter release button fully; the first frame will be exposed 3 seconds later. Then the rest of the film will be automatically - Pentax Espio | Espio Manual - Page 32
INFINITY-LANDSCAPE SHOOTING ..1101/404* * After the picture is taken by depressing the shutter release button fully, this mode is canceled. However, if this mode is used in • combination with the consecutive-shoot- ing mode, it is not canceled as long as the shutter release button is - Pentax Espio | Espio Manual - Page 33
29 - Pentax Espio | Espio Manual - Page 34
DATE MODEL Wfi i O If you purchased the DATE model, read this section. The DATE model records dates up to the year 2019 on pictures. O MODE button O SELECT button • ADJUST button Switching the Mode At each press of the MODE button °with your finger nail, the mode in the LCD panel switches as shown - Pentax Espio | Espio Manual - Page 35
Correcting the date 1. Depress the SELECT button (9 to make a different category of digits in the LCD panel you want to change to blink. 2. Depress the ADJUST button ID to change digits of the specified category you chose with the SELECT button Q. Digits increase by one each time you depress the - Pentax Espio | Espio Manual - Page 36
-exposure film rolls): Approx. 15 rolls Ordinary picture taking mode, 50% of shooting employs flash (The CR123A battery was used under the Pentax testing conditions. Actual battery life/ performance may vary drastically on either usage of Auto-Focus, Power Zoom and Flash and external conditions such - Pentax Espio | Espio Manual - Page 37
INSTALLING/REPLACING BATTERY Use one 3V lithium battery (CR-123A or DL-123A) 1 2 O9 Q Make sure that the power is off before installing or replacing the battery. 1 Open the battery chamber cover by pulling the cover lock in the direction of the arrow as shown. 2 Insert one lithium battery as - Pentax Espio | Espio Manual - Page 38
contact. Also check for battery leakage, traces of dirt or grease, or corrosion due to salinity or gas. If you cannot correct the problem, have your camera inspected at a Pentax service center. Repairs of this nature are not covered under the terms of the warranty and charges may be assessed. - Pentax Espio | Espio Manual - Page 39
shoot with it. • Repairs made necessary due to usage of this product in an industrial application may not be covered under the terms of the Pentax warranty. Red-eye phenomenon in flash shooting When a picture is taken using a flash, a subject's eyes may appear red in the print. This phenomenon is - Pentax Espio | Espio Manual - Page 40
TROUBLESHOOTING What appears troublesome may be easily remedied. Here are some problems that may occur and their remedies. Symptoms Causes and Romano* 1. The shutter cannot be released. • Is the main switch turned off ? If so, turn it - Pentax Espio | Espio Manual - Page 41
Symptoms Causes and Remedies ' 4. The [H] or [U] mark is displayed • If either mark disappears when the zoom lever is moved, on the LCD panel. the camera is ready for use. The camera may be defective if either mark appears often. The correct camera-to-subject distances when shooting using - Pentax Espio | Espio Manual - Page 42
frame numbers in ascending order when shooting, and descending order when rewinding. Lens: Pentax power zoom 35-70mm f/4.3-8.0 8 elements in 7 groups, Angle of view: 63°34.5° Focusing system: Pentax infrared active autofocusing with focus lock, Range: 0.6m (2ft) - infinity, Infinity-landscape mode - Pentax Espio | Espio Manual - Page 43
7m(70mm TELE), (ISO100 film used) Flash recycling time: Approx. 5 sec. under the Pentax testing conditions Interval shooting: Electronically controlled, started by depressing the shutter release button: 3 and 60 minutes can be selected for interval time Power source: One 3V lithium battery (CR-123A - Pentax Espio | Espio Manual - Page 44
replacement of parts as hereinbefore provided. No refunds will be made on repairs performed by non-authorized Pentax service facilities. 40 Procedure During 12-month Warranty Period Any Pentax which proves defective during the 12-month warranty period should be returned to the dealer from whom you - Pentax Espio | Espio Manual - Page 45
O Backlight Compensation O mode Bulb mode • Multi-exposure Shooting LCD (Liquid-crystal display) • When the LCD is exposed to a high tem- perature of about 60°C, it may blacken, but when the temperature falls, it will return to normal. • The LCD may also slow down in response to lower temperatures - Pentax Espio | Espio Manual - Page 46
NAME OF WORKING PARTS r /1 I lc e,' o \.. ® Flash (Red) lamp e0 Viewfinder eyepiece AF (Green) lamp 0 Main switch 0 Film information window 0 Back cover release lever 0 Battery chamber cover 0 Tripod socket i - Pentax Espio | Espio Manual - Page 47
it directly to the manufacturer. Always obtain a quotation for the service charge, and only after you accept the quoted service charge, instruct the service station to proceed with the servicing. The warranty policy does not apply to Pentax products purchased in the U.S.A., UK. or Canada. The local - Pentax Espio | Espio Manual - Page 48
, 12, rue Ambrotse Croizat 95100 Argenteuil, FRANCE Pentax Benelux Spinveld 25, 4815 HR Breda, NETHERLANDS Pentax (Schweiz) AG Industriestrasse 2. 8305 Dietlikon, SWITZERLAND Pentax Scandinavia AB Falhagsleden 57. 75127 Uppsala. SWEDEN Pentax Corporation 35 Inverness Drive East. Englewood. Colorado
-
 1
1 -
 2
2 -
 3
3 -
 4
4 -
 5
5 -
 6
6 -
 7
7 -
8
-
9
-
10
-
11
-
12
-
13
-
14
-
15
-
16
-
17
-
18
-
19
-
20
-
21
-
22
-
23
-
24
-
25
-
26
-
27
-
28
-
29
-
30
-
31
-
32
-
33
-
34
-
35
-
36
-
37
-
38
-
39
-
40
-
41
-
42
-
43
-
44
-
45
-
46
-
47
-
48
 |
 |
PENTAX®
ESPIO
ESPIO
OPERATING
MANUAL