Pentax MV MV Manual
Pentax MV Manual
 |
View all Pentax MV manuals
Add to My Manuals
Save this manual to your list of manuals |
Pentax MV manual content summary:
- Pentax MV | MV Manual - Page 1
wn PENTAX • '111111I PENTAX \ tif 3 - Pentax MV | MV Manual - Page 2
and produced meticulously to precise Asahi Pentax specifications. Lenses and accessories from other manufacturers are not produced to these precise specifications and, therefore, may cause difficulties with - or actual damage to - a Pentax camera. Asahi Pentax cannot assume any responsibility or - Pentax MV | MV Manual - Page 3
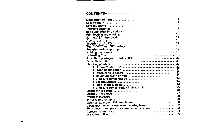
Specifications 4 Lens mounting 6 Inserting batteries 7 Basic operating instructions 8 Film loading and winding 10 Setting ASA film speed 11 Aperture setting 13 Shooting on AUTO 14 The "100X" and "B" settings 16 Focusing and composing 17 Holding the camera 18 Unloading film 19 - Pentax MV | MV Manual - Page 4
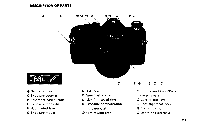
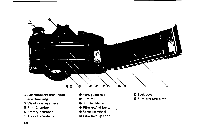
button 0 Exposure mode dial 0 Rapid-wind lever 0 Exposure modes O Hot shoe 0 Auto flash contact O ASA film speed ring Exposure-compensationindicator dial 0 Film rewind crank 0 Film rewind knob/Back cover release CD Lens release lever O Lens alignment node 0 Focusing ring O Depth-of-field scale 2• - Pentax MV | MV Manual - Page 5
19 • 21 0 Aperture/Distance index 0 Aperture ring 0 Viewfinder eyepiece ID Film Chamber 0 Battery chamber 0 Tripod receptacle •3 \\\ 16 0 Film guide rail 0 Film rail 0 Shutter blades 0 Film rewind button 0 Sprocket wheel 0 Film take-up spool 0 Back cover 0 Film pressure plate - Pentax MV | MV Manual - Page 6
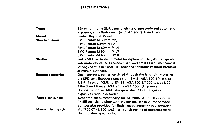
Mount: Standard lenses: Shutter: Exposure metering: Auto flash synch: Manual flash synch: 35mm full-frame SLR camera with aperture-preferred automatic exposure, auto flash synch (with AF 200 S Auto Flash). Pentax Bayonet Mount SMC Pentax-M 50mm f/2, SMC Pentax 50mm f/1.2 SMC Pentax-M 50mm f/1.4 SMC - Pentax MV | MV Manual - Page 7
, 135° advance with 30°rest setting. Rapid rewind crank for speed film rewind. Magic-needle quick/sure loading. Automatic reset, additive type. Two 1.5V Alkaline (LR44) or Silver-oxide (G13) batteries; LEDs double as battery check lamp. Standard camera back with spring catch. 132mm x 84mm x 49 - Pentax MV | MV Manual - Page 8
hand. Depress e the lens release lever while turning the lens counterClockwise with your right hand. NOTE If you have to put the lens down without the rear lens cap, place it only front-elementdown, never front-element-up. When changing lenses outdoors with film in the camera, avoid direct sunlight - Pentax MV | MV Manual - Page 9
into a fire, as it may explode.. Also, keep it beyond the reach of small children. Insertion Open the battery chamber cover with a coin. Insert the two batteries into the battery chamber of the camera as shown above, each with plus mark (+) facing down. For replacement, use Eveready S76E or Mallory - Pentax MV | MV Manual - Page 10
BASIC OPERATING INSTRUCTIONS 1. Load the film into your camera and advance it to the first exposure. (Page 10) 2. Set the ASA film speed. (Page 11) 3. Preselect the aperture. (Page 13) 4 Set the exposure mode dial to AUTO. (Page 14). • 5. Focus and compose the picture by turning the - Pentax MV | MV Manual - Page 11
comes on (i.e., f/8 to f/11, f/16, etc. See Page 14). If the yellow LED comes on: 0 use a wider lens aperture (f/4 to f/2.8, etc.). If the LED still does not change to green, 0 mount the camera on a tripod etc., or Q switch to flash photography (Page 20-21). • When you depress the shutter button - Pentax MV | MV Manual - Page 12
without J removing the lens cap, inordinately long exposures will result, hindering film advance. 2. Open the camera back by pulling up the film rewind knob until the back opens. 3. Place the film cartridge in the film chamber, and push down the rewind knob. Insert the film leader between any of - Pentax MV | MV Manual - Page 13
is ready to be taken. Reset the shutter dial to AUTO. The ASA film speed rating of all 35mm films is given in the data sheet packed with each roll of film. The higher the ASA number, the more sensitive the film is to light. To set the index, lift up the ASA dial 0 and - Pentax MV | MV Manual - Page 14
V 12• - Pentax MV | MV Manual - Page 15
in accordance with the instructions given on the following page. Although the above is all you need to know to obtain better results than you have perhaps ever obtained before with most of your photographs, as you gain more experience you may want to vary the lens aperture for special effects - Pentax MV | MV Manual - Page 16
Pentax MV is designed for use on AUTO. After loading the film battery failure and film wind on. Otherwise, keep the shutter dial set to AUTO once the film is loaded. Exposure Check: After you have set the ASA film /Camera Shake Warning: If the Yellow LED lights, it indicates that the camera has - Pentax MV | MV Manual - Page 17
35 Switch to flash photography - Page 20-21 Because the MV auto exposure system selects the shutter speed for you steplessly between button while the shutter dial is set on AUTO with the lens cap on, or in very poor lighting conditions, the mirror camera may adversely affect the exposure. 1t lx - Pentax MV | MV Manual - Page 18
While the MV is designed almost totally for use on AUTO, two other settings are provided on the exposure mode dial for special shooting situations. "100X" This manual shutter speed setting really need not be used at all if you use the Pentax AF 200S Auto Flash and keep spare batteries on hand - Pentax MV | MV Manual - Page 19
The focusing screen inside the viewfinder of your MV is a split-image type surrounded by a microprism collar. For precise focus, turn the focusing ring of the lens until the two images in the split-image than the center spot when using telephoto lenses having a small maximum aperture. N • 17 - Pentax MV | MV Manual - Page 20
, which does not release the shutter. If you hold your camera with the right hand - the hand that releases the shutter - this may cause camera movement. Often, blurred pictures are due to camera movement. Horizontal position A. Hold the camera firmly with your left hand, and draw your arms close to - Pentax MV | MV Manual - Page 21
the film rewind button p and turn the rewind crank as indicated to rewind the film into its cartridge. Rewind until the tension on the crank lessens, indicating that the leader end of the film has been released from the take-up spool. Pull out the film rewind knob (the back will open automatically - Pentax MV | MV Manual - Page 22
. The camera's exposure mode dial is kept at AUTO because the MV synchronizes automatically at 1/100 sec. when the unit charges via a special auto flash synch contact inside the hotshoe. After mounting the AF 200S, set the auto flash mode and lens aperture according to the instructions accompanying - Pentax MV | MV Manual - Page 23
flash units do not synchronize automatically with the MV. Synchronize them manually by turning the exposure mode dial to "100X." Also note that the viewfinder LED flash ready indication is not provided with other flash units. As flash operating instructions vary depending upon the type of flash unit - Pentax MV | MV Manual - Page 24
instructions for shooting on auto are all you need to know to obtain successful results for most all non-critical photography. However, the MV is a sophisticated single-lens-reflex camera is well worth your while. Optimum Apertures The aperture guide listed on page 13 is sufficient for most shooting - Pentax MV | MV Manual - Page 25
Depth of Field: The depth of field becomes progressively deeper as the lens is stop down to smaller apertures and is greatest at minimum aperture. Thus against camera shake). Small apertures are also useful for critical close-up work, but for this, refer to a close-up photography guide. Out - Pentax MV | MV Manual - Page 26
details of the subject. Such problems are easily corrected by temporarily altering the setting of the ASA film speed dial for the shot etc, compensate by lowering the ASA film speed value to half or four times the ASA film speed. For example: With ASA 100 film in the camera: reset the dial to ASA 50 - Pentax MV | MV Manual - Page 27
crank as a guide for exposure compensation. To Use: Fold out the film rewind crank as if to rewind the film and lift the knob slightly to expose the exposure-compensation-indicator dial. (CAUTION: BE VERY CAREFUL NOT TO PULL HARD AS THE BACK COVER WILL SPRING OPEN, EXPOSING YOUR FILM.) Next, turn - Pentax MV | MV Manual - Page 28
used, the range on the distance scale ring covered within the figure 4 on the depth-of-field scale indicates the area in focus at that lens opening. You will note from the depth-of-field scale in the photograph that the range from approximately 4 to 7m is in focus. Note that as - Pentax MV | MV Manual - Page 29
DEPTH-OF-FIELD TABLE: SMC PENTAX-M 50mm LENS Distance scale f/1.4 f/2 1/2.8 1/4 f/5.6 f/8 f/il O16 1/22 • Distance sesta f/1.4 f/2 f/2.8 f/4 f/5.6 1/8 f/11 1/16 f/22 •27 0.452 0.447 0.453 0.446 0.4455 0.443 0.440 '-0.461 -01.466 --S01.43232 -8:113 1.56' 1. - Pentax MV | MV Manual - Page 30
-SIVLINPLE EXPOSURE For deliberate multiple exposures, make the first exposure in the normal way. Then tighten the film by turning the rewind knob 4) , and keep hold of the rewind knob. Depress the film rewind button C) and advance the rapid-wind lever. This cocks the shutter without advancing the - Pentax MV | MV Manual - Page 31
focus. Then determine the subject-to-camera distance from the distance scale on the lens. Then match your subject-to-camera distance to the infra-red mark infra-red focusing adjustment is not required when working with infra-red color film. 22 16 11 21 / • CO1 5 A Ji l l 8 44 2 82 8 /)22 • - Pentax MV | MV Manual - Page 32
automatic diaphragm will not function. 2. Full-aperture metering lenses will function as stop-down metering lenses. How to Use Mount Adaptor K 1. Screw the conventional Takumar lens into the Mount Adaptor K. 2. Attach the Adapter/lens unit to the camera body by aligning the red dots p and 0 , and - Pentax MV | MV Manual - Page 33
RIMA.X C mount Takumar lenses can then be attached in the normal way. 1. To remove the Mount Adaptor K from the camera body, first remove the screw-mount lens. Then press, with which locks in an SMC Pentax bayonet-mount lens, the lens release lever C) on the camera body plays no part at all. •31 - Pentax MV | MV Manual - Page 34
0 VRE AND STOP-DOWN METERING LENSES Open-aperture SMC Pentax lenses have a diaphragm coupling lever on the back of the lens which couples with the camera body to permit open-aperture metering. The ultra telephotos do not have a diaphragm coupler, so they must be used with the stop-down metering - Pentax MV | MV Manual - Page 35
. Thus, sudden temperature changes should be avoided as much as possible. As a guide, a temperature change of 10° C should be allowed to take place gradually over of the battery. Therefore, the camera should be protected against low temperature. Put the batteries into the camera right before - Pentax MV | MV Manual - Page 36
to wipe away all moisture completely. Commercial lens cleaners are also effective. 31. Never touch the mirror or the shutter leaves. Minor dirt or spots on the mirror will not affect the clarity of your pictures. Take care not to drop the camera or knock it against anything solid. Accidents - Pentax MV | MV Manual - Page 37
body and lens from rain or splashing water. If your camera should get wet, dry it off immediately with a clean, soft cloth. Once a camera has become such a case, take your camera as soon as possible to an authorized Asahi Pentax Service Center. 5. Where to keep your camera while you are not using it - Pentax MV | MV Manual - Page 38
purchase. Service will be rendered and defective parts will be replaced without cost to you within that period, provided the equipment has not been abused, altered, or operated contrary to instruction. Because the tolerances, quality, and design compatibility of lenses other than Pentax lenses are - Pentax MV | MV Manual - Page 39
charge, and only after you accept the quoted service charge, instruct the service station to proceed with the servicing. This warranty policy does not apply to Asahi Pentax cameras purchased in the U.S.A. and U.K. For these cameras, please refer to the separate Warranty Policy Card enclosed here - Pentax MV | MV Manual - Page 40
Akashi Optical Co., Ltd. C.P.O. 895, Tokyo 100-91, JAPAN Asahi Optical Europe N.V. Weiveldlaan 3-5, 1930 Zaventem Zuid--0, BELGIUM Pentax Handelsgesellschaft mbH. 2000 Hamburg 54 (Lokstedt), Grandweg 64, WEST GERMANY Pentane Corporation 35 Inverness Drive East, Englewood, Colorado 80112, U.S.A.
-
 1
1 -
 2
2 -
 3
3 -
 4
4 -
 5
5 -
 6
6 -
 7
7 -
8
-
9
-
10
-
11
-
12
-
13
-
14
-
15
-
16
-
17
-
18
-
19
-
20
-
21
-
22
-
23
-
24
-
25
-
26
-
27
-
28
-
29
-
30
-
31
-
32
-
33
-
34
-
35
-
36
-
37
-
38
-
39
-
40
 |
 |
wn
PENTAX
•
‘
1
11111I
PENTAX
t
if
\
3