Pfaff 213 Owner's Manual
Pfaff 213 Manual
 |
View all Pfaff 213 manuals
Add to My Manuals
Save this manual to your list of manuals |
Pfaff 213 manual content summary:
- Pfaff 213 | Owner's Manual - Page 1
- ;-- - - PFAFF 212 213 Instruction book - Pfaff 213 | Owner's Manual - Page 2
inodOl 212 2 Paris of model 213 4 I lEO trii:il ( OnnE(cfiuo (5 Work support of model 213 7 tternovirrg tile bobbin case B Diserigiiginq the sewing rnecharicri B .iioifig he tiobhirr 10 breading the bobbin case 11 loser 1mg the bohhmo case 12 Jhr eadirig the needle 13 Dr a wi rig - Pfaff 213 | Owner's Manual - Page 3
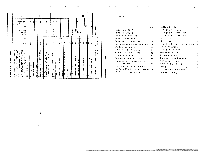
11 12 20 19 18 13 Parts of the PFAFF 212 I luke up lever 2 1 bread guide 3 Bobbin winder tension with thread guide 4 Utility stitch Selector 5 Needle plate 16 Shuttle (not visible) 17 Beitplate cover 18 Sewing toot 19 Sewing tool holder wit ti s( rev 20 Needle bar 21 Thread guides 22 Sewing - Pfaff 213 | Owner's Manual - Page 4
back> 8 Bobbin winder 9 Balance wheel 10 Disengaging knob 1 1 Reverse teed control 12 Stitch length control 13 Drop Iced knot) 14 Base plate 15 Free arm 16 Flap 11 Needle plate 18 Shuttle (not visible) 19 Sewing foot 20 Sewing toot holder with scre 21 Needle bar 22 Thread guides 23 Sewing light - Pfaff 213 | Owner's Manual - Page 5
and plug 2 into the wall outlet. Place foot control 3 within easy reach of your foot. The more the pedal is depressed, the faster the machine runs Work support of model 213 fo enlarge the sewing area for ordinary sewing operations, push the work sup port onto the free arm as tar as it will go - Pfaff 213 | Owner's Manual - Page 6
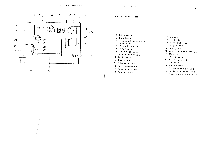
Model 213 Turn the balance wheel toward you until the take-up lever is at its highest point. Open the bedplate cover or the tree-arm flap Lift bobbin case latch I with thumb and toretinger, and putt the bobbin case out Then release the latch so that the bobbin can drop out 8 Disengaging the sewing - Pfaff 213 | Owner's Manual - Page 7
cover Disengage the sewing mechanism and place a spool of thread on pin 1 (Fig 0) Push a bobbin onto spindle 4 (Fig 7) and press against stop 5 Pull the thread under tension disc 2 (see arrow) Wind a few turns of thread on bobbin 3 in the direction indicated by an arrow Run the machine, iIhen the - Pfaff 213 | Owner's Manual - Page 8
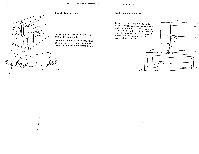
.. - Fig. 11 12 Inserting the bobbin case -- - -.cCC, %.tt Threading the needle Bring the take-up lever to its highest point. [itt latch 4 so that the bobbin will not tall out Push the bobbin case onto pin 1, making sure that finger 3 enters stot 2. Push the bobbin case in as tar as it wit - Pfaff 213 | Owner's Manual - Page 9
Pull the needle thread tight to draw the bobbin thread nut of the needle hole Lay both thread ends (abt 10 cm or 4 inches long> hack under the sewing toot 2 Red utility stitches To sew red utility stitches, turn the stitch length control to 4 3 Sewing backwards To sew backwards anii backtack a seam - Pfaff 213 | Owner's Manual - Page 10
- ,-,-.,- ----.-.-- --V- -. - - - F1g 16 Fig. I 7 Needle thread tension The normal setting is between numbers 3 and 5 on the tension regulating or anti-clockwise to ward 0 for a weaker tension Bobbin thread tension Tire bobbin thread tension is regulated by turning the sciew shown in Fig 17 - Pfaff 213 | Owner's Manual - Page 11
18 .*__. S..- "•" w5 S-.a - -U -- - - Utility stitch chart iVY Streii edge stitch br finishing edges 3 5 -s- Elastic stitch terry cloth tor inserting riatches. d9 ance cud sewing stretch iabrucs as well as - - - Straight stitch (cenrirai needie positron) br alt ordinary - Pfaff 213 | Owner's Manual - Page 12
the needle and Press the red hutton sewing foot shoe the sewing foot 1 to release the prpiuTneirnnopedpos2aelssatrieetctarniteochtenbhewrasirsttthhheslweeilfoyitsstneoeergu3wwr.afiironnlieoggdftttathoothoooaltttndhdseeshrhosoaLeaero,midwspeoehlarotctilhtmdehaeetiitt Hole 4 and edge guide dealer - Pfaff 213 | Owner's Manual - Page 13
Be careful to avoid finger injuries b the needle when sewing. 2. Make sure you unplug the power cor whenever you want to change th needle, sewing foot, bobbin or needl plate, when you want to clean and o the machine or have to interrupt sew,n and leave the machine for a while. 3. Be sure to use only - Pfaff 213 | Owner's Manual - Page 14
7 and the mark on the colour range selec tor is at the top. There are two straight-stitch settings: 5 - central needle position; 7 - left needle position Zigzag awing The machine sews zigzag stitches when the utility stitch selecto' is set at the desired stitch width in range 9 and the mark on the - Pfaff 213 | Owner's Manual - Page 15
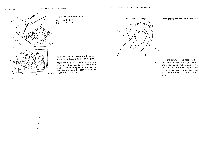
Fig 25 Sewing buttonholes Attach the clear-view foot Mark the position arid length of the buttonhole selector to "bartack' again and sew about 5 bartacking stitches Stop with the needle positioned above point 5 [urn the utility stitch selector to 7 and sew several tying slitches Carefully cut the - Pfaff 213 | Owner's Manual - Page 16
as shown at 1 in Fig 28. Then told the material hon of edge guide 6 so that the needle at the left of its throw just catches fabric 7 to the desired hero -4) Fig. 29 Place the fabric with its folded edge under the sewing foot and lower the presser bar lifter On heavy woolen fabrics the hero is - Pfaff 213 | Owner's Manual - Page 17
toot so that the tront stud enters slot 2. Push the zipper foot toward the right as far as it will go Baste the zipper on the fabric Then sew in the right halt ot the zipper (Fig 31) Raise the needle and the zipper toot. Push the toot toward lie tell as tar - Pfaff 213 | Owner's Manual - Page 18
Removing the work Raise the needle and the sewing (oot Remove the work trorn the machine by pulling it toward the rear, and trim both threads with the aid of the thread cutter Make sure to leave thread ends about 10 cm (4 inches) long in the machine with which to start the next seam 32 / Chaning - Pfaff 213 | Owner's Manual - Page 19
bobbin case Always use high-grade (resin -free) sewing machine oil After oiling, run for a short time on a piece the machine of waste ma terial in order to get rid of excess oil 34 Raise the needle with latches D. Model 212 A B C C Model 213 A B Co D 0 F Fig, 35 ID Flg36 E - Pfaff 213 | Owner's Manual - Page 20
6. Sewing foot, shuttle or shuttle race may be damaged. Replace the damaged part or send it in for repair. 36 - -- -. - Seam puckers Ca ii s e 1 The thread tension is too tight. Rem e (t y Adjust both tensions as Instructed On pages 16 and 17 8obbjn thread breaks Cause 1 If the bobbin thread - Pfaff 213 | Owner's Manual - Page 21
not in accord 3 The needle thread is not placed be tween the tension discs Remedy Adjust both lensions as instructed on page 17 Select needle and thread to Suit the material, as indicated in the Needle and Thread Chart Raise the sewing foot and draw the needle thread between the tension discs 39 - Pfaff 213 | Owner's Manual - Page 22
and is noisy Cause• 1 Dust and pieces of thread have accu mulated in the shuttle race 2 Machine has not been serviced for a longer time 3 The machine is clogged by interior oil 40 Remedy Clean the shuttle, as instructed cii pages 34 and 35 Read the instructions on page 34 Have a mechanic clean the - Pfaff 213 | Owner's Manual - Page 23
then turn the dial 1-3-I -2-3-4-0. S,'njn, on buttons Adj ust the stitch width to suit the size of the button. I-eed dog lowered Roistd Scorns Twin-needle with or without gimp cord. The stitch length can he varied. Raised seam presser foot 41 II 389 Raised seam attach ment 40 15 427
-
 1
1 -
 2
2 -
 3
3 -
 4
4 -
 5
5 -
 6
6 -
 7
7 -
8
-
9
-
10
-
11
-
12
-
13
-
14
-
15
-
16
-
17
-
18
-
19
-
20
-
21
-
22
-
23
 |
 |

-
;—-
-
-
PFAFF
212
213
Instruction
book