Pfaff 230-260 Manual
Pfaff 230-260 Manual
 |
View all Pfaff 230-260 manuals
Add to My Manuals
Save this manual to your list of manuals |
Pfaff 230-260 manual content summary:
- Pfaff 230-260 | Manual - Page 1
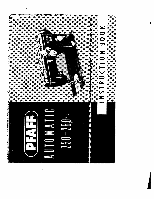
I N ST R U C TION BOOK - Pfaff 230-260 | Manual - Page 2
Correct Tension Regulation Regulating Thread Tension Stitch Length Regulation Dropping the Machine Feed Changing the Sewing Foot The Darning Foot Core and Maintenance Sewlight Facts Trouble Shooting Page 2 4 5 6 7 7 8 9 10 12 14 14 15 16 17 17 18 20 21 22 23 24 24 25 25 26 28 29 Zipper Insertion - Pfaff 230-260 | Manual - Page 3
- - Automatic 23O26O FOREWORD INSTRUCTIONS Your dream has come true! IfYFAEfooTyoYvuulohrletouoionsuwwymhioiialfnaalutrtsvh.eyiftceeironsuunedacSonteawissyowreimnewitsnhpeigbaenwl.noegiponkieregnoxxsuwcptprideitrulirotnciobetghiwnloeeconnlmpensedsry,yaooonspfueudlareaumafensaPsademtFsreAyeicrls - Pfaff 230-260 | Manual - Page 4
- -;.- 17 15 1 I 1 lucid lake-up levy, 2 1 o control cover (A) 3 Einhi oidery pallet n length lever (El 4 Oct13 5 Buttonhole slide lever 6 Bobbin winder 7 Sb pm olin,, knob 8 SIb I length slop cant, oh * - 7 8 -10 9 Stitch cog). for wo, d and reverse fever 10 kight switch 1) Drop feed control - Pfaff 230-260 | Manual - Page 5
32 R 7O8 23 ColIop,,ie spooi pvs 24 Top rovvr 25 Face cove, 26 Needle 6, Coder eve, 27 Presser how ever 28 S0 ew,,, foot sd sc cv, 29 Sewvq loot 3 30 Needle set Screw 31 Bed plole 32 Motor Pl"g receptacle 33 Bc,lo,,c Wleef - Pfaff 230-260 | Manual - Page 6
R7098 I ô /l'tadi,;c Qpitioii ® - Make sure stop motion knob b is tightened be fore you begin sewing (clockwise as indicated by white arrow) @) Whenever you have to turn the balance wheel a, turn it toward you (counter-clockwise as shown by black arrow). ii Never run a threaded machine unless - Pfaff 230-260 | Manual - Page 7
, this is done automatically by fake-up tever d. The machine will feed the material under the sewing loot automatically. Alt you have to do is guide the work. Never try to hasten feeding by pushing or pulling the fabric while stitching because the needle may bend or break. Therefore, always turn - Pfaff 230-260 | Manual - Page 8
/4ltuhmne When your PFAFF Automatic is delivered to your home, it is ready for sewing. The machine is driven by an electric motor which requires no attendance, except that the brushes should be replaced alter about 400 hours of service. When you replace the brushes, also check whether the driving - Pfaff 230-260 | Manual - Page 9
Connect electric cords as shown in illustration R 7130 Knee Control Press the right knee light ly against tile knee controt lever. Tlse harder you press, tile foster the ma chine will run. Push plug 1 into three-pin receptacle 2, and plug 3 at other end of cord into wall outlet 4. The foot control - Pfaff 230-260 | Manual - Page 10
5ta1fJht $tUt/ $ivi,ij 4 Set: Dial B -O Control D - 0 Leves E -0 Lever C - Centered 56629 Lever f regulates the stitch length and controls forward and reverse sewing. (Lever should be in vertical position be fore setting stitch length). Control e stops stitch on length desired. Forward Sewing - Pfaff 230-260 | Manual - Page 11
R 7071 i12aG Qivus:7 Set: Dial B--U Lever E-O Turn control D left to desired stitch width (indicated by numbers 1 to 6; the higher the number, the wider the stitch). Do not move C or D while needle is in fabric. A Lever I lengthens zigzag stitches or packs them more closely together. To form - Pfaff 230-260 | Manual - Page 12
R 6631 $ tftii:j /4'lf4ChillQ 1 4iz /ii(oiuaiic I6I!t( BS C D Set: Lever E-3 Swing back the cover on control A. Your embroidery design dial shows all the pri mary designs you can make with the Automatic. Pick your design and turn the dial sa it points to that design. The numbers in the slot - Pfaff 230-260 | Manual - Page 13
want a narrower design, you may set it somewhat lower, soy between "1" and "2". Pattern is not clear, if D is set above "2". A Big Advantage of the PFAFF Automatic Each of the primary designs pictured on the embroidery design dial can be sewn in diflerent lengths. Therefore you can vary the ap pea - Pfaff 230-260 | Manual - Page 14
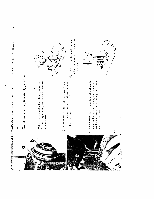
R 5704 a /Oiii?in Hold balance wheel a and turn stop motion knob b all the way to the left (counter-clockwise). Place spool of thread on right-hand spool pin. The bobbin thread should always be the same size as that used on the spool, or a little Ii n e r. Pull thread froni spoof and lead it - Pfaff 230-260 | Manual - Page 15
R7100 4 6 Pull it through thread guide h. 0 Pass end ol thread through slot in bobbin, from in side. Set bobbin on bobbin winder spindle so that key at base of spindle enters - Pfaff 230-260 | Manual - Page 16
iiiuij a 7 1 it ? 3 t 6 15 6 n i,,t, 73,661,, Ca.c As shown in illustration 1. hold bobbin in left hand so that the thread end falls from the top down toward you, and insert bobbin into bobbin case. Hold the bobbin firmly in the bobbin case and puff the thread into the case slot. () Pull the - Pfaff 230-260 | Manual - Page 17
Cii j posiAItolut. firilntMeseetfrsotbthvyehueeosaptunnb.teodheTedadthvillleseitelfntimdbislpeeaaslctcatcoihclhamlielnlaeketitthmaibetonsaondwchrekciogteyuphwnrerttnhaeosectrbtnthpisoceotibueinlbnddesti,fe.ntIryWtsooiconfuaigtyshhweoobuitolhoulkecnb, - Pfaff 230-260 | Manual - Page 18
Types of Fabrics Mercerized - CoHen Fine Fabrics -- 80 such as georgetle, chi1loi,boliste, to voile, own, silk. 100 Silk 0 to 000 twist Needle -Size 60 or 70 Lightweight Fabrics 70 such as dress silks md cottons, to sheer, woolens, shirlmg, dra- 80 A& B twist 80 peries. Medium - Pfaff 230-260 | Manual - Page 19
.ii:i).ta,i( ad.c a 6 iuit /\Qct.c nosaOyorrtsenetebPameuFvsAueaidsFsileasFdftb.oAalrmeutapoflemlrodaomtoricdneisnvteheawerryyibnegPsdfeamwIsflaiincddgheei.analGenesder,,nSueyBimsnetenebtmrPooli1ard3fef0brnlyRue. nefwtdlaotnter'seks,e.hdaSTlnyehkssetensmneheeoe1dud3lle0ldes, R 6798 r:. I iIIL - Pfaff 230-260 | Manual - Page 20
thread on spool pin 4 and lead thread end through holes in thread guides 2 cind 3 and through both thread retainer openings ti (see itlustration opposite one of the holes at its end. Pull thread into slots at left of thread guides 8 and 9, and then into the slot at left of needle clamp 10. Then - Pfaff 230-260 | Manual - Page 21
7 R 7081 19 - Pfaff 230-260 | Manual - Page 22
Threadug Diagram for Two Needtes Your upper leusion has a third disc so threads o,e separated as hey ore threaded Ihroogh the tension. woyInnoitcuhrcreocacrosoderriddntighndeguscizbstseoo. biytbokiuneewptesannisttsi.osnThoasplsiegewhitnlyftihllefeodlraucconordrddriyinn.ggF. - Pfaff 230-260 | Manual - Page 23
Jc 'hoes Two-Needle Decorative Sewing chwobs/Aha6 feeilvt4 awlthsenhnepiegnwtawwecwdtndhtioeied..twsrheninIrYigetshtnhowesiosdulooodurlnateitslansPtscl,ehtof,hoeaetafdihfafnalnepeclgadlpsooirne,lnnrwieaotegierflwsoedftmlr-olhtesoreaCtwictptmdihhcillsielihaosntnvtedeeaosei, - Pfaff 230-260 | Manual - Page 24
- -k -\, I. 57137 Three-Needle Decorative Sewing -4 To do three-needle sewing, you must buy spool holder No. 153137 which slips over the regular spool pins (see illustration) and have your Plall dealer convert your ma chine to sew a stitch width ol about '/a inch. The third thread is led to the - Pfaff 230-260 | Manual - Page 25
6 7068 6 7069 Q)atiitq tIu /( nh'Iu?tic /\Jc'?t2 'l/17Qaie 4 Before you begin, make sure that fhe needfc is at its highest position - when the fover sole of the ascending fake-up fever d is in line with the bottom edge of the top cover. Now fower the sewing toot and - 0 With your left hand push - Pfaff 230-260 | Manual - Page 26
- When you hove hod sufficient needle threading practice, you moy shorten the procedure as follows: -Push lever p up. Piace threQd behind hook of prong w so that itsend is about /2 inch to the right of the prong. Slowly lower lever p. Prong w now pulls end of the thread - instead of the loop through - Pfaff 230-260 | Manual - Page 27
' . .'L; :' I t:. '.!/'' 4 ,, Cd'2Qd (7Q;Jj'g 'qi1atIoii Balanced tensions are essential for sewing. If your tension is correct, you will have perfect seams as sketched (Ill) below. Sketch I - The threads interlock on the underside of the fabric. Ca use : Upper tension too loose or lower tension - Pfaff 230-260 | Manual - Page 28
7eIutaaisj 'l/zea '72nuic,, Bobbin tension rarely needs adjusting, except for embroidery when it should be a little tighter than for ordinary sewing. Adjustment is nide by the small screw (x) n the bobbin case Turn it tell -(( tor looser tension. Turn it right )- for tighter tension. Determine - Pfaff 230-260 | Manual - Page 29
'.: ejth ,.c'nqtI: 7'qit1atii: I Set fin neutral (vertical position). Set e so its pointer is on the indicator scale number corresponding to the desired stitch length. Turn lever ito the right as far as it will go. To sew backwards, turn lever I toward the lelt as far as it will go. Control e - Pfaff 230-260 | Manual - Page 30
5 7085 C 0 i 7 h,a,ii die 4 QIvi1iy oct Lilt both needle and presser bars to their highest positions .1 and turn scrv c to the left. The screw usually can be loosened by haiid Sut it it is too tight, use a screw driver. Tilt the loot sideways and putt it down, Slip on new toot and tighten - Pfaff 230-260 | Manual - Page 31
R 5887 Car? II1 /i'l1?in(Q1Ia1zc? Longevity and smooth machine perlorinaisce are dependent OFF F egolar ond proper cleaning and oiling. Use Plait sewing machine oil only. Never lubricate inaclsine wills animal or vegetable oils. Remove all lint belore oiling. All moving and rotating parts require - Pfaff 230-260 | Manual - Page 32
The oiling points in The machine arm can be reached easily by removing the top cover. Oil should be applied sf5aringly.Excessive quantities of oil may soil work onci-criuse machine sluggishness. One or two drops ot oil usually will suffice. Betore you remove the lop cover, set lever E between 5 and - Pfaff 230-260 | Manual - Page 33
Press this buttoH to switch sewlig lit on and oil Qwt(q/t 7act.c The 25-watt sewlight is recessed under the machine arm. Lever u swings out the light to illuminate a larger working area. To change the light bulb: Swing lever u up (see arrow) and hold. Push bulb up into socket, turn loll, and pull - Pfaff 230-260 | Manual - Page 34
flat part of needle away from you. The correct needle system is stamped on bed slide. Insert new needle. Check and correct threading as instructed. Use correct needle and thread. 2. Needle Thread Breaks Co use The above mentioned may cause thread R e in e d y See remedies listed under 1. above - Pfaff 230-260 | Manual - Page 35
Use correct needle ond thread sizes. Don't lorce the feeding motion. Guide the material lightly. Push bobbin case until you hear it snap into place. 4. Faulty Stitch Formation Cause: Remedy Improper tension. Adjust tensions as instructed. Thread too heavy, knotty or hard. Use only first-rate - Pfaff 230-260 | Manual - Page 36
away from you. 0 Take the end of the thread and pull it out while rocking the balance wheel. If thread is still jammed, call your Pfaff dealer for help. Thread jamming can be avoided by following the instructions on pages ( and 5. 31 - Pfaff 230-260 | Manual - Page 37
D -Oar 2(optional) Edge Stitcher No. 41 350. Used with tire quilting gauge sews parallel rows of stitching over the errtire surface ol tire labric. Always guide the gouge finger along tIre preceding row of stitches. Attractive tea cosies, slippers, seat pads, and covers can be quilted. 32 R5905 - Pfaff 230-260 | Manual - Page 38
R iiii Flat Felled Seams Machine Setting: E - C-2 8 -0 D - 0 or 2 (optional) Flat idled seams are used to durably oin two pieces of fabric. They are made in two operations. Flat felled seams usually are straight stitched. Narrow zigzag stitches are used for felting ois elasticized fabrics - Pfaff 230-260 | Manual - Page 39
----. -.----. - 46261 Rolled Hems Machine Setting: E-O B-0 C2 D 1 to 4 (optional) Rolled hems are used to finish sheer or deli cate fabrics. lou o smooth, unpuckered hem, ease thread tension slightly and set D on 1 to 3. To 11cm tricot fabrics increase the tension, and use the widest zigzag - Pfaff 230-260 | Manual - Page 40
Overcasting Edges Machine Selling: E - 0 0 - C-2 D-4 Overcasting prevents frayed edges. Sew edge with the needle taking one stitch info the fabric and the other over us edge. You may overcast edges 4 alter fabric is cut and before the pieces are joined. 5 5925 Buff Seaming tO89 J r ' .J I. - Pfaff 230-260 | Manual - Page 41
-,-"----- -. - - -- . r._ - Attaching Lace Machine Settiny: E-0 8-0 C-2 D-1 1o3 You can attach lace edging in one simple operation. Overlap lace on raw edge. Sew to fabric with norrow zigzag stitches, taking one - stitch into lace onct fabric and the other into lace only. -- - - Pfaff 230-260 | Manual - Page 42
17 - -1 Ltii P 7156 - - ..-- - iifi Inserting Patches Machine Setting: E 0 - B -.0 C-2 D 3 to 4 - Large holes can be patched quickly. The following method may also be used for tricot fabrics. Cut patch so that its grain will match the rest of the tabric. Place the patch over the damaged - Pfaff 230-260 | Manual - Page 43
Upper Tension Follow above directions for slurring bat place filler thread under rotlrer than on top of the fabric. Fabric and filler thread both are guided in the groove of the foot. Width of zigzag depends on tire thickness of the fitfer thread used. I-. When you have finished the zigzag - Pfaff 230-260 | Manual - Page 44
46!?! Applique Work Machine Settii: E -0 6-0 C -2 D t /2t-o1 3 6 7155 6 7429 Pin or baste applique on fabric and overcast edges. Appliques also can be attached with a satin stitch or any embroidery design. 39 - Pfaff 230-260 | Manual - Page 45
R7166 Openwork Embroidery Machine Setting: F 0 8-0 C-2 D - 0 and 272 There are hundreds of patterns excellent for openwork embroidery. Lets embroider the 25-square box illustrated. First, sew over all traced fines twice using short straight stitches. Then sew over straight-stitch lines with a - Pfaff 230-260 | Manual - Page 46
-2 D-2to4 Scaltoping con be done in o iffy on your P FAF F 230 Automatic. Scalloped edges can be used effectively as trimming on numerous articles. Draw . Set machine (shown above), place fabric under sewing foot and guide needle along traced line The scallops are produced automati cally. You - Pfaff 230-260 | Manual - Page 47
oDes I mi a Uon Hemstilchi rig Maclone Setting: E 0 C-2 8-0 Stitch Length: 1_1'/2 Increase Tensions cBestpnhauxoeeenitanetredeuandbltteeriecleautodotclsimlaote.nhnhaenLssedmeoioetntucsslssllwobiecilseltrciycetehhhtwiwhiunnrpPgogem.lvaauewidSetsn' - Pfaff 230-260 | Manual - Page 48
Length: Maximnuns Hemming dresses and skirts by hand is a laborious task. You con do it easily an yourThlaft on medium and heavy fabrics. Use blindstitch guide No. 46669, which you can buy at your Pfa(f store. Use it with zigzag loot Na. 44088 and attach it so that its vertical flange - Pfaff 230-260 | Manual - Page 49
6064 Sewing Buttonholes Machine Setting: E 0 B -0 C The setting of control 0 is changed several times while you are making button holes. So you can easily return the control to its previous setting, turn lever F clockwise, as illustrated. Put lever C in notch 1, so D will be caught in two - Pfaff 230-260 | Manual - Page 50
to completed fine of stitching. Switch D to "3". Make 4-6 bartack stitches. Raise needle. Turn D to "3", and drop machine feed. Make second tack, as instructed above. Switch D back to "0" and make two or three fastening stitches. 0 Trim the sewing threads. Open the buttonhole with your seam ripper - Pfaff 230-260 | Manual - Page 51
Z6?2O Button Sewing Machine Setting: E -o B-O C-3 D - 3 or 4 Drop Machin Feed Don't be afraid to sew on buttons, hooks, eyes or r ngs with your Piaff. Make sure the thread take-up lever is at its highest poi I. Place the button under the button sewing foot. Align button so needle will enter - Pfaff 230-260 | Manual - Page 52
of the needfe plate, as illusf rated. turn, and fasten to posif ion with bed sfide (see illustrafion below). R 5914 Attach do rning foot as instructed on page 25, and suspend presser bar from the rear of the face cover with darning hook No. 461 28. Even though the presser bar - Pfaff 230-260 | Manual - Page 53
• - . - ._-;_ S R 5913 Thin Spots Remember that "a stitch in time saves nine" and reinforce spots that save worn thin with sho, t stitches made lengthwise and across worn section. CIa nip fabric into do ning hoop and move it freely under lie needle. Long rips nay be darned with the nornial - Pfaff 230-260 | Manual - Page 54
for sotin stitch. Attach cord stitcher and sew outlines of monogram. 'sv'aIch that seams do not overlap at joints ol letters. Ask your Pfaff dealer to show you the Ornarnentograph, the in geniously designed monogram and ornamental stitch attachment. You wilt marvel at its versatility and delight in - Pfaff 230-260 | Manual - Page 55
Cording To cord, use sewing toot No. 46121 with a double needle, or Cording Kit No. 50115 available at extra cost. This set consists of: 4 double-needle holders for needle distances of i/ 6, /6a, /32 arid '/os inch, 3 cording feet, 3 cording plates (2 with cord ducts and 1 with center - Pfaff 230-260 | Manual - Page 56
-
 1
1 -
 2
2 -
 3
3 -
 4
4 -
 5
5 -
 6
6 -
 7
7 -
8
-
9
-
10
-
11
-
12
-
13
-
14
-
15
-
16
-
17
-
18
-
19
-
20
-
21
-
22
-
23
-
24
-
25
-
26
-
27
-
28
-
29
-
30
-
31
-
32
-
33
-
34
-
35
-
36
-
37
-
38
-
39
-
40
-
41
-
42
-
43
-
44
-
45
-
46
-
47
-
48
-
49
-
50
-
51
-
52
-
53
-
54
-
55
-
56
 |
 |

I
N
ST
R
U
C
TION
BOOK