Pfaff 230 Owner's Manual
Pfaff 230 Manual
 |
View all Pfaff 230 manuals
Add to My Manuals
Save this manual to your list of manuals |
Pfaff 230 manual content summary:
- Pfaff 230 | Owner's Manual - Page 1
CPFAFFD INSTRUCTION B00K - Pfaff 230 | Owner's Manual - Page 2
proud owner of a PFAFF 332-260 Automatic - - the sewing machine with unlimited possibilities. This instruction book will help you understand the machine and give you valuable tips to make sewing more fun for you. Even if you are on experienced seamstress, you will find this book a valuable guide - Pfaff 230 | Owner's Manual - Page 3
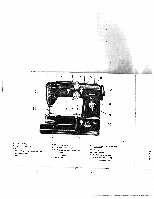
lever (E) 5 Buttonhole slide lever 6 Bobbin winder 7 Slop motion knob 8 Stitch length stop control 9 Stitch length (forward-reverse) lever 10 Light switch 11 Drop feed control 12 Needle plate 13 free arm cover sewing hook) (enclosing transverse rotary 14 Needle 15 Upper tension 16 SewlighI - Pfaff 230 | Owner's Manual - Page 4
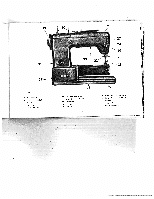
wheel 20 Collapsible 5pOol pins 21 Top cover 22 Face cover 23 Presser bar lever 24 Needle threader lever 25 Automatic needle threader 26 Sewing foot 27 Snap-out workplate 28 Free arm 3 29 Receptacle for foot control plug 30 Receptacle for power cord plug 31 Sewlight 32 Needle set screw 33 Free - Pfaff 230 | Owner's Manual - Page 5
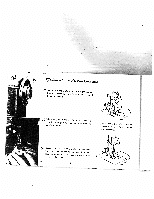
)o.auve(ctooutunrtner-thcelobckawlainsceeaws hseheolwan, Never run a threaded machine unless you have fabric under the presser foot. Raise under terial you're presser bar lever c and place both threads and behind the sewing foot. Slide ma under needle, lower sewing foot -- and ready to - Pfaff 230 | Owner's Manual - Page 6
under I t The machine will feed the material under the sewing foot automatically. All you have to do is guide the work. Never try to hasten feeding by pushing or pulling the fabric while stitching because the needle may bend or break. --4 Therefore, always turn the balance wheel toward you until - Pfaff 230 | Owner's Manual - Page 7
it until it is flush with the needle plate. Now let it snap into position. When you want to use the free arm for darn ing, lower the workplote, proceeding in re verse order. Larger articles may require a larger work surface. To further increase the sewing area, attach the workptate extension which - Pfaff 230 | Owner's Manual - Page 8
voltage indicated on the motor label (110 V) corresponds to the volt age in your home. (Check other appliances). Push plug I of power cord into receptacle 2 on bock of machine, and plug 3 (at other end of cord) into wall outlet 4. Conned plug of foot control cord 5 with receptacle at balancewheel - Pfaff 230 | Owner's Manual - Page 9
- Centered Lever f regulates the stitch length and controls forward and reverse sewing. (Lever should be in vertical position be fore setting stitch length). Control e stops stitch on length desired. R6629 Forward Sewing A Set eon number that indicates stitch length you want(1-5; the higher - Pfaff 230 | Owner's Manual - Page 10
R 7071 ifyza9 4 ewtn9 Set: DiolB-O Lever E-O Turn control D left to desired stitch width (indicoted by numbers I to 4; the higher the number, the wider the stitch). Do not move C or D while needle is in fabric. 2 A Lever f lengthens zigzag stitches or pocks them more closely together. To - Pfaff 230 | Owner's Manual - Page 11
A If a won ,,1,, C D AB Ea c Set stitch length lever f (page 8) so stitches are closely packed. If embroidery design disregard them. dial shows no symbol for lever C or control D, con pea poi fou For such them. designs C and D will operate automatically. Do not touch len - Pfaff 230 | Owner's Manual - Page 12
,ysifesetDtthitiesssdoeimtaleawbeoxhavacettll"yo2w"a.etr",2s"o;yobr,etiwf yeoeun Machine Setting: A 3, B 4, C 2 R 7095 AEcpfplsooaeeeancBuntathttgrriiengatbnrhognenufAcmisteislthdeebeonwvoeobgnranpfttenhard"iitti1mnhinas("eeg1.acdd,ero3Wiypnf,boaf5tyhedrftetoreaeetsnlsnhrenliendtgettidtin7nlPsw - Pfaff 230 | Owner's Manual - Page 13
/9 Oin?in th 2o6in Hold balance wheel a and turn stop motion knob b all the way to the left (counter-clockwise). Place spool of thread on right-hand spool pin. The bobbin thread should always be the same size as that used on the spool, or a little finer. Pull thread from spool and lead it clockwise - Pfaff 230 | Owner's Manual - Page 14
it through thread guide h. Pass end of thread through slot in bobbin, from in side. Set bobbin on bobbin winder spindle so that key ot base of spindle enters slot in bobbin. Press in lever i. Hold end of threod and slowly start machine. Having wound a few turns, break off end of thread and continue - Pfaff 230 | Owner's Manual - Page 15
it emerges from the open ing at the end of the spring. Leave about three inches of thread hanging from the bobbin case. Hold the case by its open latch, so that the bobbin cannot fall out. 6030 eu.ovin the 7 o 6 6in Ca5e Raise needle to its highest point and open cover j. Lift latch k with - Pfaff 230 | Owner's Manual - Page 16
I. In replacing the bobbin case, it is best that it will not get jammed between to hold the loose end of thread so bobbin case and hook. Release I latch k. R 7380 A Press against bobbin case until you hear it snap into place. An improperly inserted bobbin case will cquse needle breakage. Close - Pfaff 230 | Owner's Manual - Page 17
canvas. 40 to 50 C&D twist The same size threads should be used in the needle and on the bobbin. Some experienced seamstresses prefer a somewhat thinner bobbin thread. How ever, the bobbin thread never should be thicker than the needle thread. Very Heavy Fabrics 24 90 such as heavy TIcKrngz - Pfaff 230 | Owner's Manual - Page 18
R 6798 Dit,1tant 9acts 4&14t /Ve&2ks On PFAFF Automatic sewing machines, System 130R, flat-shank needles are used for all ordinary sewing and embroidery work. The needle system is stamped on The needle plate. Genuine Pfaff needles, System 130, are available from every Pfoff dealer. Bent or blunt - Pfaff 230 | Owner's Manual - Page 19
high as it will go and pass thread from right to left through one of the holes at its end. Pull thread into slots at left of thread guides 8 and 9, and then into the slot at left of needle clamp 10. Then thread needle, front to back. PFAFF's Automatic needle threader will do this for you easily and - Pfaff 230 | Owner's Manual - Page 20
R 7378 19 - Pfaff 230 | Owner's Manual - Page 21
with the bottom edge of the top cover. Now lower its the sewing foot and - 1ev With your left hand push threader engaging lever p up until threader prong $1 penetrates needle eye. Keep lever p in this position. Sir Hold thread loosely and lead from left around pin q behind hook of prong - Pfaff 230 | Owner's Manual - Page 22
left hand. Turn balance wheel toward you until the needle moves down and up again and take-up lever reaches its highest position. Lightly pull needle thread to draw bobbin thread up through iJ needle plate slot. Place both threads back under sewing foot before you put fabric into machine. 21 - Pfaff 230 | Owner's Manual - Page 23
tension too loose or lower tension too tight. Sketch II - The threads interlock on the surface of the fabric. Cause: Upper tension too tight balanced, take a closely woven piece of fabric and sew a few straight and zigzag seams. If the straight stitches are tightly drawn in on both sides of the - Pfaff 230 | Owner's Manual - Page 24
for for ordinary sewing. embroidery Adtustment when it is mode by the small screw (x) on the bobbin case: Turn ii kt R 6946 A The final stitch appearance can be regulated by , the greater the tension. 'Ii For ordinary sewing, the upper tension should be set between 3 and 5. I: 23 __ - Pfaff 230 | Owner's Manual - Page 25
obtained. To hold the stitch length in position, turn e right )- until it stops. 7 zc2inf7 tli? , 4 1ac4ine The machine feed is dropped for darning, hoop embroidery and button sewing. To lower feed below the needle plate, turn drop feed control v clockwise. Fabric will When control v is turned to - Pfaff 230 | Owner's Manual - Page 26
hand, but if it is too tight, use a screw driver. Tilt the foot sideways and pull it down. Slip on new foot and tighten screw c. R7086 t Remove the sewing foot. Attach darning foot from the rear. Hold spring clip b so that it is behind the needle set screw, and tighten screw c. Attach darning hook - Pfaff 230 | Owner's Manual - Page 27
and oiling. Use Pfaff sewing machine oil only. Never lubricate machine with animal or vegetable oils. Remove all lint before oiling. All moving and rotating parts require regular lubrication. It is advis able to establish a pattern when oiling your machine. Begin by removing the needle plate and - Pfaff 230 | Owner's Manual - Page 28
top cover. Oil should be applied sparingly. Excessive quantities of oil may soil the work and cause machine sluggishness. One or two drops of oil usually will suffice. Before you remove the top cover, set lever E be- tween 5 and 7. To pull cover up. tilt it back and lift. R 7381 Oiling points in - Pfaff 230 | Owner's Manual - Page 29
4 5esøliqht 9aai The 25-waft sewlight is recessed under the machine arm. Lever u swings out the light to illuminate a larger working area. To change the light bulb: Swing slots. Press bulb in and turn right. Press the button on the front of the machine base to switch the sewlight on and off. - Pfaff 230 | Owner's Manual - Page 30
I Ait.sttiii ,4ctc 3 e1i '7n.%ion d Your PFAFF 332 Automatic is equipped with a 30-watt electric motor (Type PE 332), which is housed in the machine base and drives the main shaft by means of a driving belt. Ii If the driving belt tension needs adjustment, take out the four screws in U cover - Pfaff 230 | Owner's Manual - Page 31
4 ShOOtUlf? 1. Machine Skips Stitches Ca use: Needle incorrectly inserted. Wrong needle. Needle bent. Machine threaded improperly. Needle too fine or too thick for the thread. Remedy: Push needle up as far as it wilt go and be sure that the long groove faces you, and flat part of needle away from - Pfaff 230 | Owner's Manual - Page 32
as instructed. Use only first-rote thread - - the correct size for the needle and fabric. Don't run it around thread tension over stud finger on top when winding the bobbin, cover and through thread but lead guide h. Release upper tension by setting ii on "0" and remove thread. 3. Machine - Pfaff 230 | Owner's Manual - Page 33
. Mechanism clogged by inferior oil. Bobbin winder working while sewing. (When a bobbin is not being filled). Snarled thread between balance wheel and bushing. Remedy: Loosen or tighten motor belt by adjusting idler. Clean and oil hook raceway. Use only Piaff sewing machine oil - never salad oil or - Pfaff 230 | Owner's Manual - Page 34
in one continuous opera tion. Use right edge of foot as a guide. For other types of zipper insertion, follow directions in your zipper pack age. Edge Stitching Machine Setting: E-0 C-2 B-C D -0 to 4 (optional) Stitch Length: 2 -4 Edge Stitcher No. 41 350. Sew parallel rows of straight or zigzag - Pfaff 230 | Owner's Manual - Page 35
Flat Felled Seams Machine Setting: E -o C-2 8-0 D -0 or 2 (oplional) Stitch Length: 1-2 Flatfelled seams are used to durably ioin two pieces of fabric. They are made in two operations. Flat felled seams usually ore straight stitched. Narrow zigzag stitches are used for felling on elasticized - Pfaff 230 | Owner's Manual - Page 36
tricot fabrics increase the tension, and use the widest zigzag stitch so the hem has a rolled shell effect. 11246 R 6083 Hemming Machine Setting: E-O C-2 B-O D-O or 2 to 4 (optional) Stitch Length: 2 -4 The hemmer foot is indispensable if you want to sew a uniform hem. You can hem with - Pfaff 230 | Owner's Manual - Page 37
LJJ Overcasting Edges Machine Setting: E -0 B-0 Stitch Length: C-2 D - 2 to 4 (optional) 3 -4 Overcasting prevents frayed edges. Sew edge with the needle taking one stitch into the fabric and the other over its edge. You may overcast edges 4 after fabric is cut and before the pieces are joined. - Pfaff 230 | Owner's Manual - Page 38
lace and fabric and the other into lace only. V 4O88 R 7161 Inserting Lace Machine Setting: E -0 B-0 C-2 D - I to 3 Stitch Length: 1 -2 Pin or baste lace on fabric. Sew to gether with needle taking one stitch into fabric alone and one into the lace. Carefully trim excess fabric underneath. IW - Pfaff 230 | Owner's Manual - Page 39
quickly. The following method moy also be used j for tricot fabrics. Cut patch so that its grain will match the rest of the fabric. Place the potch over the damaged area. Sew it down with zigzag stitch of medium length. R 7156 I For additional strength stitch over corners twice. Turn over and - Pfaff 230 | Owner's Manual - Page 40
Needle Cording Machine Setting: E -o B-O Stitch Length: C-2 D-2 -1 Trace pattern on fabric and place a filler thread under the groove in the sole of the cording foot. Followthe pattern and hold the filler thread lightly. 46121 R 7162 Shirring Machine Setting: E -0 C -2 B-O D 1 /-2 2to2 Stitch - Pfaff 230 | Owner's Manual - Page 41
R 7163 6612! 61 Applique Work Machine Setting: E -o B-O Stitch Length Minimum C-2 D-V/to3 Pin or baste applique on fabric and overcast edges. Appliques also can be attached with a satin stitch or any embroidery design. R 7167 40 R 7155 - Pfaff 230 | Owner's Manual - Page 42
4612! Openwork Embroidery Machine Setting: E -o B-O Stitch Length: C-2 D-Oand 21/a Minimum wgiLltiheanter'ases R7179 .4 When you finish modern design, sewing, cut out outline flowers every other square. To or free farms with an make an attractive embroidery design IL - Pfaff 230 | Owner's Manual - Page 43
R 7158 4O88 ScaIIopng Machine Setting: ScII'WWk E-1-7(optional) 8-3 A-5 D-2 Stitch Length: Minimum Scalloping can be done in a liffy on your PFAFF 332 Automatic. Scalloped edges can be used effectively as trimming on numerous articles. The illustrations left show how scalloping adds - Pfaff 230 | Owner's Manual - Page 44
7138 He mstitc hi n g Hemstitching is succesful on linen and twilled fabrics. For this type of work use on ordinary needle. Draw several threads out of the fabric. Set machine for a medium-wide zigzag stitch and sew along both edges of the strip, making sure that "zigs" and "zags" in both rows ore - Pfaff 230 | Owner's Manual - Page 45
guide. Set 0 so that needle takes left stitch exactly in the folded edge and the right stitch up to or over the hem edge. When hem is finished, stitches will not be visible on top side. 44088 Automatic Blindstitching Used for draperies or curtains Machine Setting: E -1 B-i A -6 C -1 Stitch - Pfaff 230 | Owner's Manual - Page 46
grow wider. V Use buttonhole foot No. 51016 and set slide on buttonhole gauge to buttonhole length de sired. If you prefer more prom inent buttonholes, pull a filler R 6088 cord through the hole in left toe of foot. length, loosely under To get the correct stitch sew on a piece of - Pfaff 230 | Owner's Manual - Page 47
filler cord. Lift foot turn fabric clockwise using needle as a pivot. Lower foot, take one stitch to the left, pull filler cord taut and lay it parallel to completed line of stitching. Switch D to "3". Make 4-6 bartack stitches. Raise needle. ® three fastening stitches. Trim the sewing threads - Pfaff 230 | Owner's Manual - Page 48
45720 R 7160 Button Sewing Machine Setting: E -o B-0 c-I D-Oand3to4 Drop Machine Feed sDthuoerne'bttuhbteteotnahfrrseaeaiwddinttogakseefow-outpo. nAleblviugetnrtoinbssu,attthoointos kshso,igenhyeeeessdt loperaiwrninitl.gl sPelwnatcietehr your Pfaff. the button right hole Make under when D is - Pfaff 230 | Owner's Manual - Page 49
your PFAFF 332 when you darn sleeves and socks. Machine Setting: E -0 B -0 C -2 D -0 Remove presser foot and drop machine feed. Use feed cover plate No. 60407 to increase tautness of fabric and permit free movement. R 6121 To fasten the feed cover plate to the machine, slip its spring into - Pfaff 230 | Owner's Manual - Page 50
that "a stitch in time saves nine" and reinforce spots that have worn thin with short stitches made lengthwise and across worn section. Clamp fabric into darning hoop and move it freely under the needle. Long rips may be darned with the normal sewing foot and without hoop. Raise machine feed and use - Pfaff 230 | Owner's Manual - Page 51
lever lowered. Lower needle into fabric at the beginning of your design and draw bobbin thread up through the fabric. Hold both thread ends, and sew over outline, moving hoop slowly and evenly. 7165 46121 Sewing Monograms Machine Setting: E -0 C-2 B-0 D - 2'/ to 3 Stitch Length: Minimum The - Pfaff 230 | Owner's Manual - Page 52
. Tighten set screw securely. The large needle holder screw must always point toward the right. Use System 130 B round-shank needles in l/ and 5 /64-inch double-needle holders, and System 130 R flat-shank needles in 3/35 and 7 /o4-inch needle holders. To attach cording plate refer to instructions on - Pfaff 230 | Owner's Manual - Page 53
Threading Diagram for Two Needles filler cord. MachineSetting: E-0 B-0 C-2 D-0 Additional Information on Cording Ordinary No. 41319 cording in and cording medium-heavy fabric plate No. 60417. is made with cording foot For thicker cording use foot No. 41 318 with cording plate - Pfaff 230 | Owner's Manual - Page 54
patterns on the narrow-stitch side of the dial wheel con be sewn with two needles, if the needle gouge does not exceed /o* inch. To make them, no machine parts have to be changed. If any of the other designs ore sewn with two needles, the needle plate, machine feed and sewing foot must be changed - Pfaff 230 | Owner's Manual - Page 55
) and is avail able at your Pfaff store. The third thread is led to the needle with the second thread. You can sew the same pattern with three needles that you can make with two needles using the regulation machine parts. R 7175 Automatic Embroidery Interesting design effects are easy to - Pfaff 230 | Owner's Manual - Page 56
The Transverse Spool Holder To ensure that the transverse machine. stphoeotlhhreoaldderwiwllhuicnhwiisndpoervteonflythferosmtanadcarrodsse-qwuoiupnmdenspt ooofl.youuser ahspotTslheinooneltdi,.snabpsWiatenottsranoiupcttlhrclhepatpetqcoihtdnhuere.tefii2irsor.espmnpdPro.ilronyoefWgs. - Pfaff 230 | Owner's Manual - Page 57
the Automatic Needle Threader Drawing Up the Bobbin Thread Correct Tension Regulation Regulating the Thread Tension . Stitch Length Regulation Dropping the Machine Feed Changing the Sewing Foot The Darning Foot Care and Maintenance Sewlight Facts Adjusting the Motor Belt Tension Trouble Shooting - Pfaff 230 | Owner's Manual - Page 58
I I A. C. WEBER & CO., JNC. Di3tributor • Chicago
-
 1
1 -
 2
2 -
 3
3 -
 4
4 -
 5
5 -
 6
6 -
 7
7 -
8
-
9
-
10
-
11
-
12
-
13
-
14
-
15
-
16
-
17
-
18
-
19
-
20
-
21
-
22
-
23
-
24
-
25
-
26
-
27
-
28
-
29
-
30
-
31
-
32
-
33
-
34
-
35
-
36
-
37
-
38
-
39
-
40
-
41
-
42
-
43
-
44
-
45
-
46
-
47
-
48
-
49
-
50
-
51
-
52
-
53
-
54
-
55
-
56
-
57
-
58
 |
 |
CPFAFFD
INSTRUCTION
B00K