Pfaff 262 Owner's Manual
Pfaff 262 Manual
 |
View all Pfaff 262 manuals
Add to My Manuals
Save this manual to your list of manuals |
Pfaff 262 manual content summary:
- Pfaff 262 | Owner's Manual - Page 1
- Pfaff 262 | Owner's Manual - Page 2
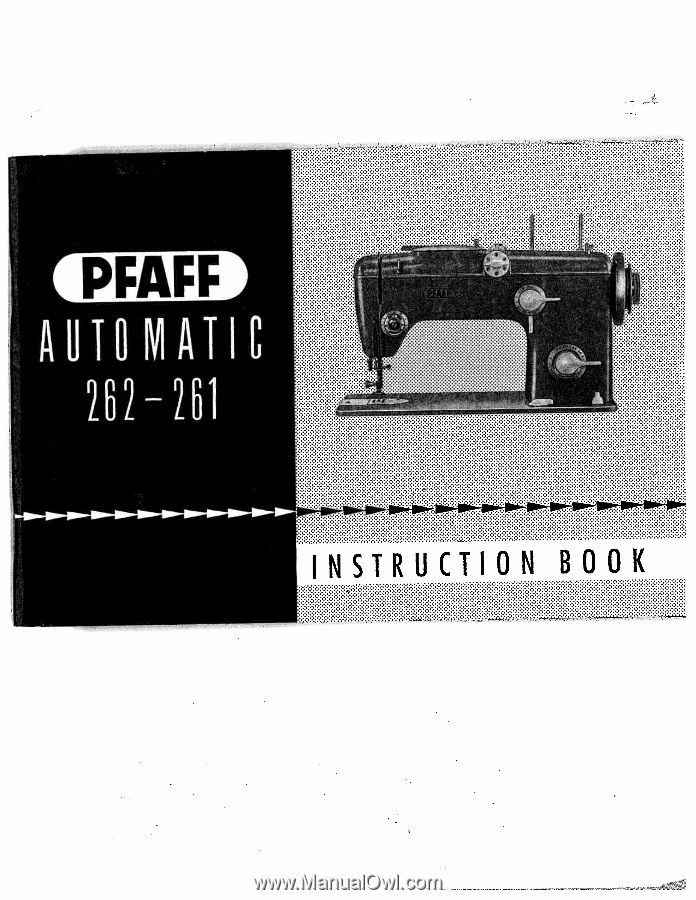
-261 INSTRUCTIONS Foreword Your dream has come true! You ore now the proud owner of a Pfaff 262-261 Automatic -- the sewing machine with unlimited possibilities. The machine you have chosen has a built-in vibrator which enables you to darn without hoops. An exclusive feature of Pfaff sewing machines - Pfaff 262 | Owner's Manual - Page 3
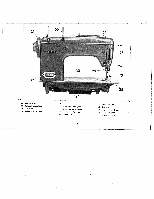
finger-tip control 6 Bobbin winder 7 Stop motion knob 8 Stitch length dial 9 Reverse feed control 10 Light switch 11 Drop feed control 11 o Electric motor 12 Needle plofe 13 Tronuverse rotory hook 2 R 8025 A 14 Bed slide 15 Needle 16 Automatic needle threader 17 Needle thread tension 18 Sewlight - Pfaff 262 | Owner's Manual - Page 4
R 8024 A 21 Balance wheel 22 Collapsible spool pins 23 Top cover 24 Needle threader control 25 Face cover 26 Presser bar lifter (also used to operate the Stopmatic) 27 Sewing fool thumb screw 28 Sewing foot 3 29 Needle set screw 30 Bed plate 31 Stopmatic switch box 32 Double receptacle for speed - Pfaff 262 | Owner's Manual - Page 5
in this position, the needle can be threaded with the needle motor will automatically lift the take-up lever and the needle to the positions re quired for threading the needle and re moving the work. (Don't forget to plug in the machine, though.) threader, or the work be removed from the Whenever - Pfaff 262 | Owner's Manual - Page 6
electric circuit is A. C. before you plug in the machine. Electrical Information Push plug I into receptacle 2, and plug 3 at other . Rest the right foot on the control pedal and press. The harder you press, the laster the machine wilt run. If your cabinet is equipped for foot and power drive, as - Pfaff 262 | Owner's Manual - Page 7
Lever B= I Lever E engages and disengages the Automatic mechanism. If you don't need this mechanism for a longer period, set lever E at "0". I This setting is indicated on pages 32 to 53 as follows: A=0; B=4; C=0; E=0 I w 11 Dial 0 regulates the stitch length (the higher the number on thedial - Pfaff 262 | Owner's Manual - Page 8
for making buttonholes). When you push the control up, the machine will sew straight, regardless of the stitch width set (ideal for tying off zigzag seams). Lever B changes the position of the needle in the needle plate slot. Thus the stitching can be moved from the center to the left or right - Pfaff 262 | Owner's Manual - Page 9
And watch your Pfaff conjure up the design you want. To ensure that the zigzag stitches are packed closely automatic embroidery mechanism after periods of idleness, occasionally set lever E on 3, dial D on 4, and dial C on 5. Then unthread the needle, raise the presser bar lifter and run the machine - Pfaff 262 | Owner's Manual - Page 10
wheelrso that this setting need hardly be changed. A Big Advantage of the Pfaff Embroidery Unit Each of the primary designs pictured on the embroidery design dial you can vary the appearance of the pattern without changing the stitch length. The pattern length is controlled by lever E, which has - Pfaff 262 | Owner's Manual - Page 11
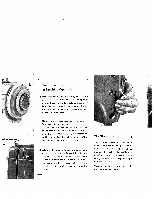
DR 699 Winding the Bobbin Hold the blonce wheel and turn stop motion knob b all the way to the left (counter-clockwise). Place spool of threod on right-hand spool pin. The bobbin thread should always be the some size as that used on the spooi, or a little finer. Pull thread from spool and lead it - Pfaff 262 | Owner's Manual - Page 12
continue winding at a faster pace. Bobbin winder will stop automatically when bobbin is full. If you don't want a full bobbin, press out lever when sufficient amount of thread has been wound. You may continue sewing while you are winding bobbin without disconnecting balance wheel. 7 R7067 R7102 8 - Pfaff 262 | Owner's Manual - Page 13
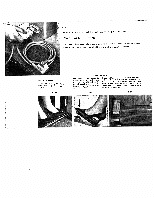
. Hold the case by its open latch, so that the bobbin cannot fall out. 'F R 8001 Removing the Bobbin Case A Operate the Stopmatic lever to raise the needle, open the bed slide, so you can see sewing hook. and Reach under the machine with your left hand and lift latci k with your forefinger - Pfaff 262 | Owner's Manual - Page 14
It is best to tilt machine bock when inserting bobbin case the first time. After you have become more practiced, you will manage without tilting it. Move bed slide all the way to the left. Make sure the needle is still at its highest point. With the thumb ond forefinger of left hand - Pfaff 262 | Owner's Manual - Page 15
the correct relationship between needle, thread and fabric. Select the proper thread sizes and needles from this chart. The same size fhreads should be used in the needle and on the bobbin. Some experienced seamstresses prefer a somewhat hinner bobbin thread. However, the bobbin thread never should - Pfaff 262 | Owner's Manual - Page 16
Pfaff 262 sewing machines, System 130 R, flat-shank needles are used for all ordinary sewing and embroidery work. The needle system is stamped on the bed slide. Genuine Pfaff needles, System 130 R, are available from every Pfaff dealer. Bent or blunt needles should not be used. Changing the Needle - Pfaff 262 | Owner's Manual - Page 17
will go and to left through one of the holes at its arid. Pull of thread guides 8 and 9 and then into the slot of pass thread from right thread into slots ot left left of needle clamp 10. Then thread needle, front to back. The automatic needle threader will oihis for you easily and quickly. 16 - Pfaff 262 | Owner's Manual - Page 18
V 9109 N - Pfaff 262 | Owner's Manual - Page 19
about /32" below the top of its stroke, os illustrated on page 4). Now lower the sewing foot and -- With your left hand push needle threader control down until threader prong w (see opposite page) penetrates needle eye. Keep control in this position. Hold thread loosely and lead it from left around - Pfaff 262 | Owner's Manual - Page 20
in your left hand. Turn balance wheel toward you until the needle moves down and up again and take-up lever reaches its highest position. Lightly pull needle thread to draw bobbin thread up through needle plate slat. Place both threads back under sewing foot before you put fabric into machine. 19 - Pfaff 262 | Owner's Manual - Page 21
use: Upper tension too tight or lower tension too loose. A To check whether the tensions ore correctly balanc ed, take a closely woven piece of fabric and sew a few stroighi and zigzag seams. If the straight stitches exactly at the zigs ond zags of the seam, the tension adlust ment is correct. 20 - Pfaff 262 | Owner's Manual - Page 22
for ordinary sewing. bobbin case which bobbin tension by holding the thread end between thumb and forefinger strong enough and letting the bobbin case hang freely. The to keep the bobbin bobbin case should gradually slide down. V The final stitch sewing, the upper tension should be set at - Pfaff 262 | Owner's Manual - Page 23
used. Far normal satin stitching, set dial on 0.2. Reverse Sewing To backtack the beginning or end of a seam, simply press the finger-tip control down. When the control is released, the machine resumes forward sewing automatically. This feature is ideal for darning rips with the ordinary sewing foot - Pfaff 262 | Owner's Manual - Page 24
Dropping the Machine Feed The machine feed is dropped for darning with the aid of the vibrator, for hoop embroidery and button sewing. To lower feed below the needle plate, turn drop feed control v clock wise. Fabric will cease feeding. 1 When control v is turned to the right as far as itwill go, - Pfaff 262 | Owner's Manual - Page 25
Stopmatic lever to lift the needle, Turn the sewing foot thumb screw to the left. Tilt the foot sideways and pull it down. Slip on new foot and tighten the screw securely. R 7085 Darning Foot and Vibrator .2 Attach darning foot No. 53670, as instructed above. Drop machine feed and lower presser - Pfaff 262 | Owner's Manual - Page 26
and Maintenance Longevity and smooth machine performance are dependent on regular and proper cleaning and oiling. Use Pfaff sewing machine oil only. Never lubricate machine with animal or vegetable oils. Remove all lint before oiling. All moving and rotating parts require regular lubrication. It is - Pfaff 262 | Owner's Manual - Page 27
R 8065 A The oiling points in the machine arm can be reached easily by removing the top cover. Oil should be applied sparingly. Excessive quantities of oil may soil the work and cause machine sluggishness. One or two drops of oil usually will suffice. Before you remove the top cover, set lever E - Pfaff 262 | Owner's Manual - Page 28
the needle plate half a turn (Fig. R 8455), and lift it out. To replace, reverse the above procedure. V 8 8454 R 8455 Tilt the machine back and take out bobbin case and A bobbin. With a soft brush remove the lint which has accumulated in the vicinity of the sewing hook. Once in a while your Pfaff - Pfaff 262 | Owner's Manual - Page 29
Sewlight Facts The 15-watt sewlight is recessed under the machine arm and can be swung out by pulling down the grille. To change the light bulb: Push bulb into socket, turn Ieft and pull out. When inserting new Pfaff light bulb, be sure to slide bulb pins into bayonet socket slats. Press - Pfaff 262 | Owner's Manual - Page 30
Poor, knotty or rotten thread used. Hook raceway is jammed with thread or needs oiling. Burrs or sharp edges on needle plate slot. Remedy: See remedies listed under 1. above. Adjust tensions as instructed. Use good quality threads only. Clean and oil hook raceway. Polish needle plate slat with fine - Pfaff 262 | Owner's Manual - Page 31
as instructed. Use only first-rate thread -- the correct size for the needle and fabric. Don't run thread over finger when winding the bobbin, but lead it around thread retainer stud on top cover and through thread guide. Raise presser bar lifter and remove thread. 5. Machine Feeds Improperly - Pfaff 262 | Owner's Manual - Page 32
by inferior oil. Machine works heavily when automatic embroldery mechanism is engaged. Bobbin winder working while sewing (when a bobbin is not being filled). Remedy: Have your Pfaff dealer adjust the belt tension. Clean and oil hook raceway. Use only Pfaff sewing machine oil -- never salad oil or - Pfaff 262 | Owner's Manual - Page 33
. Run a straight seam close to left edge of zipper, stitch across end and up the other side in one continuous operation. Use right edge of foot as a guide. For other types of zipper insertion, follow directions in your zipper package. V Machine Setting: DialA=Oto4 Lever Dial C=O Lever E=0 Sew - Pfaff 262 | Owner's Manual - Page 34
that pro truding seam allowance is not fold ed twice. Second Seam Open the two pieces, place them under the needle right side up, insert seam ridge into felling foot opening, and stitch down to the left. Make sure that second seam is placed close to the edge but not beyond it. The - Pfaff 262 | Owner's Manual - Page 35
3. To hem tricot fabrics, increase the tension and use the widest zigzag stitch so the hem has a rolled shell effect. 41248 R 5912 Hemming Machine Setting: DialA=eOor2to4 LeverB='I Dial C=O Lever E=O The hemmer foot is indispensable if you want to sew a uniform hem. You can hem with straight or - Pfaff 262 | Owner's Manual - Page 36
Machine Setting: Dial A=2 to 4 ' Lever B= Dial C=O ' Lever E=O 4 Overcasting prevents frayed edges. Use a long, wide zigzag stitch and sew edge with the needle taking one stitch the sewing foot so that the abutted edges are centered under the needle, Join them with close, wide zigzag stitches. Hem - Pfaff 262 | Owner's Manual - Page 37
on wrong side close to seam. 'V - 44088 Inserting Lace Machine Setting: DialA=lto3 LeverB='l Dial C=O Lever E=O This sewing job takes two operations. Place the lace over the desired area of the fabric and attach with a line of straight stitching along both edges of the lace. Turn the work over and - Pfaff 262 | Owner's Manual - Page 38
length control between 0.2 and 0.6 (see also page 53) Lever E=1 Inserting Patches with Zigzag Stitches (especially on non-elastic materials) Machine Setting: Dial A==4 Lever B=+ Stitch length control about 0.5 Dial C=O Lever E=0 Large hales can be patched quickly. Cut patch so that its grain - Pfaff 262 | Owner's Manual - Page 39
in the sole of the sewing foot. Follow your pattern with a satin stitch and Filler thread: cotton (pearl thread) ' hold the filler thread lightly. The satin stitch is Follow above directions for shirring, but used for many sewing lobs. For added effects sew place filler thread under rather - Pfaff 262 | Owner's Manual - Page 40
the applique with a line of Automatic embroidery. Applique Work The embroidery outlines below were sewn Machine Setting: D1 / ials A==1 LeverB to the line of stitching and go over the edges of the applique with medium-wide satin stitches. To make the design more visible, run a filler thread ( - Pfaff 262 | Owner's Manual - Page 41
is much simpler. Let's embroider the 25-square box illustrated. First, sew over ciii traced lines twice, using short straight stitches. Then sew over straight-stitch lines with a medium-wide satin stitch. Make sure that your rows of satin stitching are even so the corners of your squares look neat - Pfaff 262 | Owner's Manual - Page 42
to do it. First, trace the collar pattern on a doubled J \ piece of fabric. Set machine as indicated above, place fabric under sewing foot and J guide needle along traced line. The scallops are produced automatically. You may vary the length of the scallops (see ( sketch) by changing the setting of - Pfaff 262 | Owner's Manual - Page 43
is successful on linen and twilled fab rics. For this type of work use on ordinary needle. Draw several threads out of the fabric. Set machine for a medium-wide zigzag stitch and sew along both edges of the strip, making sure that "zigs" and "zags" in both rows are exactly opposite each other. Set - Pfaff 262 | Owner's Manual - Page 44
can do it easily on your Pfaff on medium and heavy fabrics. Use zigzag foot No. 44088 with blindstitch guide No. 46669, which you can buy at your Pfaff store. Attach the guide so that its vertical flange goes through the sewing foot slot. Use a No. 70 needle, a loose upper tension and thin thread - Pfaff 262 | Owner's Manual - Page 45
I? 8046 Sewing Buttonholes Machine Setting: Dial A 1 /z =1 Lever 8= i. Stitch Length: 0.2 Darning Thread: No.50 Filler Thread: cotton (pearl thread) Dial C=0 Lever E=0 Attach buttanhole foot No. 54300 and set slide on buttonhole gauge to buttonhole length desired. The buttonhole is the right - Pfaff 262 | Owner's Manual - Page 46
the bartacks. ©©0©©0 Instructions for Buttonholing I Sew first side over a filler cord. When beginning of seam reaches slide indicator on buttonhole gauge, it is the right length. Leave needle in fabric on right side of its throw. 2 Lift foot, turn fabric around clockwise, using needle as a pivot - Pfaff 262 | Owner's Manual - Page 47
with your Pfaff. Attach all-purpose sewing foot No. 51991 or button sewing foot No. 46120, which can be obtained from your Pfaff dealer, and drop machine feed. Machine Setting: Dial A=0 Lever B= • . Dial C=0 . Lever E=0 Place button under button sewing foot and align so that needle will enter - Pfaff 262 | Owner's Manual - Page 48
Setting: Stitch width dial A=0 Needle position lever B=4 Attach darning foot, as instructed on page 24, drop machine feed, and lower presser bar lifter. Since your machine is fitted with a vibrator, there is no need to place the fabric into darning hoops. Simply guide it under the needle free-hand - Pfaff 262 | Owner's Manual - Page 49
Darning without Foot R 5914 Prepare your machine for darning as follows: Remove presser foot and increase Pfoff dealer. Place fabric into darning hoops. Machine Setting: This technique is such as nylon. Stitch width dial used primarily to A=2. Needle position lever B= 4 darn small holes in - Pfaff 262 | Owner's Manual - Page 50
'' The vibrator of your machine (see page 24) makes it possible to sew both block and script letters with the machine feed dropped and the darning foot attached, guiding the material free-hand. idAtsesskvigeynroseuadtrilmPitfyoafnfaondgderaadmleelriagtnohdtshionorwnitas mycooeuunnPtatfllaefssfs - Pfaff 262 | Owner's Manual - Page 51
set screw securely. The large needle set screw must always point toward the right. Use System 130B round-shank needles in 1/16 and 5 /64-inch double-needle holders, and System 130R flat-shank needles in /32 and '/64-inch needle holders. To attach cording plate, refer to instructions on page 48 far - Pfaff 262 | Owner's Manual - Page 52
cording size you want. To sew filled cording, use the two cording plates with cord ducts. Only very narrow tucks ore made without filler cord. Machine Setting: Dial A=0 Lever B=1 (Both needles are to be threaded by hand.) Dial C=0 Lever E=0 Additional Information on Cording Ordinary cording in - Pfaff 262 | Owner's Manual - Page 53
not exceed /64 inch. These patterns can be sewn without changing machine parts. To sew all other designs with two needles, the needle plate, machine feed and sewing foot must be changed. Your Pfaff dealer will do this for you at extra cost. These parts have wider slots to allow for movement of both - Pfaff 262 | Owner's Manual - Page 54
to sew a stitch width of about ')s inch. The third thread is led to the needle with the second thread. Afieryour machine has been convert ed, you can sew all black patterns on the narrow-design side of the embroidery dial with three needles. / .7 A Automatic Embroidery Interesting design - Pfaff 262 | Owner's Manual - Page 55
thread the machine as instructed. R 6533 - ss 4, All-Purpose Sewing Foot (with Clear-View Shoe) All-purpose sewing foot No. 51 991 is attached as instructed on page 24. The transparency of its shoe facilitates all sewing operations where it is important to watch the needle penetrate the fabric - Pfaff 262 | Owner's Manual - Page 56
the Needle Threader Drawing Up the Bobbin Thread Correct Tension Regulation Regulating the Thread Tension Stitch Length Regulation Reverse Sewing Dropping the Machine Feed Changing the Sewing Foot Darning Foot and Vibrator Care and Maintenance Regular Machine Core Sewlight Facts Trouble - Pfaff 262 | Owner's Manual - Page 57
CPFAFFI Pfaff, D 6750 Kalserslautem Postlach 302013040, Telefon (0631) 200-0, Telex 45753, Telefax (0631)1 7202 Nr. 296-12-07121 Wormsr Vo1 sdnickre. 0-6520 Wom undesrepublk 0etsohIand Printed o Wont Gormony deotsotr/orrgt/troflo/$pan. 9/96
-
 1
1 -
 2
2 -
 3
3 -
 4
4 -
 5
5 -
 6
6 -
 7
7 -
8
-
9
-
10
-
11
-
12
-
13
-
14
-
15
-
16
-
17
-
18
-
19
-
20
-
21
-
22
-
23
-
24
-
25
-
26
-
27
-
28
-
29
-
30
-
31
-
32
-
33
-
34
-
35
-
36
-
37
-
38
-
39
-
40
-
41
-
42
-
43
-
44
-
45
-
46
-
47
-
48
-
49
-
50
-
51
-
52
-
53
-
54
-
55
-
56
-
57
 |
 |